Sweet Potato Spice Cake

There is a dominant flavor profile among us every fall. It is pumpkin spice and it is everywhere. I am guilty as well (see Pumpkin Spice Pound Cake and Pumpkin Spice Cinnies, for example), but what if I told you that there was something…even better? And if I told you that that something better was a Sweet Potato Spice Cake?

Well, I am saying it. Sweet Potato Spice Cake has entered the fall chat and she is the spicy, dense, rich personality that we’ve been missing. 🤩

About this Sweet Potato Spice Cake

For those among us who love the spice-forwardness of this season, this Sweet Potato Spice Cake delivers in a huge way. 

First, of all, the sweet potatoes call for roasting instead of boiling, which helps pull out their incredible natural sweetness and enhances their delectable maple notes. 

Those roasted sweet potatoes are then processed until smooth (you can use either a potato ricer or a food processor for this job), and they get a beautiful lift from some pure maple syrup. This combination creates an unbelievable base for the perfectly balanced and prominently featured spices that help this cake pull way ahead of pumpkin spice in the overall standings. 🥇

(Don’t get me wrong. My Pumpkin Spice Pound Cake is the it girl of the season for my pumpkin spice fanatics.)

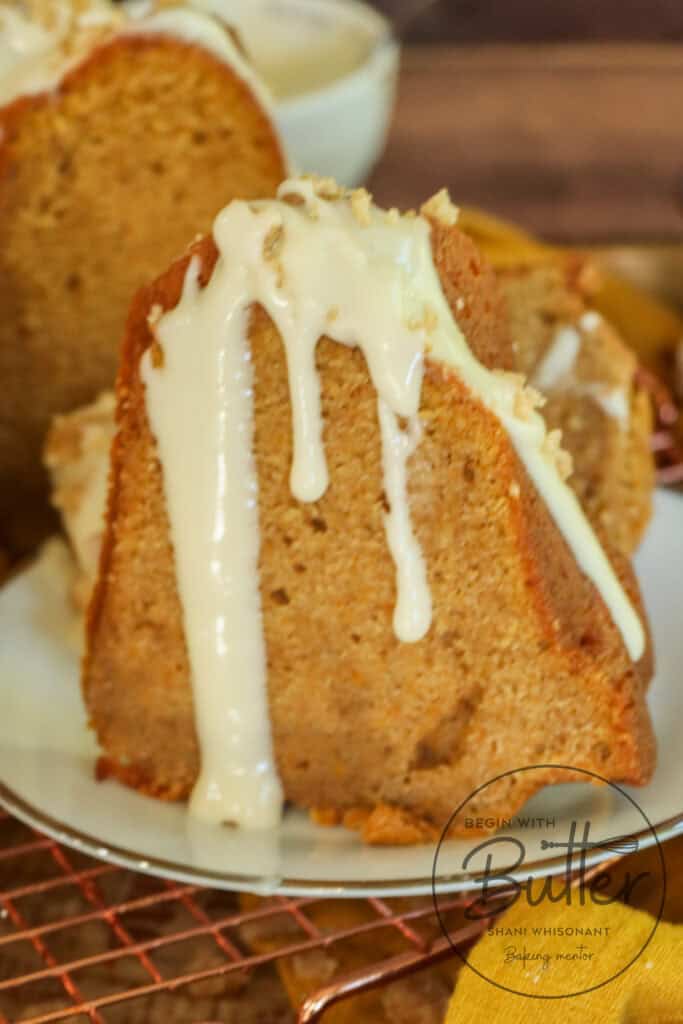
The sweet potatoes create an impossibly, deliciously moist (🙉) texture that helps this cake become the most impressive of the season.

So, for the “I’m not into pumpkin spice” crowd, I’ve got you. This one is…luxe.

Sweet Potato Spice Cake Ingredients

All-Purpose Flour: A pound cake has to have a pleasantly plump texture. In my experience (and with my cakes), that beautiful texture comes from all-purpose flour. That particular flour is absolutely perfect for this cake.

Baking Soda: Sweet potatoes are ever-so-slightly acidic. Because of that, baking soda was the proper leavening to add to this cake.

Kosher Salt: Salt is very important in any dessert; it balances the sugar and keeps the dessert from becoming cloyingly sweet. If using table salt for this recipe, cut the amount in half.

Sweet Potato Spice (Cloves, Nutmeg and Cinnamon): The “sweet potato spice” featured in this cake recipe gives this cake absolutely huge spice flavor. The cloves have a deep, spicy, earthy flavor. The nutmeg gives this cake deep warmth, like a hug for your insides. Finally, the cinnamon gives that well-known smoky/spicy kick that make it a star in so many recipes.

Unsalted Butter: This cake has huge flavor, and butter plays a delicious part in that. Additionally, properly creaming butter and sugar creates air pockets that assist with cake rise.

Full-Fat Cream Cheese: The full-fat cream cheese adds additional delicious fat to this recipe, while also giving the cake an almost creamy mouth feel. 

Granulated Sugar: Granulated sugar gives our cake the sweetness that it needs, but did you know that granulated sugar is also responsible for caramelization too? As the sugar caramelizes, it develops a golden-brown color and a nutty, toasted flavor that perfectly complements the rich sweet potato flavor in the finished cake.

Eggs: The protein in the eggs adds structure to the cake, while the fatty yolk adds delicious flavor. This recipe calls for four eggs, which is perfection. While many pound cakes have five or six eggs, that is too many for this particular cake, considering the amount of sweet potato here.

Pure Vanilla Extract: The pure vanilla extract in this cake provides the perfect assist for the sweet potato spice mixture. 

Roasted Sweet Potatoes: The roasting process brings out the natural sweetness of the sweet potatoes, and it also gives the cake a much deeper sweet potato flavor!

Real Maple Syrup: Real maple syrup helps to bring out the sweet potato flavor even more! It provides a beautiful balance to the heavily spiced cake. 

Beginners Start Here

If you’re new to baking, or if you want to learn how to do some of the more tricky baking techniques, here are a couple of super helpful articles from the BwB site that will help you get set up for success with this Sweet Potato Spice Cake.

These resources are super helpful to help you build consistency and confidence on your baking journey. Happy Reading!

Important Tools Used in this Sweet Potato Spice Cake

Guess what? Begin with Butter has its own Amazon Storefront, where you can find all of the amazing equipment that I used in this Sweet Potato Spice Cake! Want even more specific product recommendations? Check out the product links, below.

I do get paid a commission when you purchase, but these are the tools that I use all the time in my own kitchen.

If you have these tools already, great! Think of this as a checklist to help you build the confidence that you’ll need to execute this recipe!

Enjoy the recipe BBs! Happy baking, and may all of your pound cakes have perfect caramelization!

Love this post? Check out some other popular BwB content!

Brown Butter Kentucky Bourbon Cake with Salted Caramel
In this Post About this CakeBrown Butter Kentucky Bourbon Cake: The Key …
Classic Cream Cheese Pound Cake
Friends, pound cakes are deeply, deeply nostalgic for many of us. They …
Whole Wheat Banana Bread
Up next in our “Healthy-ish January: Whole Wheat Banana Bread!  Let’s be …
Half and Half Cake
Y’all…this Half and Half Cake is the best kind of line jumper. …

Simple, Classic Apple Pie

0

Hello, BBs, and welcome to fall at Begin with Butter! When fall rolls around, there is one pie that is arguably the queen of pies. She appears on many holiday tables throughout the year, and she is always the first to go (and potentially cause…ahem…”mayhem fights consternation” at the dessert table 😂). BBs, today I have for you: Classic Apple Pie.

This is an overhead photo of an apple pie with a slice cut out of it.

And now you can make it, because this recipe will walk you right through it. So let’s get to it!

About this Simple, Classic Apple Pie

Oftentimes, when we hear the words “make” and “pie” in the same sentence, our ears shut down entirely and we shake our heads “no” like toddlers being fed Brussels sprouts. Because we’ve convinced ourselves that pie is fickle and difficult, and that only people with “pie hands” can make delicious, flaky pie.

This is a photo of an apple pie with a slice cut out of it..

Here at Begin with Butter, we are all about dispelling baking myths. And that, dear reader, is a BIG MYTH. So, let me take you by the hand and show you the apple pie for which you will become famous at every gathering going forward. The beautifully-spiced apples maintain a crisp-tender texture (no baby food apples here!), the crust is my now-famous all-butter pie crust, and you’ll want to add this to your comfort food dessert table forevermore.

It’s just the sweetest little piece of Americana. Really.

Apple Pie Filling Ingredients

Apples: You’ll need 9 cups of apples for this pie. But not just any apples. You need crisp apples. So, put those red delicious and Macintosh apples down. Any apple that is soft when it’s raw will turn to mush when it’s baked in a pie, and since the objective is to get apples that maintain an al dente texture, we have to start with crisp apples. My absolute favorite, commercially-available apples for baking are a combination of Fuji, Granny Smith (because of course), and Honeycrisp. However, this is a deeply personal decision, so I invite you to explore and find your favorite baking apple combination! (I also peel my apples for apple pie, because I don’t want the texture from the peel in the bite of pie, but by all means, you can eliminate that step if you want the fibrous texture!)

Granulated Sugar: The standard amount of sugar that I call for in this recipe is 200 grams (1 cup). However, the amount of granulated sugar that I use for the filling mostly depends on the sweet-tart balance in the apples! For example, if I’m using all Honeycrisp apples, which are more sweet than tart, I will cut the sugar amount to 150 grams (3/4 cup). This decision is highly personal to you as the baker; the sugar adds sweetness to the pie filling and also helps with caramelization of the pie overall (because the filling will bubble up over the top crust 😋), but you will get the best of both worlds with either 150 grams or 200 grams. Want a more tart pie? Use less sugar! Go ahead!

All-Purpose Flour: Remember how I said that you can personalize the amount of sugar in the filling? Yeah, you can’t do that with the flour. 😂 The flour has an important job; it literally holds everything together. Without it, the pie, even when cooled, will be very runny. So, don’t forget that little 32 grams (1/4 cup) of flour. It’s crucial to pie cutting success.

Lemon Juice: The lemon juice in this recipe adds an important element: acid. You need that acid to balance the sweetness of the apples and the sugar. Yes, salt also balances the sugar, but the acid actually neutralizes the sugar to an extent, which actually creates that harmonious balance that we are looking for, whereas salt works in a different way.

Fine Sea Salt: If acid neutralizes sugar, salt counteracts that sugar beautifully to help desserts avoid becoming overly sweet. Salt is also a flavor enhancer, meaning that it will help you better taste the more complex flavors presented in the sugar! Those caramel notes you taste in this pie? That’s not caramel! It’s the caramelization of the sugar, as enhanced by the salt.

Ginger, Allspice, and Cinnamon: This is my holy trinity of apple pie spices. Used in proper amounts, they contribute to that warm, loving apple pie scent that will draw family, friends, acquaintances and neighbors to your kitchen on a random Sunday. (My advice: put them to work! Those dishes won’t wash themselves! 😂)

This is a photo of a pie, an apple and a pumpkin.

Butter: Ah, the famous “knob of butter”. Once your pie filling is in the bottom pie crust, you’ll cut that knob of butter into four pieces and add them to the top of your pie. This butter does two things well: it adds to the Maillard (caramelization) effect when your pie bakes, and it also adds an even more luxurious mouthfeel to your finished pie. Full disclosure: I forget this knob of butter about 40% of the time when making pies, and the pies are still unforgettable. 😂

Turbinado Sugar: You can use turbinado sugar to finish your pie, after it’s baked for a while. I’ve gotten away from this habit, because: 1) for me, it allows the sugar too much of a starring role; and 2) I’m not crazy about the crunchy texture on top of the pie. But this is, again, a very personal choice!

Beginners Start Here

Pie really forces us to hone in and develop our baker’s feel: that intangible sense that lets you know when you have enough water, when your laminated dough is ready to put into your pie plate, when your pie filling has reached the proper consistency…I could go on. So, for this reason, pie is really daunting for many a baker. Don’t worry, though, I’ve got some tips that will help you!

In this section, I’m going to walk you through the techniques that I use in this pie, to give you a FAQ tutorial to make this amazing pie (and all of the pies in your future). Remember, the absolute best apple pie will come with practice, practice, practice. So that leads to the first tip:

Tip #1: Don’t expect to master pie crust the very first time.

We hear it everywhere: “Mindset is key”. Nowhere in the baking world is that more true than when working with pastry. Because pastry is as much about feel as it is about skill. And the learning process can be incredibly frustrating. But it’s incredibly rewarding when it “clicks”, so the best advice I can give you? Indulge your curiosity, take your time, and go into your first pie crust attempts with a beginner’s mind.

Tip #2: Chill your tools.

One of the best ways to ensure great pie crust is to keep all of your crust ingredients very cold. But, did you know that if you keep your tools cold, you actually increase your chances of great, flaky crust?

When preparing to make pie crust, I recommend chilling your (stainless steel) mixing bowl, your pastry cutter, your rolling pin, and even the little fork that you’ll use to stir ingredients together. This initial chilling helps make sure that your butter doesn’t melt as you work with it, and that’s vitally important to helping you achieve the flaky crust of your dreams.

And if the butter starts to melt, don’t panic, refer back to Tip #1, and get it into a refrigerator as quickly as possible.

Tip #3: Make your filling before the pie crust and allow it to “cook”.

Remember that lemon juice? In addition to its sugar neutralizing super power, it helps to “cook” the apples, drawing out the liquid from those apples and allowing that liquid to combine with the sugar to create the most gorgeous syrup. But, in order to achieve maximum goodness, you have to allow the pie filling to sit for a time before adding it (and the syrupy goodness) to the pie crust. So, I actually make my filling first and allow it to stay in the refrigerator while I make my pie dough. Then, everything can go in the fridge until the next day!

Tip #4: Your refrigerator is as important as your oven!

I get it. When we think of “baking” we think of using our oven to heat things to a certain temperature. And while that is correct, it is also correct that another appliance is equally important for this apple pie: your refrigerator.

First, you’ll need to refrigerate/freeze your ingredients and tools to help everything stay nice and cold. Some recipes even call for the use of frozen butter, and while this recipe does not require that, I have much respect for those who do use it.

Second, you’ll need to halve the completed pie dough, create thick discs with each half, cover them in plastic wrap, and, you guessed it, refrigerate those discs for at least two hours before using.

Third, you’ll need to make and refrigerate your apple filling. Like chill it to the center. So, once again, the refrigerator is the MVP.

Fourth, as you build the pie, you’ll need to use your refrigerator to keep the bottom crust in place while you roll out the top crust.

And finally, you’ll need your refrigerator to hold the completed pie while your oven does a long preheat. You don’t want to skip this final refrigeration, since this helps keep your pie from shrinking!

So yes. Give the refrigerator its flowers because it is an extremely important participant in the all-butter pie crust world. 😊

Tip #5: Slow and steady baking wins the race!

There are two schools of thought when it comes to baking fruit pies: either start at a high temperature and reduce to a lower temperature, or bake at a steady temperature for the entire baking time.

I have a strong preference for the latter. In my experience, starting at a higher temperature (425°F) and then reducing to a lower temperature (375°F) can lead to overbaked, dry external edges and inconsistently baked crust underneath. A steady-state bake brings this apple pie to its best deliciousness, with consistent crust all around.

Tip #6: Allow the pie to cool COMPLETELY before cutting.

This one is difficult, BB. You see, that all-purpose flour in your filling needs time after the baking process to finish its work. While the pie is cooling, the filling is completing its gelling process. If you are a patient baker and wait until the pie is completely cooled and chilled in the refrigerator (~2 hours after it’s finished baking, and then in the fridge again overnight, if possible), you’ll be able to cut it into beautiful, picture-perfect slices with filling that remains intact.

Feeling confident and ready? Let’s make some apple pie! (And psst…if you’re feeling confident and ready and you want a photo tutorial of how to make the most perfect all-butter pie crust, check out this post!)

Sweet Potato Pie

Friends, the postseason is upon us. Thanksgiving is right around the corner and it’s our Super Bowl. There are staples that absolutely must be on our Thanksgiving tables, and today I’m sharing the one classic dessert that you nearly unanimously said has to be present at your feast. This is the Sweet Potato Pie holiday episode and I hope you’re tuned in. 😊It’s time to have a lot of fun in the kitchen. 

About this Sweet Potato Pie

This sweet potato pie features roasted sweet potatoes instead of boiled. The roasting process brings out the natural sweetness of the potatoes, helps those sweet potatoes maintain their structural integrity (making for a more creamy result), and also gives the pie a deeper sweet potato taste. Cinnamon, nutmeg, and brown sugar provide the perfect accompaniment to the natural caramel notes of the sweet potatoes. The brown sugar and brown butter also enhance the caramel notes that make this pie so special.

Then, if the filling wasn’t decadent enough, you have a laminated all-butter pie dough that just complements the filling perfectly. It’s perfectly flaky and caramelizes beautifully in the oven, coming to a deep brown color that is positively irresistible for consumers. 

And finally, because this is Begin with Butter and over-the-top is our template, there is a cinnamon vanilla meringue that makes your eyes roll back when it hits your tongue at the same time as that delicious filling. 

This pie is one to perfect before it hits the scene on the big day. The good news is that you get to eat pie early, and the better news is that you have enough time to get proficient with the ingredients, timing and presentation if you start now!

Sweet Potato Pie Ingredients

The Crust Ingredients:

All-Purpose Flour: Okay BBs, here’s the thing. The type of flour that you use for this pie crust depends entirely on your comfort level with making pie. While I recommend all-purpose flour because of the higher protein content (leading to a lessened likelihood that the pie crust will fall apart in your hands when you’re working with it), I actually use White Lily All-Purpose Flour for my pie crust. It leads to positively crust shattering results. White Lily All-Purpose has a lower protein content (9%) than Gold Medal All-Purpose (10.5%), King Arthur All-Purpose (11.7%), and Bob’s Red Mill All-Purpose (10-12%) flours. So, White Lily flour, combined with the laminating technique that I use, leads to incredible pie crust results.

Fine Sea Salt: A small touch of fine sea salt in the crust gives this pie crust delicious flavor.

Granulated Sugar: A couple of tablespoons of granulated sugar give this pie crust a nice sweetness, and also helps with caramelization. Additionally, the granulated sugar in this pie crust slightly enhances the sweetness of the sweet filling.

Cold Butter: This pie crust uses the grandaddy of all pie crust fats: BUTTER. Butter, in my humble opinion, gives pie crust the absolute best taste. The laminating process also helps ensure that this crust shatters all over your clothes like the best croissant. You’re welcome. 😊

This is a photo of an unbaked pie crust.

Water: This ingredient is the bane of the existence of many a pie maker. Too little and you get a positively dry pie crust. Too much and you get a pie crust that never reaches its flaky potential. Oh, and every pie crust has a magic amount of water that only it knows before you start. There are so many variables that impact how much water a specific pie crust needs, and BB, you can only figure this out with practice. That’s why I’m releasing this recipe early for you!

The Filling Ingredients:

Roasted Sweet Potatoes: Roasted sweet potatoes provide the foundation of this delightful pie, offering an irresistibly smooth texture and natural sweetness. By roasting them, the natural sugars are coaxed out, intensifying the flavor and creating a rich base.

Brown Sugar: Brown sugar adds a deep, comforting warmth to this pie, with its caramel-like flavor. This warmth complements the sweetness of the sweet potatoes in a way that granulated sugar cannot. 

Cinnamon: Cinnamon brings the most cozy warmth and aromatic spice to the pie, evoking feelings of comfort and nostalgia. This classic spice harmonizes beautifully with sweet potatoes, and creates a truly inviting flavor.

Nutmeg: Nutmeg adds a subtle yet distinctive earthy warmth, which subtly enhances the pie’s complexity.

Kosher Salt: Every dessert needs salt to balance the sweetness of all of the sugar. A little bit of kosher salt expertly balances the sweetness in this pie, allowing each ingredient to shine. By reducing cloying sweetness, salt brings out the best in the other flavors.

Evaporated Milk: Evaporated milk enriches the filling with a luxurious creaminess and subtle sweetness. Its smooth texture ensures a silky, velvety pie that gives a joyful mouthfeel.

Pure Vanilla Extract: Pure vanilla extract enhances the sweetness and adds delicate, creamy notes that perfectly round out the flavors. High-quality vanilla makes all the difference in this pie.

Bourbon: A splash of bourbon adds a sophisticated depth and complexity to the pie, with hints of smoky oak and rich warmth. Used sparingly, bourbon elevates the flavors without overpowering them. This is an optional ingredient, but it makes for an even better pie. Don’t worry about the alcohol; it cooks out during the baking process. 

Beginners Start Here

If you’re new to baking, or if you want to learn how to do some of the more tricky baking techniques, here are a couple of super helpful articles from the BwB site that will help you get set up for success with this amazing Sweet Potato Pie.

These resources are super helpful to help you build consistency and confidence on your baking journey, and specifically with this special pie. Happy Reading!

This is a photo of a sweet potato pie.

Important Tools Used in this Sweet Potato Pie

I am so happy to announce that Begin with Butter has its own Amazon Storefront, where you can find all of the amazing equipment that I used in this special pie! Want even more specific links? Check out the recommendations, below.

I do get paid a commission when you purchase, but these are the tools that I use all the time in my own kitchen.

If you have these tools already, great! Think of this as a checklist to help you build the confidence that you’ll need to execute this pie recipe!

This pie is something to behold, BBs and I hope you love it! If you have questions, please don’t hesitate to reach out to bakingbestie@beginwithbutter.com!

Happy baking!

Simple Sunday Artisan Bread

My family loves Sunday bread. Whether it’s my Perfect Sunday Dinner Rolls or a good crusty bread, when we do special Sunday dinners, those meals aren’t complete until the bread bowl makes its way to the table. This Simple Sunday Artisan Bread recipe is my favorite “Easy Like Sunday Morning” bread. It hits all the marks: a deliciously crusty exterior, a wonderfully soft and hole-y interior, and it also boasts a slight sourdough flavor. And it does all of that with very little input from the baker.

This is a photo of Simple Sunday Artisan Bread.

This one is incredibly easy. To make it even easier, I’m giving you the whole process in pictures!

About this Simple Sunday Artisan Bread

My Simple Sunday Artisan Bread is a traditionally crusty, no-knead Dutch oven bread. Dutch ovens hold heat beautifully, creating a deeply caramelized and beautifully thick exterior crust. This bread is decidedly un-fussy; you mix a whopping five ingredients together in a large bowl with a wooden spoon or Danish dough whisk, then let it rise for 3-4 hours. That’s right. You leave it all the way alone for 3-4 hours. So, you can start it on Sunday before breakfast and have warm crusty bread (that is ready for pats of butter or beef stew) in time for dinner.

It’s still confusing to me that something this easy can be this incredible.

How to Make this Simple Sunday Artisan Bread Recipe

This lean bread recipe uses five ingredients: flour, water, salt, instant yeast, and sugar. It all goes in one bowl, and stays there for a while.

Before you start, though, test your yeast by combining one teaspoon of yeast, 1/8 tsp of sugar, and 63 (1/4 c) grams of warm (110°F-115°F) water to a small bowl. Stir together and wait for 8-10 minutes. If the yeast blooms on top of the water, then you’re working with good yeast. You won’t use this yeast in your recipe, but this step will give you the confidence of knowing that you’re working with live yeast.

Want to see what properly proofed yeast should look like? Check out this post, Yeast Basics for Beginning Bakers!

To make the bread, check out these easy steps:

Add bread flour, kosher salt, sugar, and instant yeast in a large bowl. Stir with a whisk to combine thoroughly. *Note: You can absolutely use all-purpose flour for this recipe, but you won’t get as much chew or as much variation in the size of the holes in the final bread. It will be delicious though!

Next, pour water over the mixture. This dough has 70% hydration, so don’t be intimidated when you see a lot of water in the bowl.

Stir with a wooden spoon or Danish dough whisk until the mixture looks shaggy and the flour is mostly moistened. I love my Danish dough whisk but my big wooden spoon is going to do the job every time.

Cover with plastic wrap and go away for 3-4 hours. Seriously. Scram. 😆 The longer you allow the bread to rise, the more sourdough quality it will have.

This is a photo of Simple Sunday Artisan Bread dough.

After the first rise, spray cooking spray on your hands and then gently squeeze the dough to de-gas it slightly and remove any large lumps. Then, perform eight folds, pulling the sides of the dough into the middle of the dough.

Turn the dough over and spray some non-stick cooking spray on the bottom and sides of your bowl. Place the dough into the bowl, cover with plastic wrap, and allow it to rise for another hour.

This is a photo of Simple Sunday Artisan Bread dough.

Shape the loaf into a circle by stretching the top and folding it underneath. This is necessary in order to create good surface tension on the top of the bread. Place the dough on a piece of parchment paper, cover with a clean kitchen towel, and allow to rise for another 45 minutes. While the bread is doing its final rise, heat the oven to a true 450°F. Place the Dutch oven in the oven while it’s preheating so that it will be hot when you place the loaf into the Dutch oven. During the last ten minutes of the preheating time, place a cup of water in a loaf pan and place the loaf pan on the rack underneath the Dutch oven will bake.

This is a photo of Simple Sunday Artisan Bread dough.

Gently move the loaf, still on the parchment paper, to the heated Dutch oven. Be careful not to burn yourself! Dust the top of the loaf with flour and then score (slice) the top of the loaf several times with a sharp knife or razor blade. Your scoring should cut DEEP. Like at least 3/4″ of an inch deep. The flour on top of the loaf will help the blade avoid sticking to the loaf during scoring, and will allow you to get clean cuts.

This is a photo of a Simple Sunday Artisan Bread loaf before baking.

Cover the Dutch oven with its lid and place in the oven on the middle rack. Bake, covered, for 45 minutes. Remove the lid and allow the loaf to bake for another 10-15 minutes, or until the loaf is deeply caramelized (golden brown). At the end of the bake time, you’ll have this:

Carefully remove the loaf from the Dutch oven and place on a cooling rack. Allow it to cool for at least thirty minutes before cutting. When you cut it, you’ll be treated to an incredible sight:

You’ve done it. You’ve made an incredible artisan bread in one day that is beautiful and appropriate for any dinner table. And you’ve spent a grand total of forty minutes of active time to do so.

Beginners Start Here

If you’re new to baking, or if you want to become more consistent with bread in general, here are a couple of super helpful articles from the BwB site that will help you get set up for success with this Simple Sunday Artisan Bread.

These resources are super helpful to help you build consistency and confidence on your baking journey. Happy Reading!

This is a photo of a Simple Sunday Artisan Bread loaf after baking.

Important Tools Used in this Simple Sunday Artisan Bread

Below, you’ll find some tools that I used for this Simple Sunday Artisan Bread. These are the tools that I use all the time in my own kitchen.

This is a photo of a Simple Sunday Artisan Bread loaf after baking.

If you have them already, great! Think of this as a checklist to help you build the confidence that you’ll need to execute this recipe!

This homemade artisan bread works with every kind of Sunday dinner, whether it’s a simple soup or a coq au vin. Serving multiple courses or having a dinner party? Slice and serve this bread some great olive oil and freshly cracked pepper and create a bread course that will knock everyone’s socks off and prepare them for the special meal that is to come!

Enjoy the recipe, BBs! May this Simple Sunday Artisan Bread be loved by your family, as it has been loved by mine.

Lemon Cranberry Cake with White Chocolate Ganache

Inspiration really is annoying sometimes. There are nights when it wakes me from a deep sleep and I have to incoherently mumble a voice note before I can dive back into slumber. Sometimes, however, inspiration is quick work. Like looking into the recesses of your deep freezer, expecting to find frozen raspberries, and instead finding a HUGE bag of frozen cranberries (thanks Mom!). And suddenly, what was supposed to be Lemon Raspberry Cake becomes Lemon Cranberry Cake with White Chocolate Ganache. And you’re not sorry about that fact one bit. 😂

That is exactly how this recipe came to be. Because I patently refused to return to the store. 😂

I am stunned by this cake in the absolute best way.

In this Blog Post:

About this Lemon Cranberry Cake with White Chocolate Ganache

Simply put, she is outstanding. A brilliant lemon cake sponge is enhanced with the most delicious cranberry buttercream, and then you have a thick and luscious cranberry filling and topping to complete this positively piquant sensation. A white chocolate ganache adds a *peck* of sweetness to further balance the colorful sweet-tart flavor profiles of the lemons and cranberries.

I don’t know why God allowed me to be the one to develop this cake, but I am ever grateful that He trusted me to do it. This cake is a must for all of my upcoming holiday celebrations, and this might be my birthday cake forevermore.

I am IN LOVE.

Ingredients in this Lemon Cranberry Cake

Cake Flour: The flour in a cake recipe impacts the final texture of a cake in a big way. Flour is the primary ingredient that is responsible for the amount of structure and chew in your cakes, cookies, and breads. The higher the protein content in a particular type of flour, the more structure and chew in the final product. For this cake, I wanted a very soft, moist crumb, so I use cake flour here. My caveat: my fave “cake flour” is actually White Lily’s All-Purpose Flour, which has a similar protein content to most cake flours!

Baking Soda: This Lemon Cranberry Cake contains sour cream, which is naturally acidic, so baking soda is the proper leavening here.

Kosher Salt: Salt is very important in any dessert; it balances the sugar and keeps the dessert from becoming overly sweet. Salt is very important in this particular cake recipe, as it helps to balance both the sugar, cranberries and lemon in this recipe.

Cornstarch: This cake sponge has an almost ethereal crumb. That is because the cake flour has a lower protein than typical all-purpose flour, yes, but it is also because we added another ingredient whose only job was to tenderize the crumb even more. A big thank-you to cornstarch for understanding this important assignment.

This is a photo of a Lemon Cranberry Layer Cake.

Unsalted Butter: As usual, butter has a starring role in this cake! It gives wonderful special flavor, and also the creaming process creates the absolutely necessary air pockets that help this cake to rise. Additionally, the fats in the butter are needed to tenderize the powerhouse protein molecules in your cake flour and egg whites, giving it a marvelously moist, light crumb. This ingredient does a lot of work! Make sure that your butter is room temperature before you begin. I set my butter out for at least 1.5-two hours before baking time. Also, buy a LOT of butter for this recipe. 😂 Like, a lot A LOT. Between the cake and the buttercream, you’ll need it!

Neutral Vegetable Oil: Vegetable oil adds additional moisture to this cake, and it also helps the cake stay moist longer. One tablespoon is more than enough to make sure that this beautifully moist cake stays that way. I love avocado oil for baking, but any vegetable oil will do.

Granulated Sugar: The sugar in this recipe adds a nice sweetness to this cake, and it also helps with caramelization (browning). Additionally, granulated sugar helps to balance the tartness from the lemon juice and lemon zest in this cake!

Lemon Zest: You’ll use the lemon zest and the vanilla beans to make lemon vanilla sugar for your cake. The technique of rubbing the lemon zest into the sugar releases the oils from the zest even better, which gives a big boost of lemon flavor.

Whole Vanilla Bean: This cake uses the beans from an entire vanilla bean pod. The amped-up vanilla flavor is necessary to help balance the sweetness from all of the sugar and the tartness of the lemon so I strongly recommend using this ingredient for this cake. If you don’t have access to a whole vanilla bean, you can sub a tablespoon of pure vanilla extract.

Eggs: The protein in the eggs adds structure to the cake, while the fatty yolk adds delicious flavor, and also tenderizes the proteins in the egg whites and the cake flour. It’s a true multi-tasker and I couldn’t love it more. ❤️

Sour Cream: I loved the final texture that sour cream lent to this cake. In a pinch, you can also use 250 g (1 c) of buttermilk. Subbing buttermilk will give you all of the tang that sour cream will; however, you’ll be sacrificing on the additional tendering properties of the sour cream, as buttermilk contains substantially less fat. (On that note, make sure to use full-fat sour cream for this recipe. 😊)

Lemon Juice: The cake calls for 63 grams (1/4 c) of freshly squeezed lemon juice, on top of the sour cream. The lemon juice and lemon zest combo means that you will never need to use lemon extract in this cake. Please don’t use the lemon juice in a bottle. It has additional preservatives that can impact the taste of the final product.

This is a photo of a Lemon Cranberry Layer Cake.

You’ll notice that there are not whole cranberries in this Lemon Cranberry Cake! That’s because I wanted to have a very clear cranberry presence in the cake, so I kept the two flavors from directly interacting with one another. I also wanted the slightly toothy cranberry texture of the cranberry filling to come shining through, and I found that baking whole cranberries did not meet this objective. If you’d like to add cranberries to this cake, however, you can fold in one cup of flour-covered cranberries at the end of the mixing time.

Beginners Start Here

If you’re new to baking, or if you want to learn how to do some of the more tricky baking techniques, here are a couple of super helpful articles from the BwB site that will help you get set up for success with this unbelievable Lemon Cranberry Cake.

These resources are super helpful to help you build consistency and confidence on your baking journey, and specifically with this special cake. Happy Reading!

This is a photo of a Lemon Cranberry Layer Cake.

Important Tools Used in this Lemon Cranberry Cake

I am so happy to announce that Begin with Butter has its own Amazon Storefront, where you can find all of the amazing equipment that I used in this special cake! Want even more specific links? Check out the recommendations, below.

I do get paid a commission when you purchase, but these are the tools that I use all the time in my own kitchen.

If you have these tools already, great! Think of this as a checklist to help you build the confidence that you’ll need to execute this recipe!

This cake is a lot, BB, but it is absolutely worth it. If I can give you one piece of advice, it is this: practice before you need it for the big day! Every cake you make gets better when you practice it.

I hope this cake becomes one of your holiday staples! It will definitely be the showstopper that takes center stage for all of your dessert tables. Once you make it, tag me on Instagram @beginwithbutter so that I can shout out your success!

Until next time!