They say that good things come to those who wait. And they are not wrong. Friends. FRIENDS. This baguette is the one that I envisioned in January 2022 when I started working on this recipe. It didn’t come together like I wanted it to back then, so I put it on the back burner for a bit.
Inspiration to work on it came roaring back this week, and the issue that plagued me all those months ago just…disappeared.
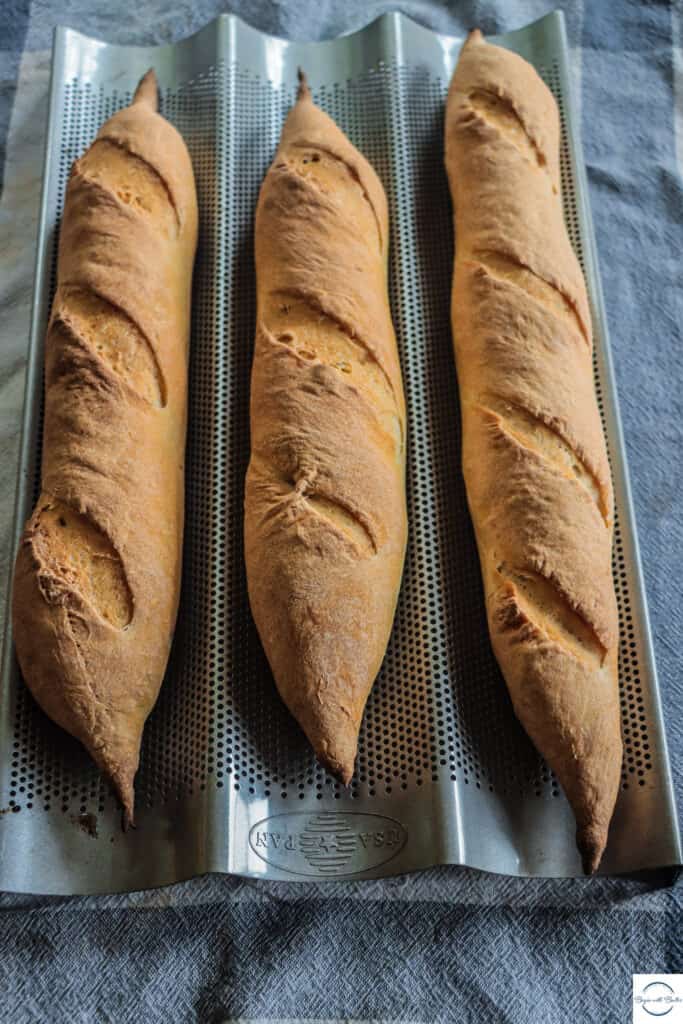
My Friends, she is my absolute favorite baguette and she is finally ready to make her blog debut. I honestly feel like she is owed a name, for how long she took to create, but that’s another issue for another day.
She is here.
About this Baguette
When I am in the mood for baguette, I want it to be right. It has to have a crackly crust and be pillowy soft inside. The flavor must be delectable enough to stand alone, but perfectly complemented by an amazing butter, goat cheese, or even wine.
It must be sturdy enough for a sandwich, but a star in its own right. With just a kiss of good salt, a good baguette can make your whole day better.
And this, Friends, is ALL OF THAT.
This baguette is classic in the sense that it uses a pre-ferment called a poolish. Not to be confused with a starter (although that is the mother of all pre-ferments), poolish makes all the difference in this wonderful bread.
To use a poolish, you’ll need to start this bread a day ahead of time, but Friends, it’s absolutely worth it.
The Stages of Poolish
It is true that this baguette takes a bit of patience. But it is also true that the payoff is entirely worth it.
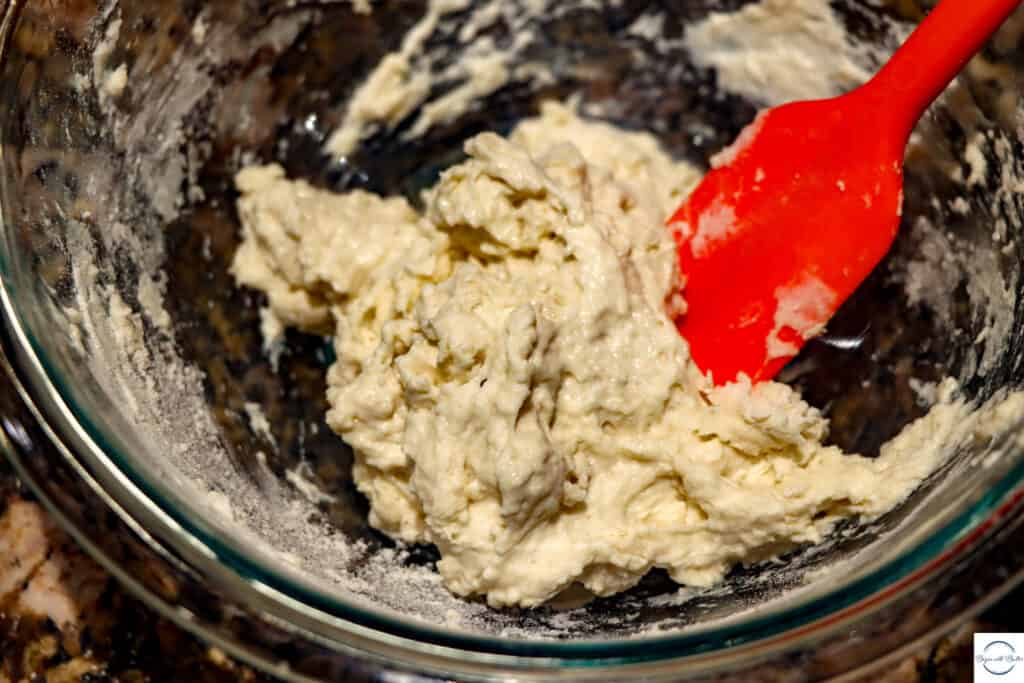
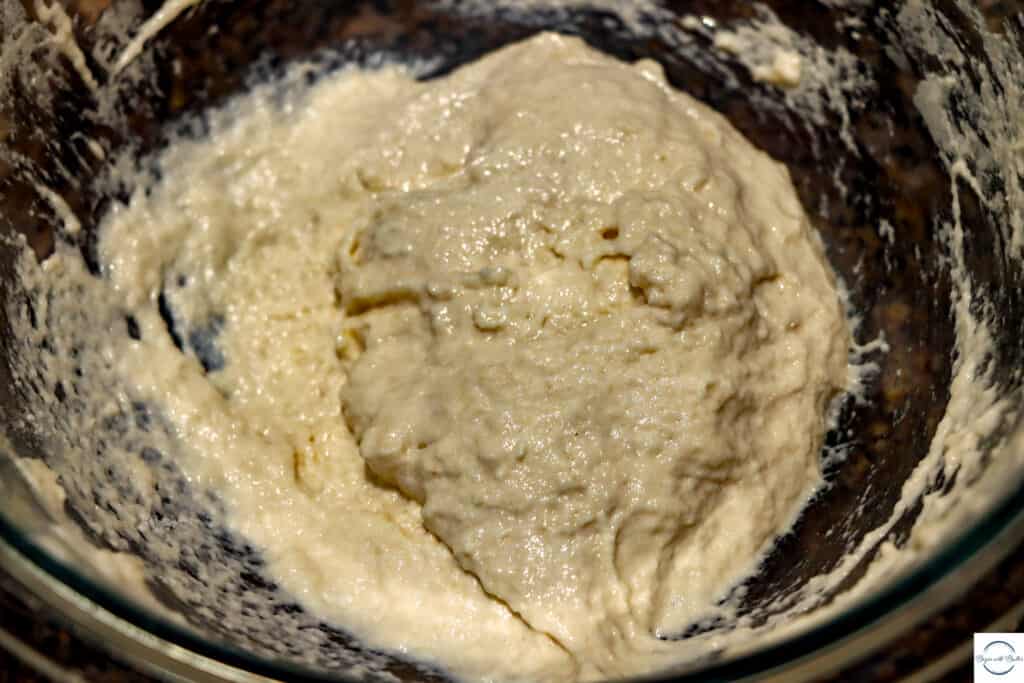
Why does it take patience, you ask? Because of the poolish. Poolish is a pre-ferment where you take some of the flour from the recipe, some of the liquid from the recipe, some of the yeast from the recipe, and a *kiss* of honey and stir it all together until it’s thoroughly mixed and loose.
Then you leave it alone for 15-18 hours and go on about your day.
The stages of poolish: 1) the initial mix; 2) the mix that’s ready to rest; and 3) the final poolish that’s ready to use in your recipe.
The final mix should jiggle like good cellulite, and be near the point of collapse when it goes into your recipe. This, Friends, is the optimal time for this poolish. The flavor that it imparts on these baguettes when you give it enough time to do its thing is just…as the French say, “superbe”.
If you need some help figuring out the basics of bread, check out this post! Want even more help? You can take my Bread Bootcamp course!
The Baguette Dough
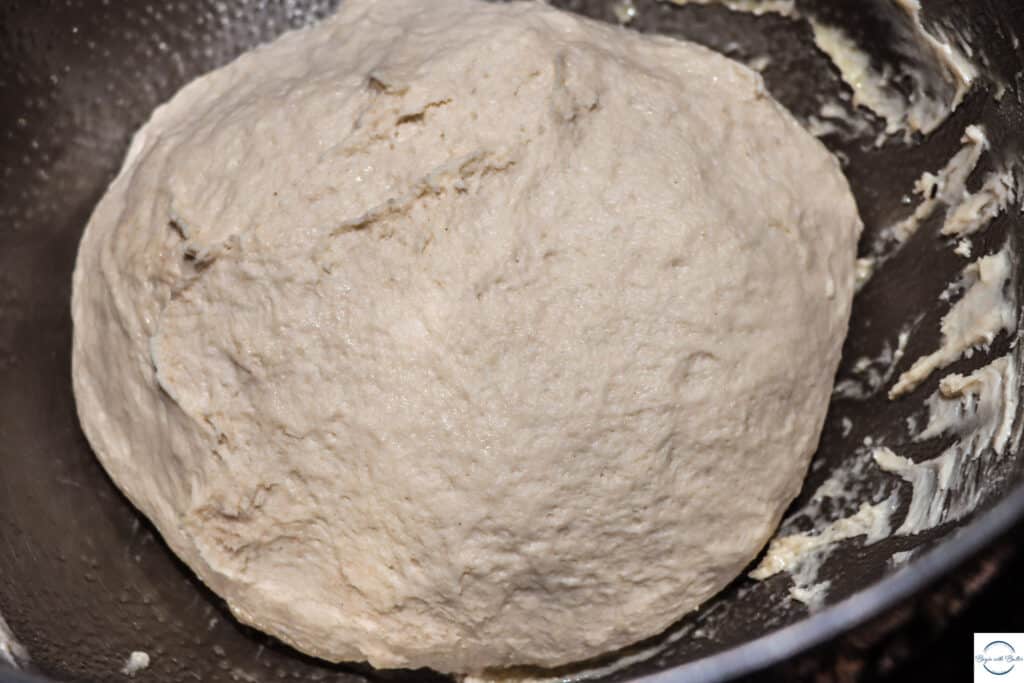
Once the poolish is ready, it’s time to get busy! You add the whole mixture to the rest of your flour, water, salt and yeast, and it makes the most incredible dough. When it’s finished with its initial mix, it will be bumpy and quite sticky. It will pass the windowpane test, though, so you know it’s ready to rest!
This is just a tremendous dough.
Once the dough is finished, let it rise for an hour, then pull the four corners to the center, just like you would with focaccia dough.
Cover the dough and allow it to rest for another hour. This additional hour gives the dough time to develop more strength and elasticity, so you don’t want to skip this step.
Once the two-hour rise time is over, it’s time to separate the dough into three equal parts. Make sure to use your digital kitchen scale for this step, since you’ll want loaves that bake equally. Don’t shape the dough just yet; just make three dough balls and put them onto a very lightly greased countertop under a clean dish towel. Leave them for 15-30 minutes.
Seriously. Go do something else.
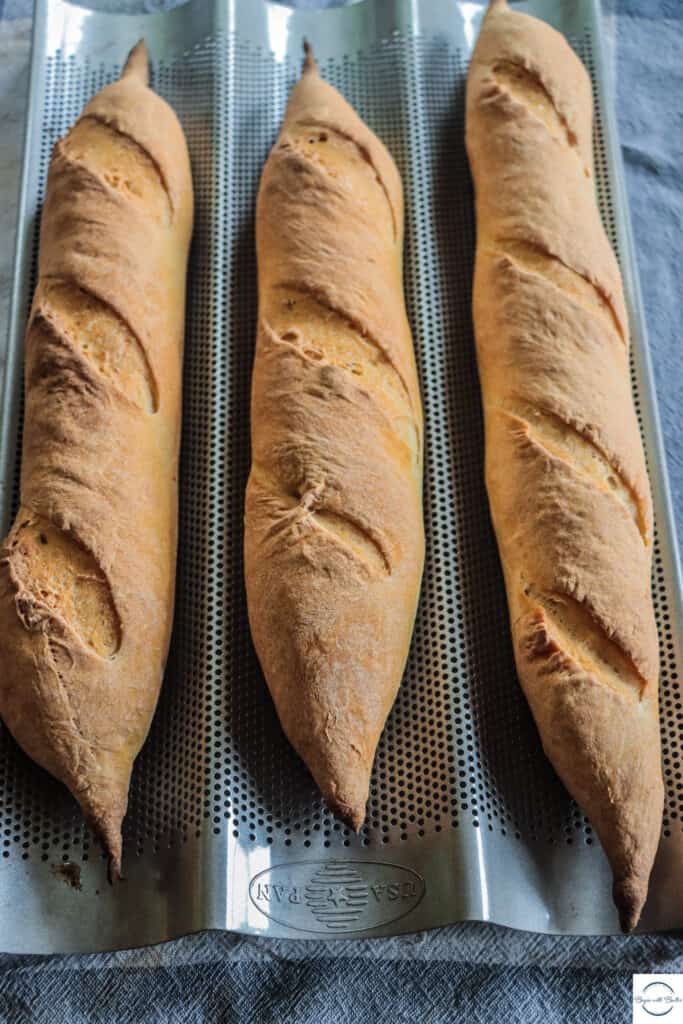
Because once you return to the dough, it will be time for one of my favorite parts. Shaping the dough. This incredible video from King Arthur Baking will help you if you have never shaped baguettes before. Once they’re shaped, put them either on a baguette pan (like this one!) and cover them with a clean tea towel, and allow them to rise for another 45 minutes.
While the loaves are rising, it’s time to preheat your oven to a true 425° and put your bread stone in the middle of your oven. An oven thermometer will help you know when your oven is at the right temperature. You need a good long preheat for these loaves, so that you can get the right crackle on the bread, so make sure to preheat your oven for the entire time that the loaves are proofing!
Ten minutes before baking, add a cup of boiling water to the bottom of a loaf pan. Handle with care; the pan will be hot! Put the loaf pan on the bottom rack or bottom of your oven. The steam will help create that beautiful baguette crust that you want!
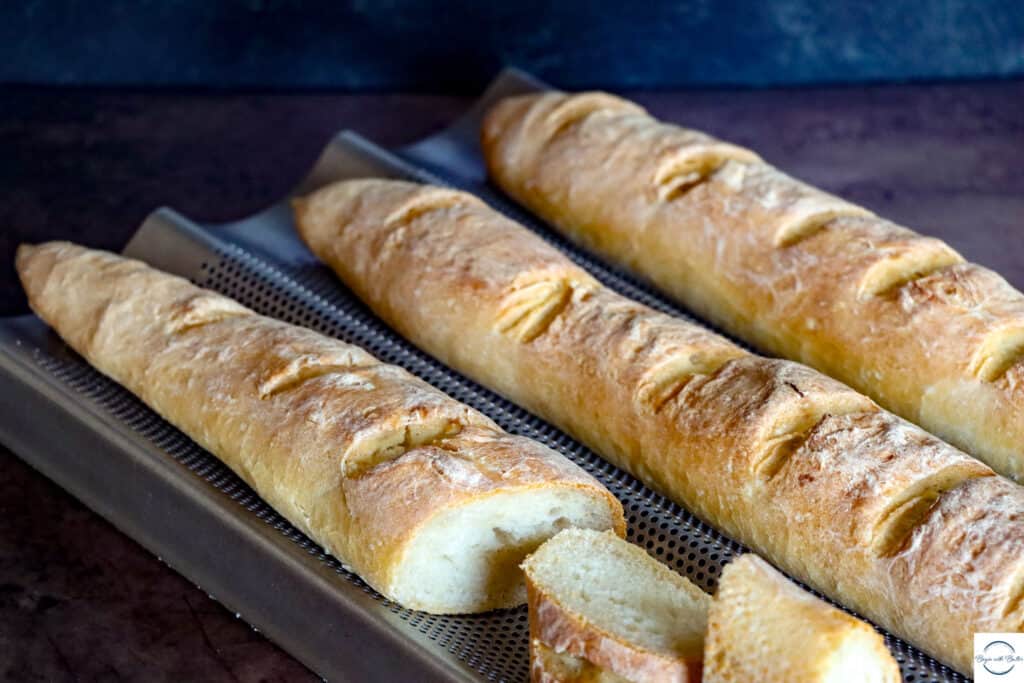
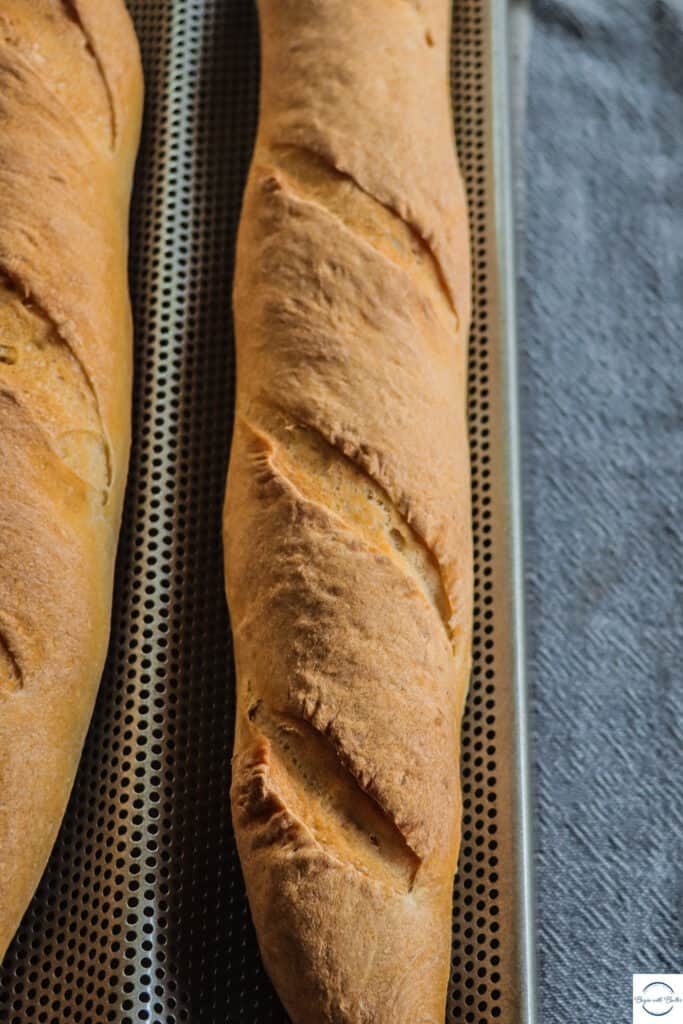
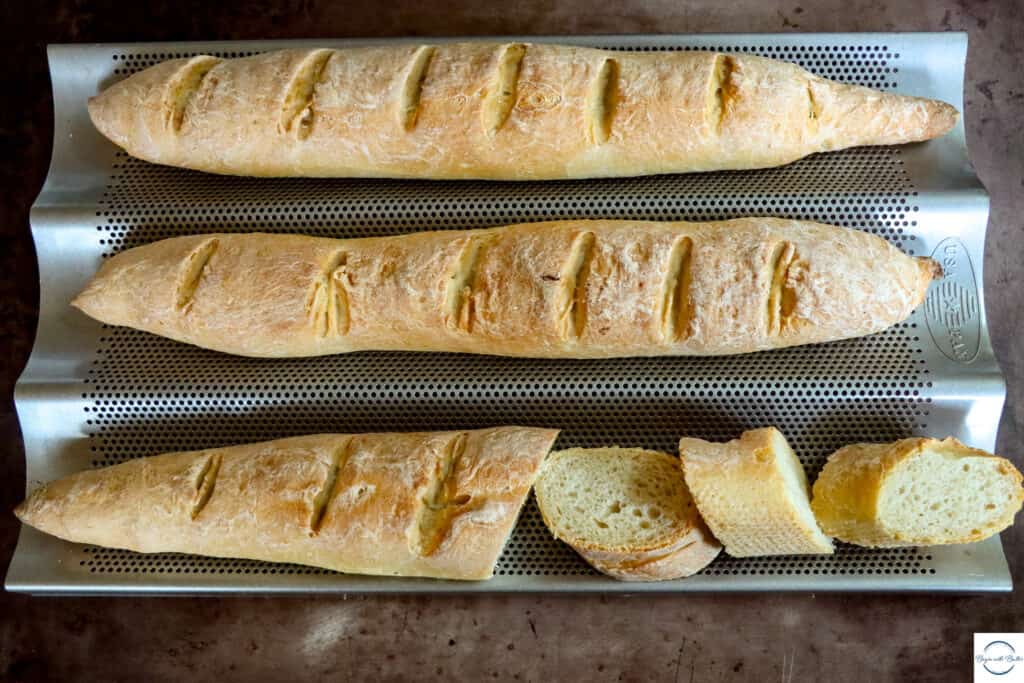
Once the bread is done rising, slash each loaf 4-6 times. Place loaf pan into the oven on top of the bread stone to bake for 18-25 minutes, or until the loaves are a deep golden brown.
The Finished Product
When the bread is done, the crust will have a gorgeous crackle to it. One of the hardest parts of this whole process is waiting until the baguettes are cool enough to eat.
Because…look at them.
They’re gorgeous. And when you bite into them, that crackle is life-giving.
I hope you all love these baguettes as much as my family and I do. They’re truly one of the highlights of my 2023, and I can’t wait to hear how they go for you!
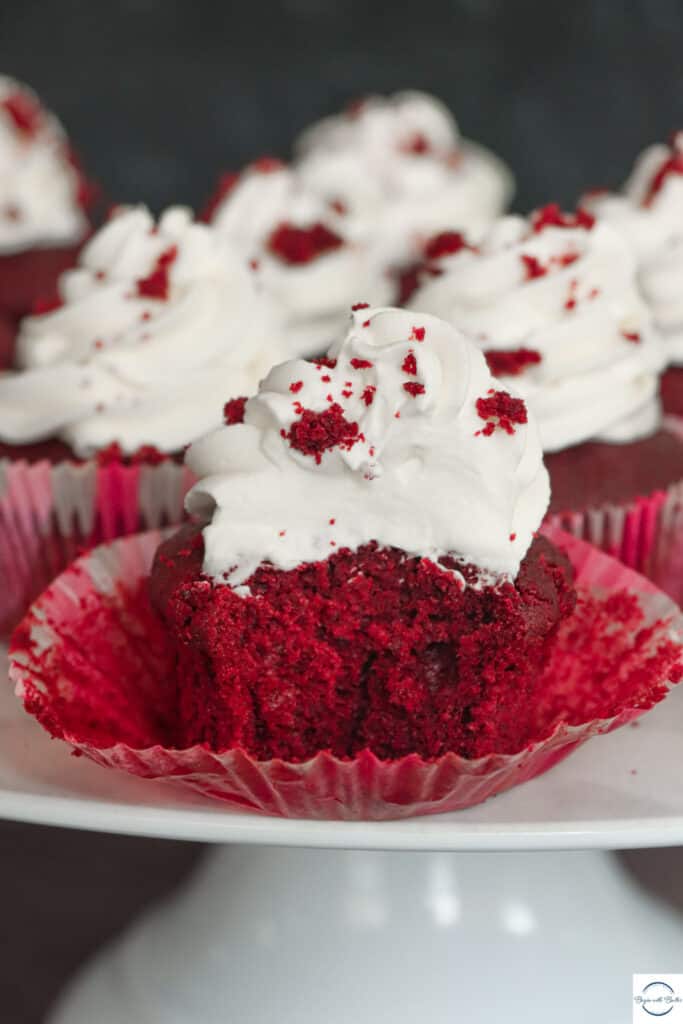
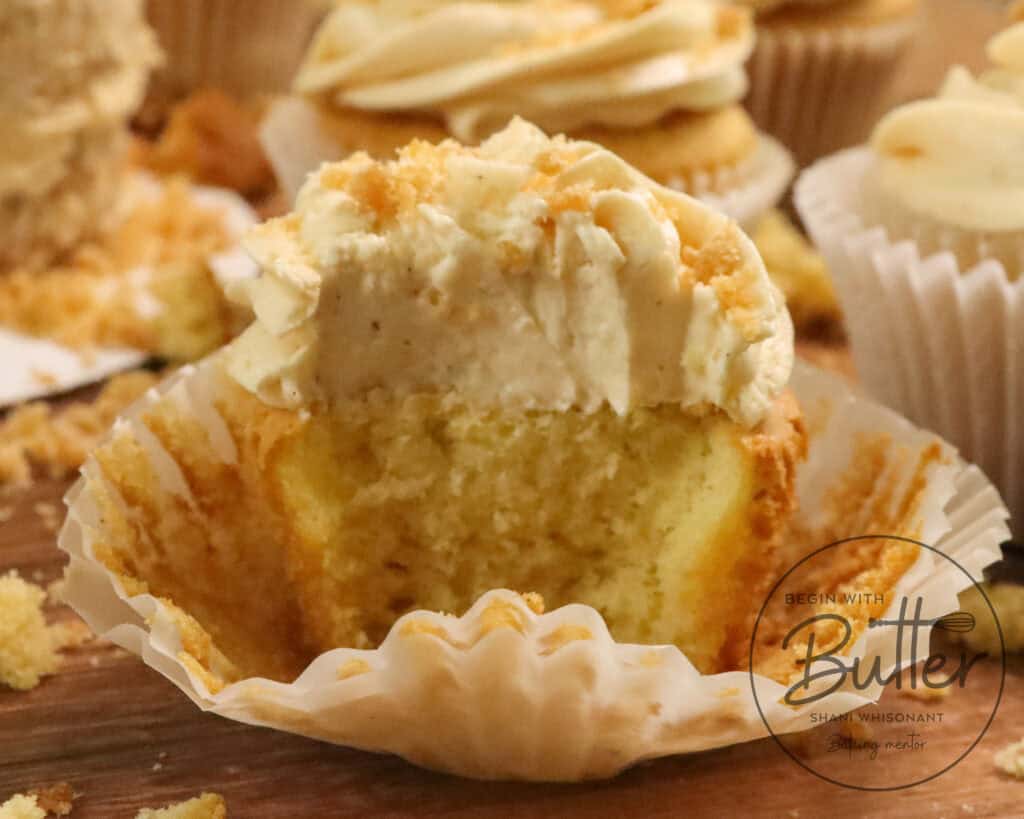
Friends! It’s time for Juneteenth and I…just love this holiday. I was first introduced to Juneteenth by my father when I was a kid. And, to me, it’s not Juneteenth unless there’s a Red Velvet dessert on the table. So, in honor of Juneteenth this year, and in collaboration with Eat the Culture, I’ve developed these absolutely luxurious Red Velvet Cupcakes.
Join me in celebrating Juneteenth with more than 30 other Black culinary creators. Juneteenth marks our country’s second independence day, signifying the final emancipation of those enslaved in the US announced in 1865. This year, we are celebrating "Freedom Day" by offering a delightful selection of mains, sides, desserts, and refreshing drinks that are perfect for backyard barbecues and summer gatherings with friends and family.

Join us in honoring the legacy of progress and freedom by cooking and sharing these recipes. Additionally, you can easily follow each participant by using the hashtag #JuneteenthCookout2023 on Instagram. You can find a list of all recipes from the 2023 Juneteenth Virtual Cookout on the Eat the Culture website.
About Juneteenth
When I was a child, my father explained that Juneteenth was the day that the last enslaved people in the United States were notified of their freedom. More than two years after the Emancipation Proclamation became the law of the land, the last enslaved people in Galveston, Texas, learned that they no longer had to involuntarily give their lives to someone else.
What a profound thing to learn.
They had dominion and control over their own lives and their own bodies. And, as a descendant of enslaved people in the United States, I see it as my duty to pay homage to the many generations of people in my lineage so that their legacy isn’t forgotten. Being the link between past generations and future generations is one thing that I’m constantly thinking about when I’m filming my Youtube show “I’ll Bring Dessert“. I love being part of that oral history.
It’s also the reason why I created the Begin with Butter Home Baking Academy. It’s beyond important to me that I am able to teach future generations of bakers the ins and outs of baking, so that they can have the kitchen experiences with family and friends that are so integral to community building. I realize that, for a long time, my ancestors didn’t have the luxury of choosing their livelihoods or how they moved about in the world. It is my great hope that I’m making them stand tall now.
About these Red Velvet Cupcakes
Friends, here’s the thing about red velvet: it can get very dry. So dry, in fact, that it’s unpleasant.
These…are not dry.
I did a few things with these cupcakes to make sure that they didn’t suffer that fate:
I added sour cream. The 80% fat content gives great flavor to these cupcakes, but that fat also tenderizes the crumb, making it just incredible;
I added a touch more sugar to give these just a little bit more liquid to work with;
I added a tablespoon of oil to the butter. This is a marvelous trick that you can use with just about any cake.
The end result was a Red Velvet Cupcake that is not only beautifully red (in honor of the holiday), but one that is also delectably moist.
I had to be a little bit different with these cupcakes, though. While I do love a well-executed cream cheese frosting, I wanted something impossibly light and not-too-sweet to pair with these cupcakes.
So stabilized whipped cream entered the chat.
And Friends…FRIENDS. This stabilized whipped cream is the thing that Red Velvet Cupcakes didn’t know they needed. It’s so light, yet it perfectly complements the flavor and texture of the cupcake because it’s not cloyingly sweet.
You want to make these NOW.
Want some other ideas for incredible Juneteenth recipes? Check out the other recipes from the “Sweet Miss Juneteenth” recipe edit, courtesy of Eat the Culture!
You can find a list of all recipes from the 2023 Juneteenth Virtual Cookout on the Eat the Culture website
Red Velvet Cupcake Ingredients
All-Purpose Flour: I went back and forth between all-purpose flour and cake flour for these cupcakes. The all-purpose flour helped me achieve the texture that I really wanted; with all of the moisturizing and fat-enhancing efforts that I put into these cupcakes, I found that the texture with cake flour was a bit more mealy than I would have wanted.
Natural Cocoa Powder: Natural cocoa powder is the right cocoa powder for any red velvet dessert. That’s because natural cocoa powder needs additional acid, and with vinegar and buttermilk in this recipe, there is plenty of acid to work with.
Baking Soda: The vinegar and buttermilk are acidic ingredients. Because of that, baking soda was the proper leavening for this particular cupcake recipe.
Kosher Salt: Salt is very important in any dessert; it balances the sugar and keeps the dessert from becoming cloyingly sweet. If using table salt for this recipe, cut the amount in half.
Unsalted Butter: These cupcakes have some heavy-duty ingredients, so I wanted to use butter as the primary fat. The reason is surprising…butter helps these cupcakes become lighter! Specifically, the process of creaming butter and sugar creates air pockets that assist with rise.
Neutral Oil: I added avocado oil to these cupcakes to improve moisture. A tablespoon works wonders!
Granulated Sugar: Granulated sugar adds sweetness, moisture and caramelization to this recipe!
Eggs: The protein in the egg whites adds structure to these cupcakes, while the fatty yolk adds delicious flavor.
Pure Vanilla Extract: Make sure to use the good stuff, like Nielsen-Massey, for this incredible recipe! Whatever brand you use, make sure you use pure vanilla extract.
Red Food Coloring: Whether you use natural food coloring or traditionally mass-produced food coloring, you won’t need more than 1-1.5 tbsp of it. Too much more and it will impact the taste of the cupcakes in not a good way.
White Vinegar: A touch of white vinegar in this recipe helps brighten the red food coloring even more!
Sour Cream: You’ll want to use full-fat sour cream for this recipe. Fat=flavor and you don’t want to skimp on flavor! The rich sour cream also plays nicely against the depth of the cocoa powder.
Buttermilk: Buttermilk is a perfect accompaniment for these cupcakes. It adds a beautiful, tangy level of moisture to these cupcakes.
Beginners Start Here
If you’re new to baking, or if you want to learn how to do some of the more tricky baking techniques, here are a couple of super helpful articles from the BwB site that will help you get set up for success with these Red Velvet Cupcakes.
These resources are super helpful to help you build consistency and confidence on your baking journey. Happy Reading!
Friends, I am so happy to be collaborating with Eat the Culture again for this super special event. You can find all of the recipes that are part of this collaboration right here; check this out for incredible Juneteenth menu ideas!
I hope you enjoy these amazing cupcakes and that you have the best Juneteenth celebrations this year!
Friends, let me tell you. I have been a King Arthur Baking fanatic for years. For just as long, however, I’ve been hearing a steady drumbeat about White Lily flour, so I finally decided to give it a try several months ago. This isn’t unusual; I’m always trying to figure out how to improve upon my recipes, so I frequently test ingredients to determine what works best, and it was time to see if my loyalty to King Arthur All-Purpose Flour for daily use was the best strategy.
**At the outset, I want to make clear that this all-purpose flour test is not sponsored by King Arthur Baking or White Lily. All thoughts and opinions are my own, and have not been influenced by any outside sources.**
When I do an ingredient test, I go into it with no expectations. It’s the only way to give a fair shot to contenders. I’ve been extremely surprised in the not-so-distant past with butter and egg tests, so I completely understand the importance of not giving any team home field advantage.
It was difficult, Friends. Because I do love my King Arthur Flour. BUT it’s the only way to be fair about these things.
When I started this test, I knew that I wanted to do a true head-to-head test of these two titans in the baking industry. For this test, I used two commercially-available flours that you can readily find in a grocery store. Here are the stats on each:
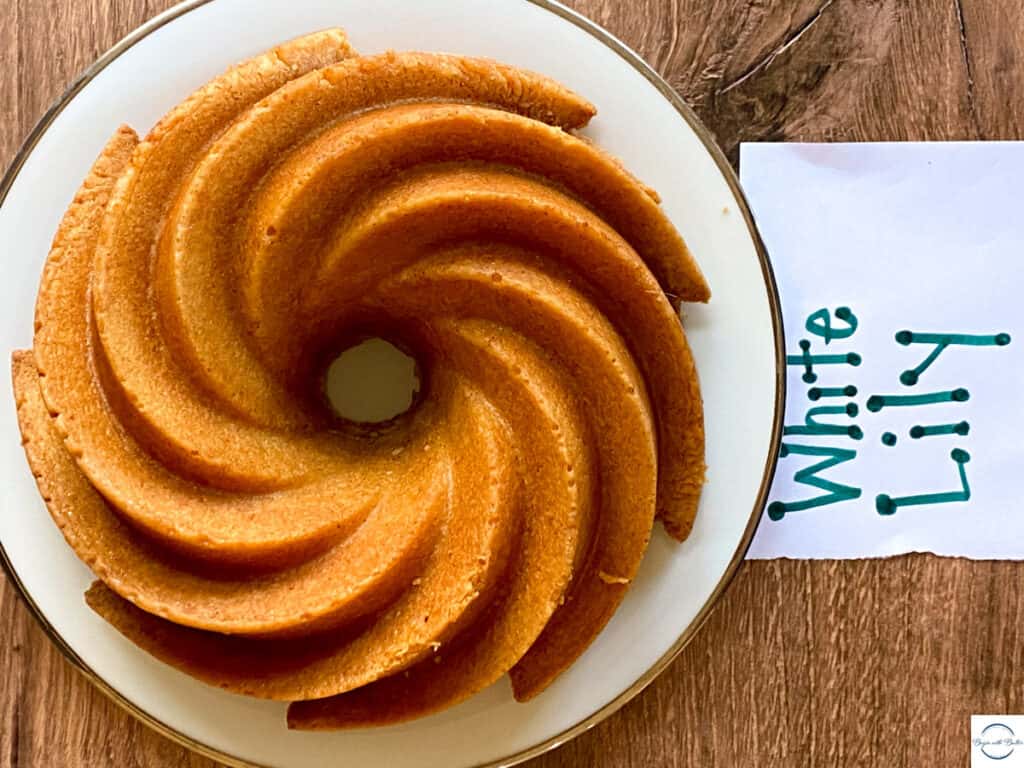
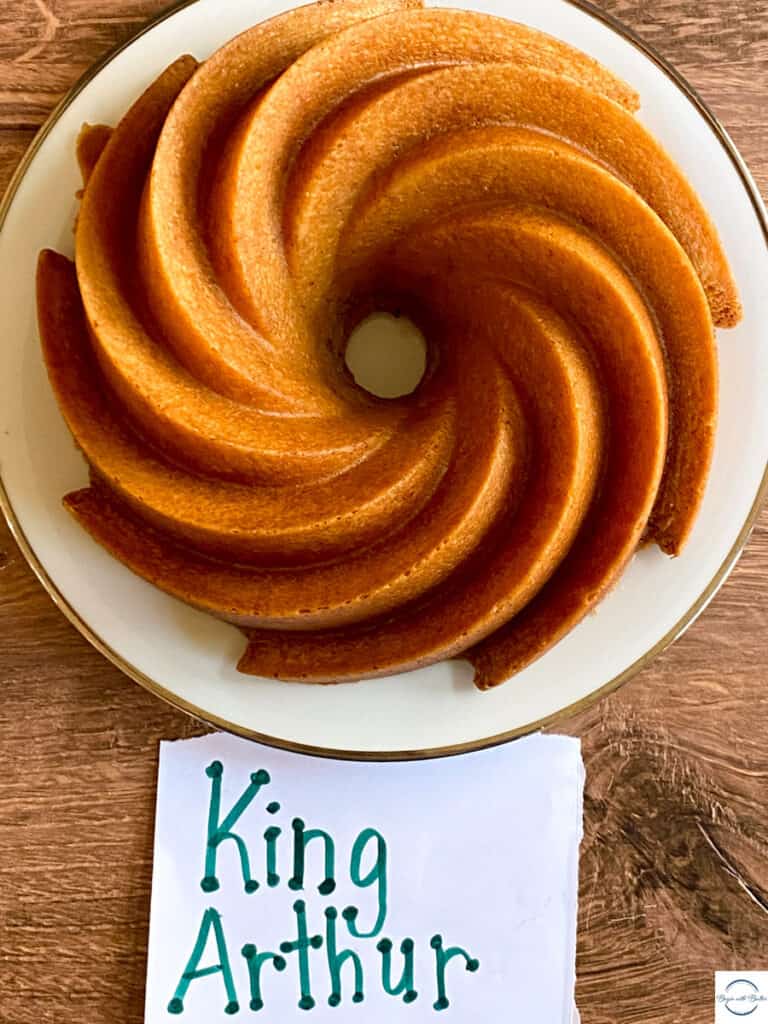
King Arthur All-Purpose Flour: Unbleached, unenriched, unbromated flour. 11.7% protein content. Made from hard red wheat.
White Lily: Bleached, enriched, unbromated flour. 9% protein content. Made from soft red winter wheat.
Flour Texture
When doing ingredient tests, I start simply. By looking at the products. Actually reviewing the products side-by-side. In this case, I got into it and did an unscientific texture check by rubbing each of the flours in my fingers.
There is a noticeable difference between the two. The White Lily flour actually feels softer between the fingers. This has everything to do with the fact that, at 9% protein, White Lily’s all-purpose flour is milled from soft red winter wheat, while King Arthur Baking’s all-purpose flour is milled from hard red wheat (and comes in at 11.7% protein).
From a pure protein (and texture) standpoint, White Lily All-Purpose flour is more consistent with King Arthur Baking’s Cake Flour, and not King Arthur Baking’s All-Purpose flour. BUT this is a comparison of the two companies’ all-purpose flours, so I continued with both all-purpose flours here.
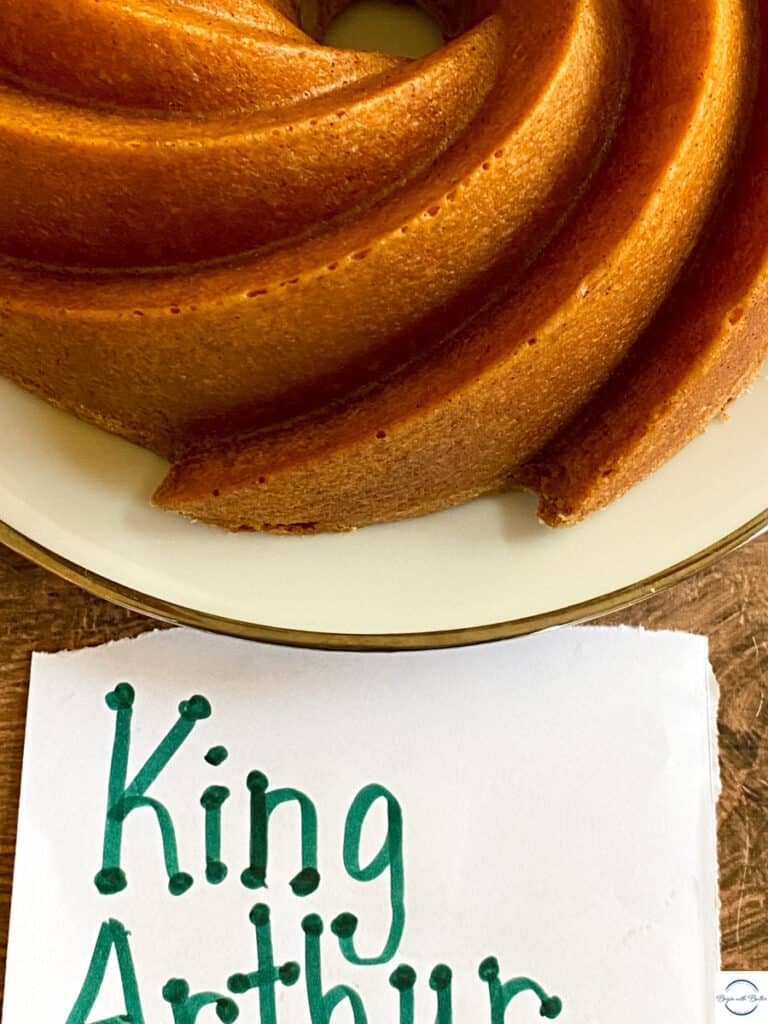
Snickerdoodle Pound Cake
I picked the Snickerdoodle Pound Cake for this test because it’s kind of my signature. So, to test these flours in my kitchen, I wanted to make a cake that is familiar to my kitchen.
It’s also the most popular pound cake on my site, so I felt like it was a good pound cake representative.
The two batters looked the same until the addition of the flour mixture. At that point, it became clear that I was working with two very different products. The batter with the White Lily flour was noticeably looser and more silky. That was to be expected, considering that the protein content was so much lower for the White Lily flour (for more on protein content and how it impacts baked goods, take a look here!).
The bake time for each cake was quite similar: it took about 70 minutes for each one.
But that’s where the similarities ended.
The Finished Cakes
Both of the cakes came out of their pans nicely. That was to be expected, though, since I buttered and floured the pans the same way. There was no sticking whatsoever with either cake.
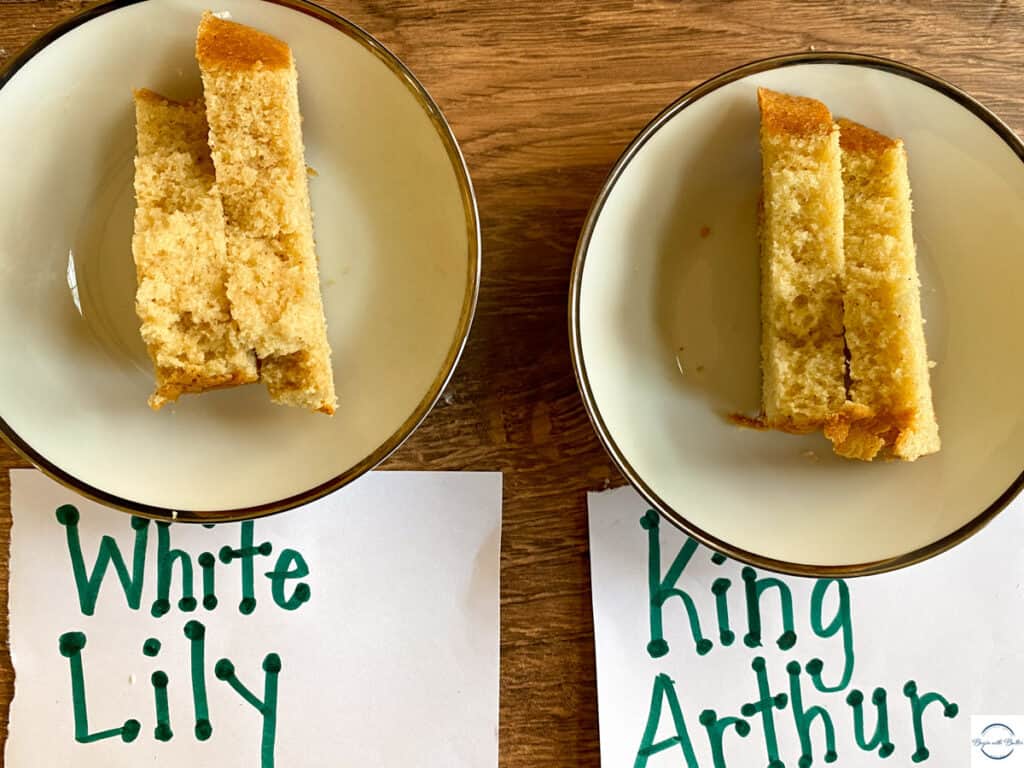
Why is that relevant? Because the edges on the White Lily cake were not nearly as sharp as the edges on the King Arthur cake. I’m kind of a stickler for sharp edges on bundt cakes, so this was a big deal for me.
The edges on the White Lily cake were not nearly as crisp and defined as I’m used to getting from my pound cakes. So, King Arthur was a clear winner for me here.
However, pound cakes are about more than sharp edges. Taste and texture are just as important, because…well, it’s cake!
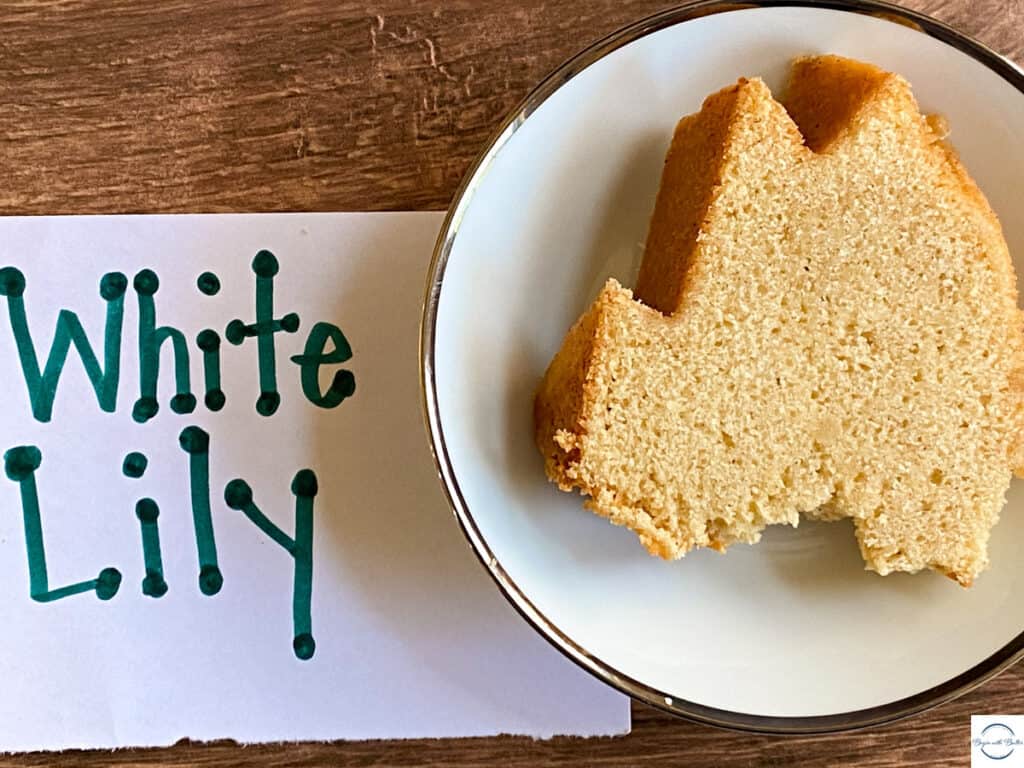
Not surprisingly, the texture of the cakes were quite different. The White Lily cake had a looser crumb that was more delightfully crumbly. This isn’t a bad thing with cake! Indeed, it’s what I want in a layer cake.
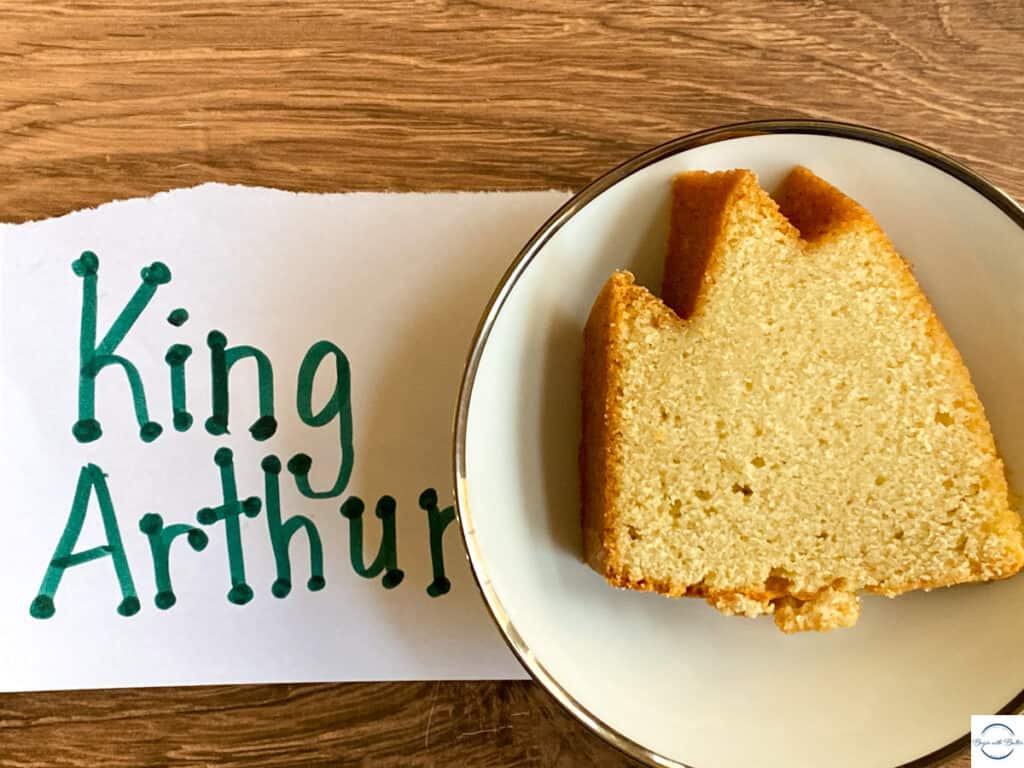
The King Arthur cake had the tighter crumb that I want from a pound cake. This is unsurprising, since I developed the cake using King Arthur Flour in the beginning.
And here’s the side-by-side picture to show you the texture of each cake. The crumb of the White Lily cake is looser and lighter than the crumb of the King Arthur cake.
Honestly, there’s no wrong answer here. They are both premium flours. So, for texture, it really depends on the finished product that you want from your pound cakes.
If you’re asking me, though, I develop pound cakes to have a tighter crumb that doesn’t really crumble apart when you’re walking around with it in a napkin. (Yes, this is a real test!). So, King Arthur Flour won for me on a texture front.
…But How Did They Taste?
Of course, the ultimate arbiter of any baked good is taste. I can make a cake look pretty all day, but if it doesn’t taste good, it’s not a success.
There was a marked difference in taste! So much so that even I was shocked.
Let me start by saying that they both tasted good! But, with the White Lily cake, the flour taste was more pronounced. The mouthfeel was softer (not surprising, since the batter was so much smoother than the King Arthur batter), and reminded me more of a birthday cake than a pound cake.
Again, not a bad thing. Just not what I was going for when I developed this cake.
The King Arthur cake was as expected. Consistently delicious and tasted exactly as I wanted it to taste. The flour-y taste was noticeably absent from this cake (not that it’s super prominent in the White Lily cake, but it is there). The King Arthur cake tasted exactly as I intended this cake to taste. And that made me super happy.
Winner of the Snickerdoodle Pound Cake Battle: King ArthurFlour
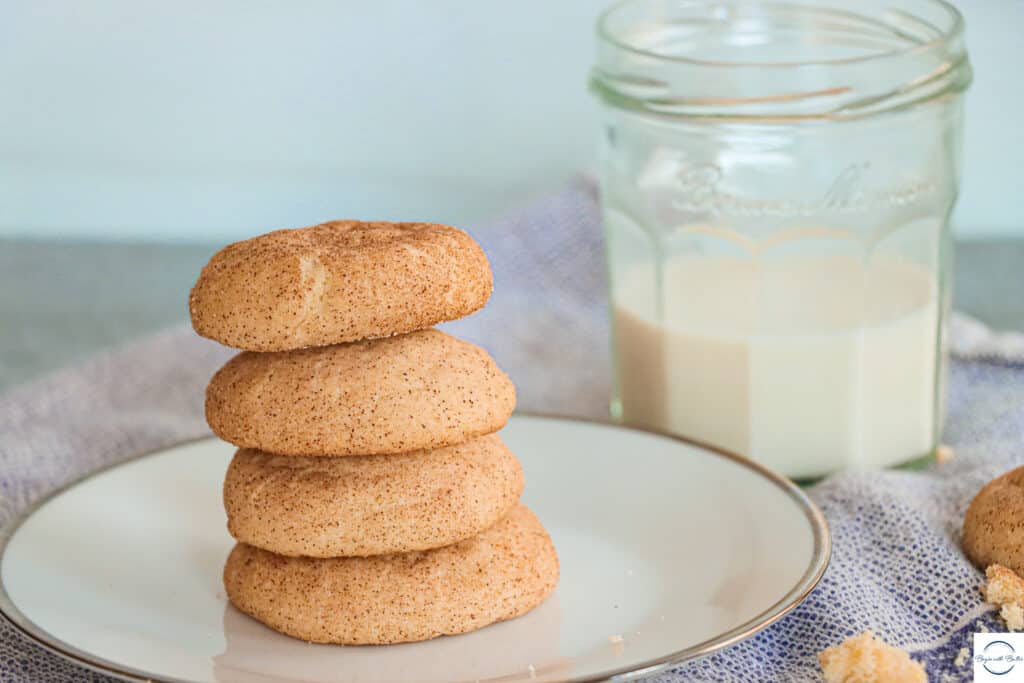
Snickerdoodle Cookies
Next up in the flour test was my favorite cookie of all time.
So, absolutely no pressure whatsoever. LOL
It was time for the snickerdoodle cookie test.
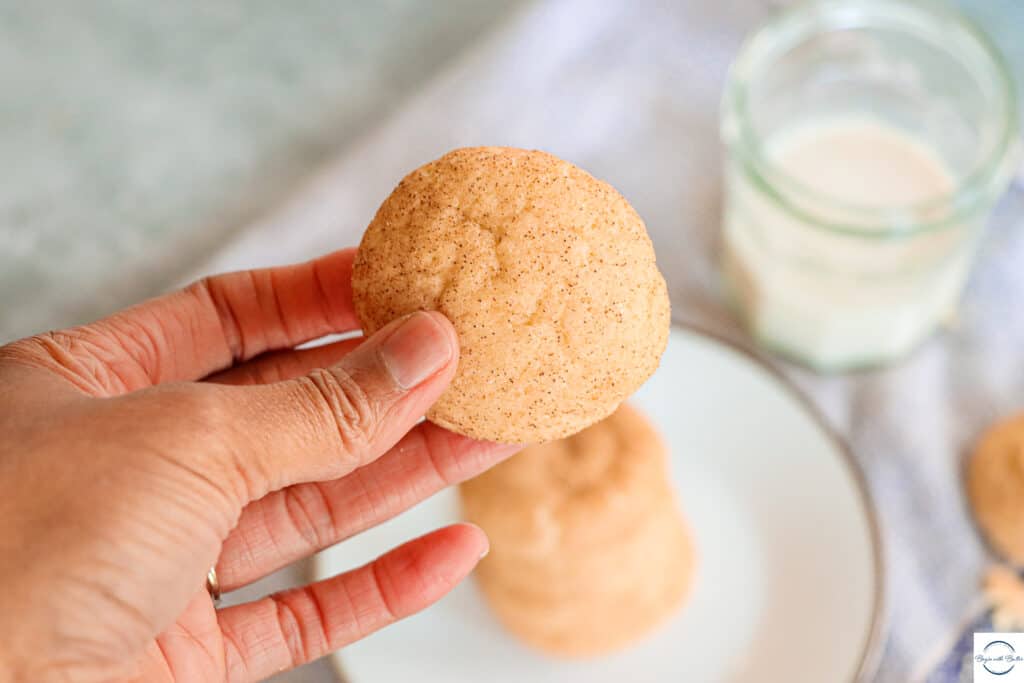
The Dough
Once again, when I mixed the dough, the White Lily dough was noticeably more loose. It was still a cookie dough, but it wasn’t nearly as stiff as the King Arthur cookie dough. This didn’t concern me, since ultimately the texture of the dough wouldn’t necessarily impact the finished texture of the cookie. But I took note!
The Bake
Again, the bake time was identical for each cookie. Five minutes on the first side, four minutes on the second side. The two batches baked equally and looked nearly identical. In fact, it was hard to tell them apart!
Hello King Arthur!This is White Lily
And Finally, the Result
Texture-wise, they were nearly identical. I love a thick, chewy snickerdoodle cookie and neither of these flours disappointed on that front. I was truly happy to see that my cookies could produce a nice chewy cookie with either flour.
Once again, though, the difference came in the taste. With the White Lily cookie, I once again tasted more flour. It wasn’t the most off-putting taste, but it did impact the taste for me.
With the King Arthur cookie, I did not notice that taste. Just pure snickerdoodle nirvana. I might be splitting hairs though…
BECAUSE…
My children positively devoured the White Lily cookies. If they tasted flour (or anything off-putting), they didn’t tell me. Of course, it’s possible that the rate at which they were inhaling the cookies means that this was a failed experiment. With the sheer speed of consumption, they might not have tasted much of anything except snickerdoodle goodness.
This was good news to me.
Winner of the Snickerdoodle Cookie Battle: Tie
Layer Cakes
Remember when I said earlier that White Lily flour is more akin to cake flour than other “all-purpose” flours? Well, I needed to figure out how it would perform in a layer cake compared to my experiences with King Arthur Baking.
The object with layer cakes is simple: I want to create a moist, almost ethereal crumb that is lighter-than-air. To achieve that, I typically use a lower-protein flour, since it won’t create strong gluten bonds (and thus a tighter, more dense crumb). But again, this is an all-purpose flour head to head, and White Lily is branded as an all-purpose flour, so off to layer cake land we went.
I won’t even bury the lede BB. White Lily is the positive GOAT when it comes to layer cakes. The crumb is absolutely outstanding; it is moist and a little crumbly, and crumbs just…float down the sides of the cake in the most beautiful, almost ethereal display.
King Arthur Baking does a great job as well. With its higher protein content, the crumb is tighter and doesn’t melt on the tongue as much as the White Lily cake, and I’m a texture buff so this is noticeable to me (but I am also admittedly strange in this regard 😂). But Friend, the soft wheat and lower protein content of the White Lily Flour creates such an aesthetically beautiful sight and a melt-in-your-mouth texture that it has quickly become my absolute favorite for layer cakes. I hope you’ll give it a try!
Winner of the Layer Cake Battle: White LilyFlour
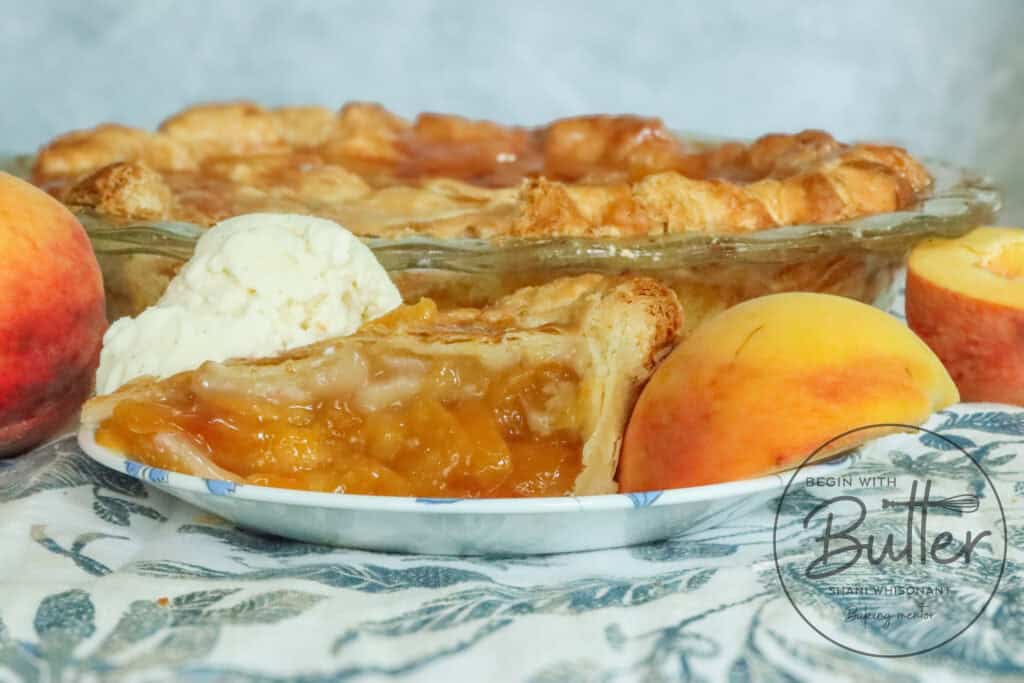
Pies
Pies hold a particularly special place in my kitchen. When making these special treats, it’s extremely important to me to have a pie crust that positively shatters when you eat it.
Pie. Meet croissant. Croissant. Meet pie.
That is what I’m going for with every single pie crust that I ever make. And to ensure this effect, I laminate my dough. (Want to see what I mean by laminate? Check out my post on Apple Hand Pies for a video tutorial!)
Pie dough strikes fear into the most accomplished bakers, because it is a true test of bakers feel. Bakers feel is that instinct that bakers develop as they practice, and practice, and practice some more. It’s the hands and wrists knowing that something literally feels complete. It’s training the eyes to know what to look for to know when something is actually complete. It’s the confidence that you develop overall when you’ve developed proficiency. And when I say that pie crust (and pastry in general) will leave your confidence on the side of the road…
Why mention bakers feel in this discussion? Because it actually dictates my findings in this instance!
Successful pie crust is fully dependent on not overworking the pie dough. When you work the protein (gluten) too much, it creates strong gluten bonds that create more chew, and which are decidedly not flaky. In other words, too much chew = bad pie crust. For this reason, the smart money is on lower-protein flour for this very important task.
For these reasons, I love White Lily. It makes the absolute flakiest, most delicious pie crust I’ve ever made. Watching the final crust do its croissant-inspired thing is a beautiful sight.
BUT, with its lower protein content (and it being closer to a typical cake or pastry flour than a higher-protein all-purpose flour), it can be tricky and frustrating to work with White Lily as a beginning pie maker. This is especially true with my all-butter pie crust. And this is why, as a beginning pie maker, I recommend starting with a higher-protein flour until that bakers feel is well established. 😊
King Arthur Flour is actually a very good all-purpose flour for pie! Though it is a higher-protein flour than White Lily, it still makes a very flaky pie crust that is exceedingly delicious! It is also more forgiving than White Lily, so it will help you establish great muscle memory while you build your pie prowess!
Winner of the Pie Battle: White Lily Flour for intermediate/advanced pie bakers; King Arthur Flour for beginning pie bakers
Final Thoughts
Friends, I thoroughly enjoy ingredient testing. I’m constantly in search of the absolute best ingredients I can source for my baked goods (because ingredients can make a huge difference), so it’s wonderful to be able to do these kinds of tests from time to time.
What do I think? I think you really can’t go wrong with either King Arthur or White Lily. As a baker, you have to determine which flour meets your tastes. So, if you are a die-hard White Lily fan, I say use White Lily! Many baked goods will be lighter than those baked with King Arthur, and if that serves your taste, then keep on keepin’ on with White Lily.
I am going to use them both for different purposes. Working with both of them in their respective strong suits helps me make the absolute best product for you all, and I love that for us.
I will continue to update this post as I test White Lily and King Arthur Baking on more and more, and more, and more products…
Will update my findings as I do each project.
I hope you found this helpful as you go about your baking exploits! Whatever you choose, may you have the best bakes of your life.
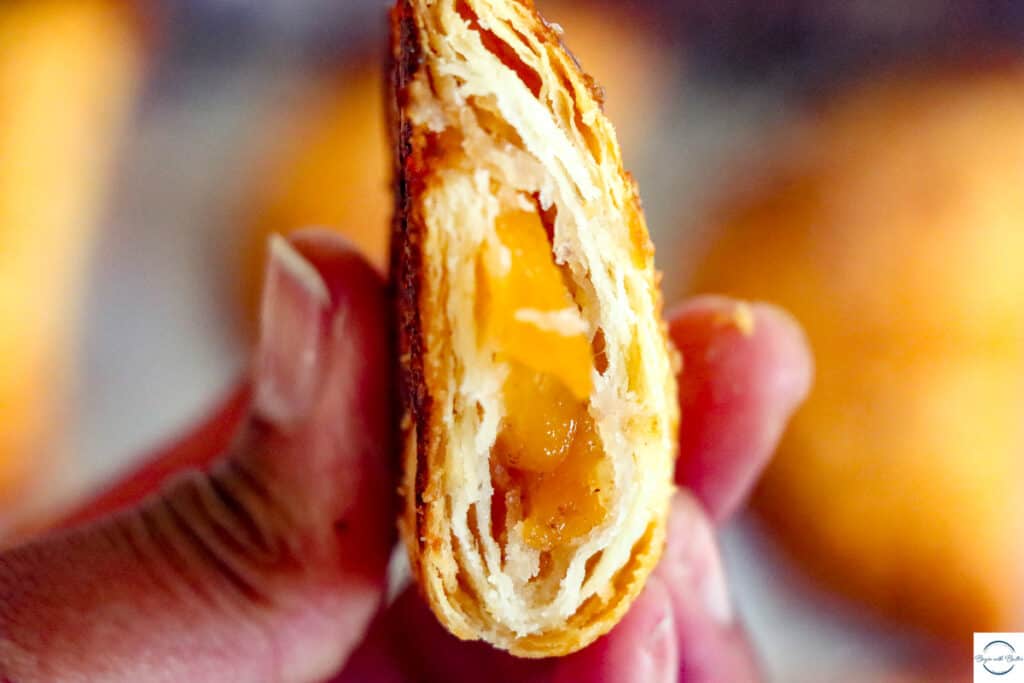
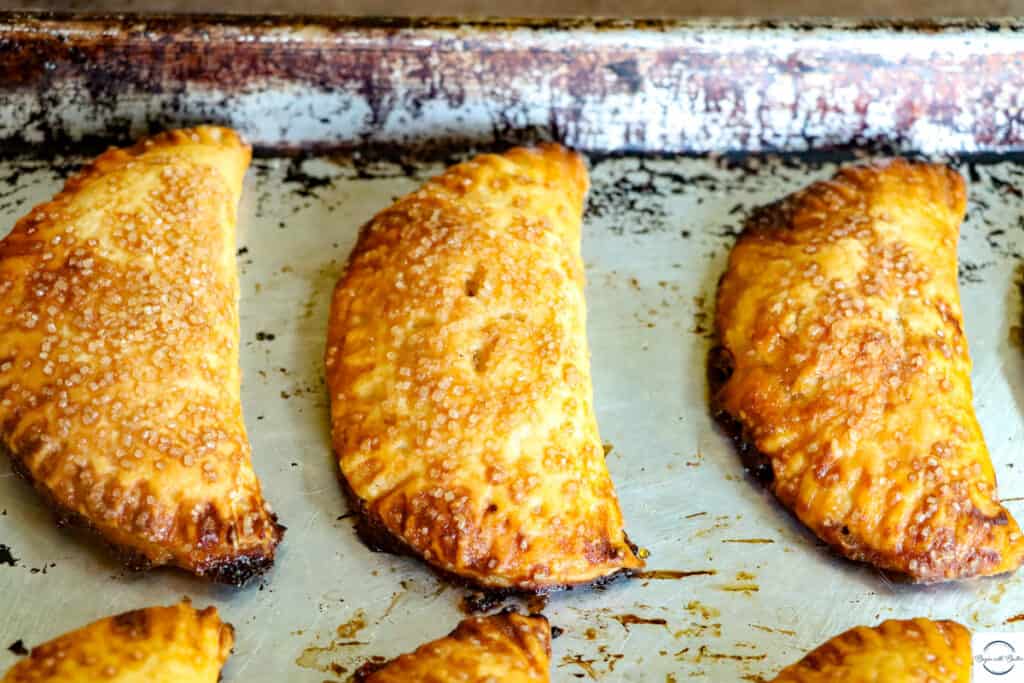
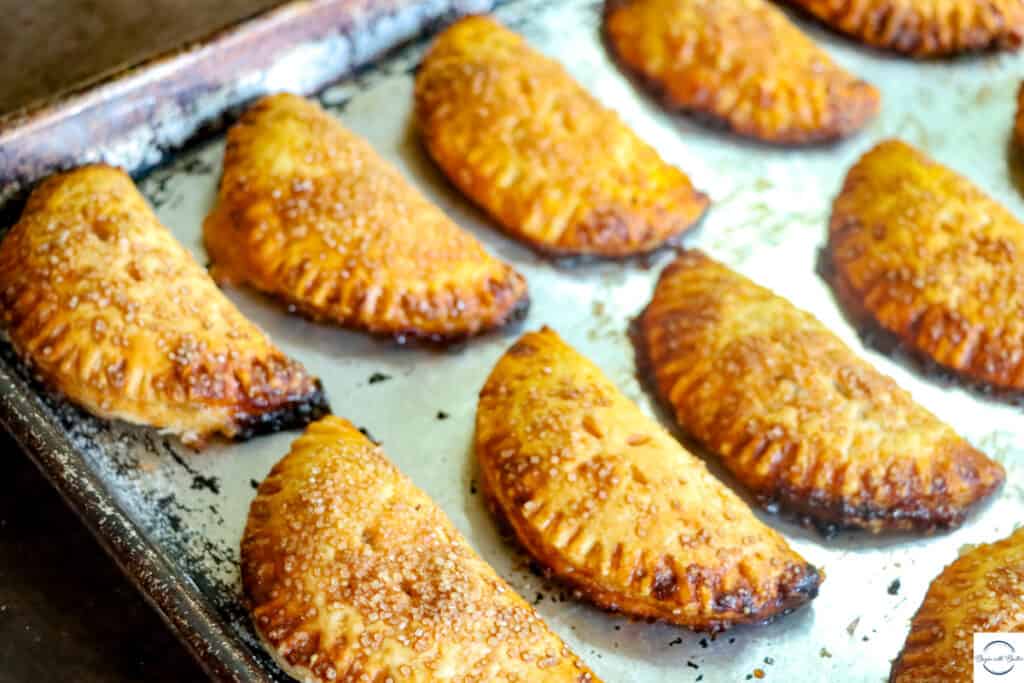
Friends, my daughter has been waiting for this one since the top of 2023. She recently hit me with the eyes and I was powerless to put this off any longer. So, today on the blog, we have my amazing Peach Hand Pies. These don’t last long at all in my house.
These Peach Hand Pies are flaky and decadent, and because these use frozen peaches, YOU CAN EAT THEM YEAR-ROUND.
That was wonderful news for my baby girl, who has a serious thing for anything peach. ? That’s right. You don’t have to wait for the 5-week peach season to enjoy these peach pies. just go to your local grocer’s frozen food section and grab a bag of frozen peaches, and you’re good to go! So now, you can have a taste of summer any time of the year.
You’re absolutely welcome!
About these Peach Hand Pies
The cat’s out of the bag with these, friends. In order to develop this recipe two whole months before peaches even consider being ripe in Maryland, I had to go to the freezer aisle of the grocery store. A 16-ounce bag of frozen peaches is more than enough to make these hand pies. And since frozen peaches are peaches that are picked and packaged at the height of their ripeness, you’re losing nothing by using the frozen ones. You can actually depend on these peaches to be sweet, unlike fresh peaches, which can vary from sweet to tart with no rhyme or reason.
Now, Friends, I love a sweet, fresh, juicy peach. I love the way the juice positively dribbles down my chin and clothing. I love them when they’re just reaching that soft-er phase, and the flesh is nice and dark in the middle. But I love to eat those peaches as God made them.
So this solution is absolutely perfect for me.
Can you use fresh peaches? I’m sure you could. I’ll report back later this summer.
Another little secret about this recipe? ORANGECELLO. YES.
Trust me. You want either Orangecello or Triple Sec to really bring out the peach notes in this incredible recipe. It’s optional and you can absolutely use fresh squeezed orange juice, but OMG it takes these Peach Hand Pies way over the top.
Lastthing, I promise. I love how friendly these Peach Hand Pies are for beginning pie bakers. Pie is traditionally a very daunting task for new pie bakers, and this coconut oil crust gives you lots and lots of leeway to learn! While you’re building confidence with pie baking, you’ll want that leeway. Save the butter and leaf lard for another day.
I should mention that this pie crust is also incredibly flaky as well, so flaky that you won’t believe that it’s not a butter crust. I mean…
Beginners Start Here
I get it. Pie can be a daunting task. There are many, many places where it could go terribly wrong, and, truth be told, you don’t ever know if it went right until you’re biting into the finished product.
But the more you make it, the more you develop a feel for what each stage should look like. And that, friends, is where kitchen confidence comes from.
To help you with that learning curve, here are some articles from the Begin with Butter site!
Coming to the BwB Home Baking Academy on July 1, 2023: My LIVE Hand Pie Class!
These aren’t mandatory reading, but they will help you tremendously with your pie confidence! And who wouldn’t want that? ?
How to Make this Peach Hand Pie Crust
Here at Begin with Butter, we believe in 360° of baking education. So much so, that I’ve created a whole Begin with Butter Home Baking Academy to help you shore up baking skills! My classes teach you how to become a more consistent, confident baker, and they’re super fun to boot!
There’s also oodles of free information right here on the site! Check out the Equipment & Ingredients and Techniques pages to help you improve your baking skills!
For this special Peach Hand Pie Crust, I hosted an Instagram Live the other day and had an absolute blast. You can watch me make the crust (and get a bunch of tips!) by checking out this Instagram Live post! It’s thirty minutes of instruction that will make all of your pies so much better.
If you’d like to learn how to make this special pie crust with pictures instead of video, I’ve got you there too! Check out my Apple Hand Pie recipe, which has a step-by-step picture tutorial for how to successfully execute this wonderful pie dough.
However you want to learn this amazing dough, I’ve got you covered!
Because baking education is kinda my jam.
Answering some of your questions about Peach Hand Pies
Does the coconut oil have to be refrigerated before using in the pie dough?
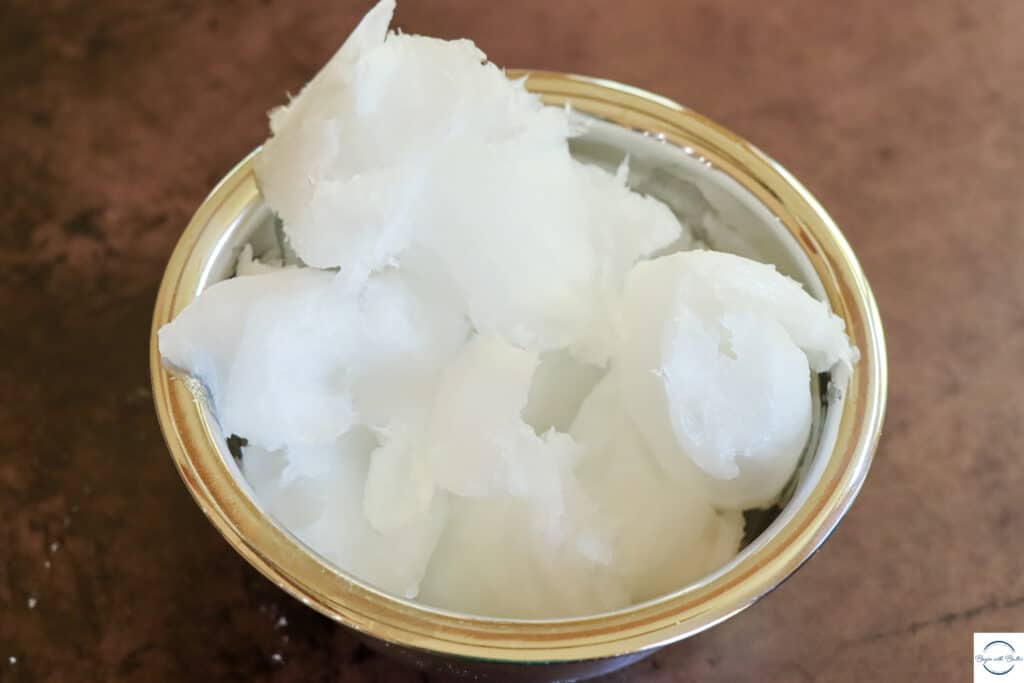
No! You actually don’t want the coconut oil to be rock-hard before you use it. To make this dough, your coconut oil needs to be solid but soft. The only caveat is that it cannot be liquefied.
If the coconut oil is too hard, it will just break into pieces when you try to roll out your dough. So, don’t refrigerate the oil before using! It works against you!
Why did you use frozen peaches?
Here in Maryland, the peach season is SHORT. We can rely on good peaches from mid-July until maybe mid-August.
My daughter finds this unacceptable. So, in my never-ending desire to make my children happy, I figured out a happy medium. I have not tested this recipe with fresh peaches, but I imagine that it will be absolutely amazing. Will report back.
Why do I need to refrigerate the hand pies after shaping them?
While you’re shaping the hand pies, you don’t want your oven on at 400°, heating up your kitchen and possibly melting the fat in your dough. Keep the kitchen as cool as possible, friends. Because although the coconut oil doesn’t need to be frozen or cold when you make this dough, you still don’t want it to melt.
Once the hand pies are shaped, you want them as protected as possible from the residual heat from the oven. Coconut oil doesn’t take much to go to liquid, and the refrigerator will keep the fat comfortably solid while you heat your oven for 35-45 minutes.
Can I make a double crust pie with this recipe?
Yes! You’ll want to double the filling recipe though.
Friends, I am absolutely in love with these special little hand pies. I hope you make them and enjoy them as much as my family and I do!
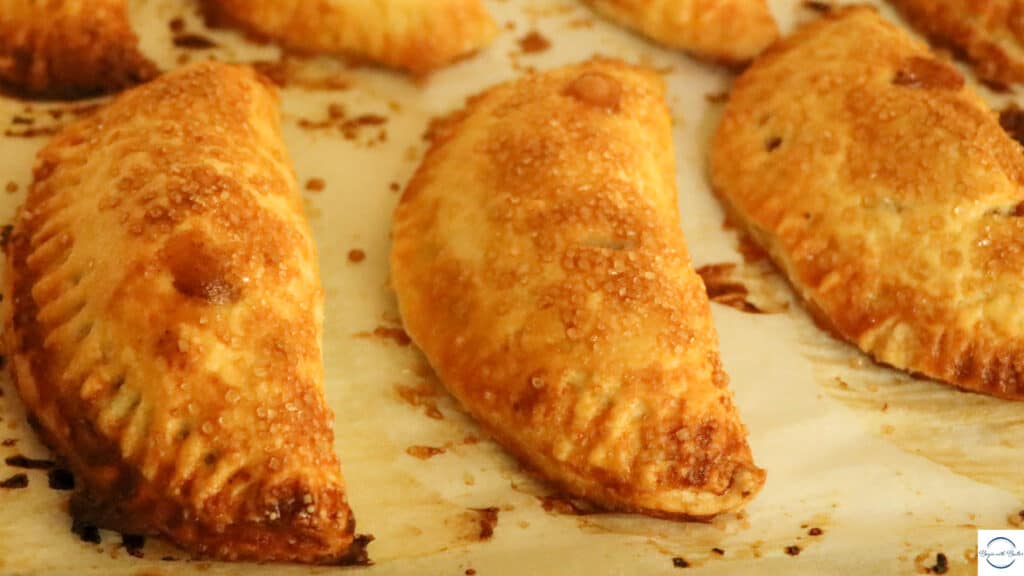
There are few things in life more delicious than apple pie. The filling of apple pie, Friends, is something that I could eat all by itself. And I often do! Today I have for you, my favorite Apple Hand Pies on earth. It is the easiest pie crust I’ve ever developed, and it doesn’t even require refrigeration!
If you’re intimidated by pie crust, and you’ve been afraid to make your own, then this pie crust is the place to start. Even experienced pie makers will love this crust for its simplicity. You don’t have to refrigerate it, and there is no sacrifice in quality with this flaky, delicious crust.
About these Apple Hand Pies
There are three big secrets to these Apple Hand Pies:
They use coconut oil as the fat in the crust! It has an extremely neutral flavor, so you only get the slightest bit of coconut flavor (read: no real coconut flavor) in the crust.
The dough is laminated, meaning that it’s folded over itself twice and rolled a second time. This creates layer upon layer of incredibly flaky crust!
They use vodka in the crust as well. The vodka assists with the incredible flakiness!
These hand pies are so simple to make, and you don’t have to refrigerate the dough after you make it. That cuts down the time to make these by…a LOT. They bake quickly and they’re best served very warm, so, of the pie options that you could make, these are the fastest, and they are unbelievably delicious.
How to Make these Apple Hand Pies
Because these come together so quickly, it’s important to make the filling first. Once you have the dough ready, you’ll want to get straight to the action.
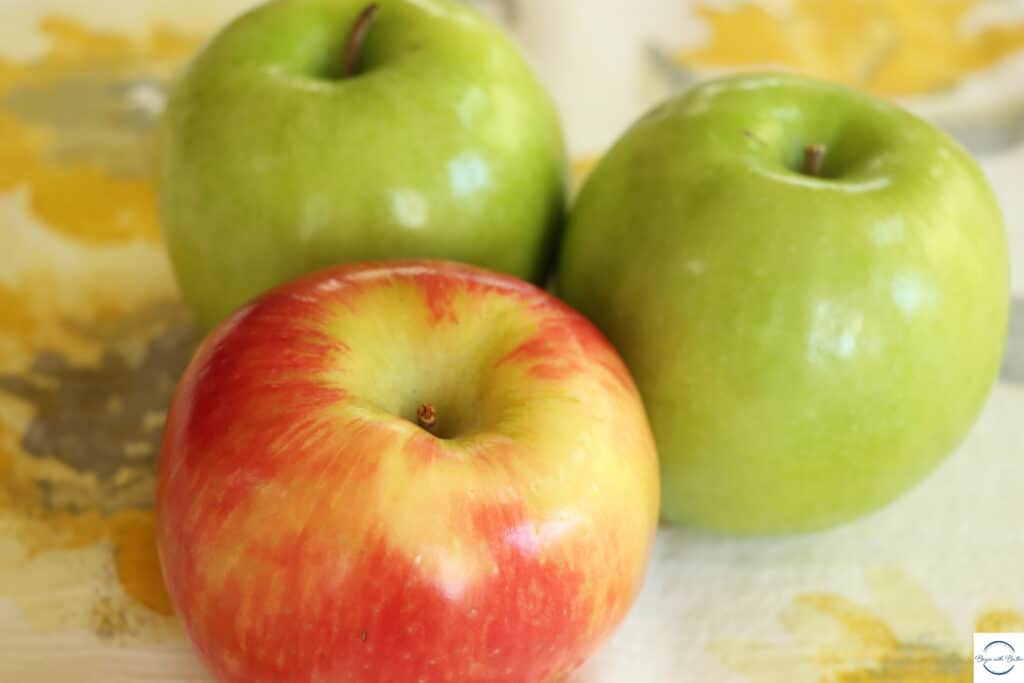
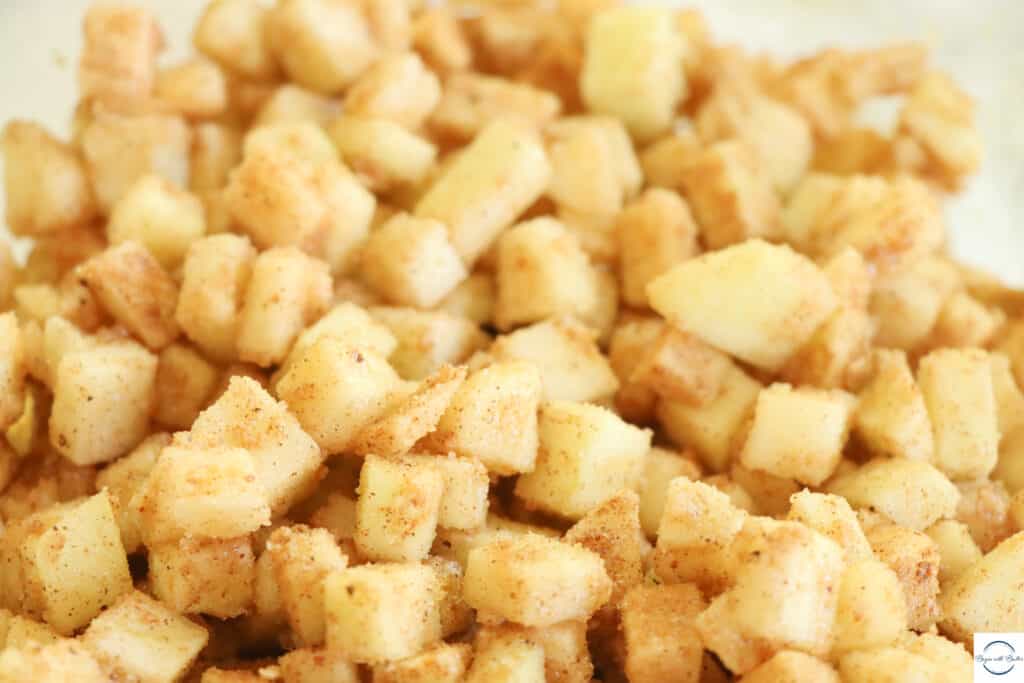
To make the filling, peel 2 large (or 3 medium) apples. Roughly dice the apples and place in a medium bowl. I like Honeycrisp and Granny Smith apples for these hand pies, but any firm, semi-sweet apple will work!
Add the sugar, flour, apple cider vinegar, ground ginger, nutmeg, cinnamon, and salt, and stir gently to combine completely. Set the filling aside and get ready to make the easiest crust of your life.
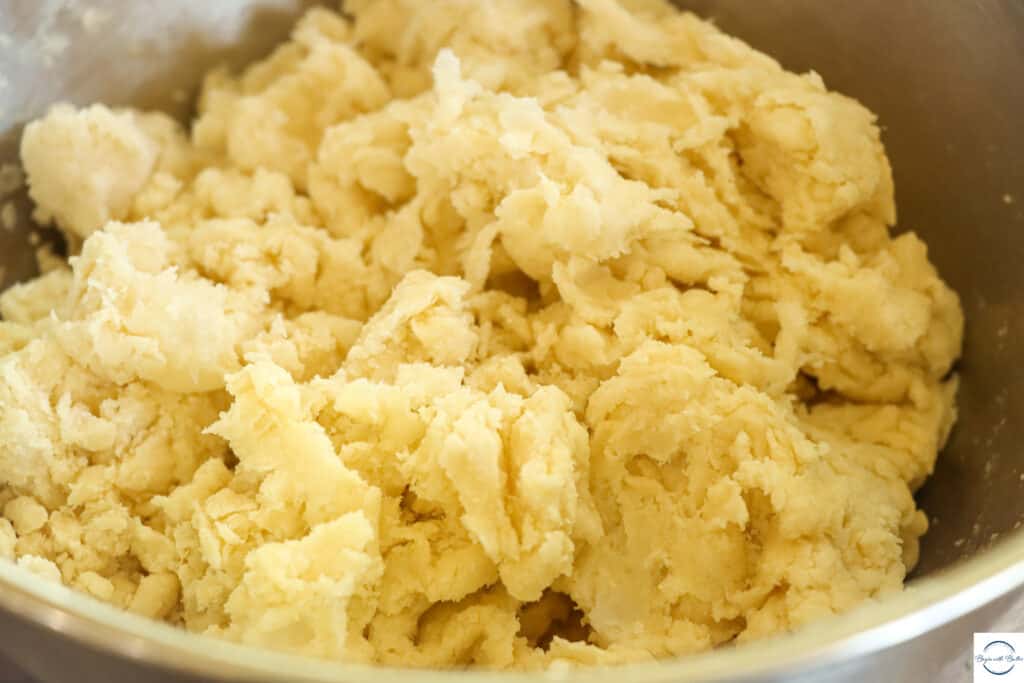
To make the crust, put the all-purpose flour, sugar, and salt in a large bowl. Whisk to combine the dry ingredients.
Note: I use all-purpose flour in this recipe because it gives me the structure that I want, while also making a tender, flaky crust. You can use pastry flour, but you will lose some of the flakiness if you do.
Put the coconut oil in the flour mixture in tablespoon-sized pieces. Toss in the flour to coat completely before going onto the next step.
Once the coconut oil is completely coated in the flour mixture, use your fingers to smush the coconut oil into pea-sized pieces. Some of the pieces might be a little larger, and that’s fine!
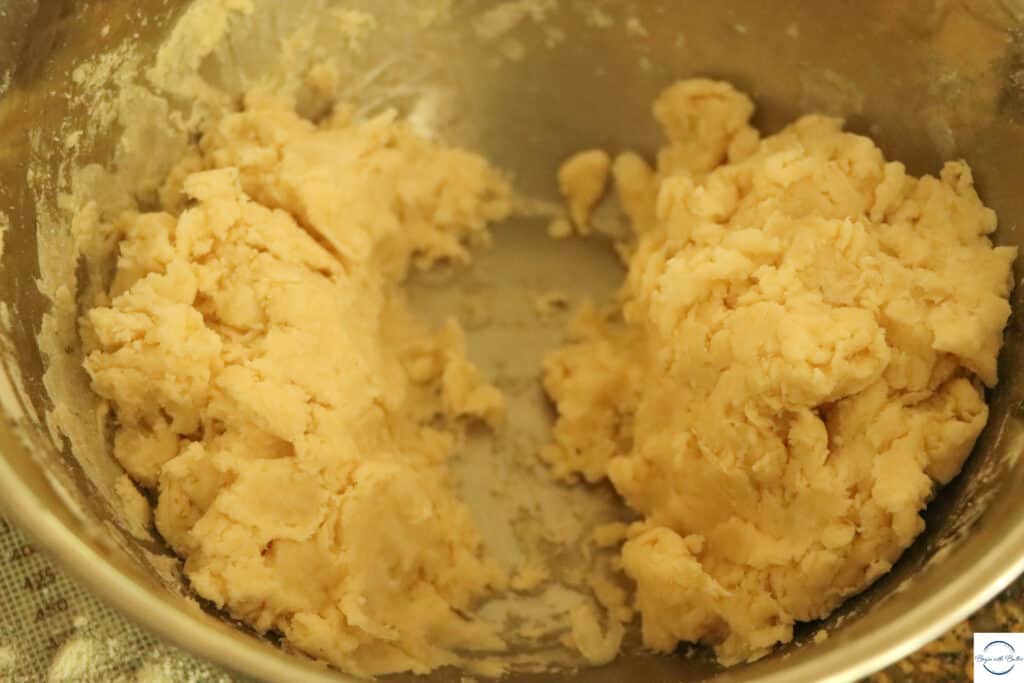
Combine the vodka and water. Pour evenly over the flour/coconut oil mixture. Use a fork to gently combine. The dough should be very shaggy, but it should stick together if you press it between your fingers. The dough shouldn’t be wet when you’re done!
Split the dough into two “even-ish” sections. You’ll work with each section separately, and you’ll work with each section immediately!
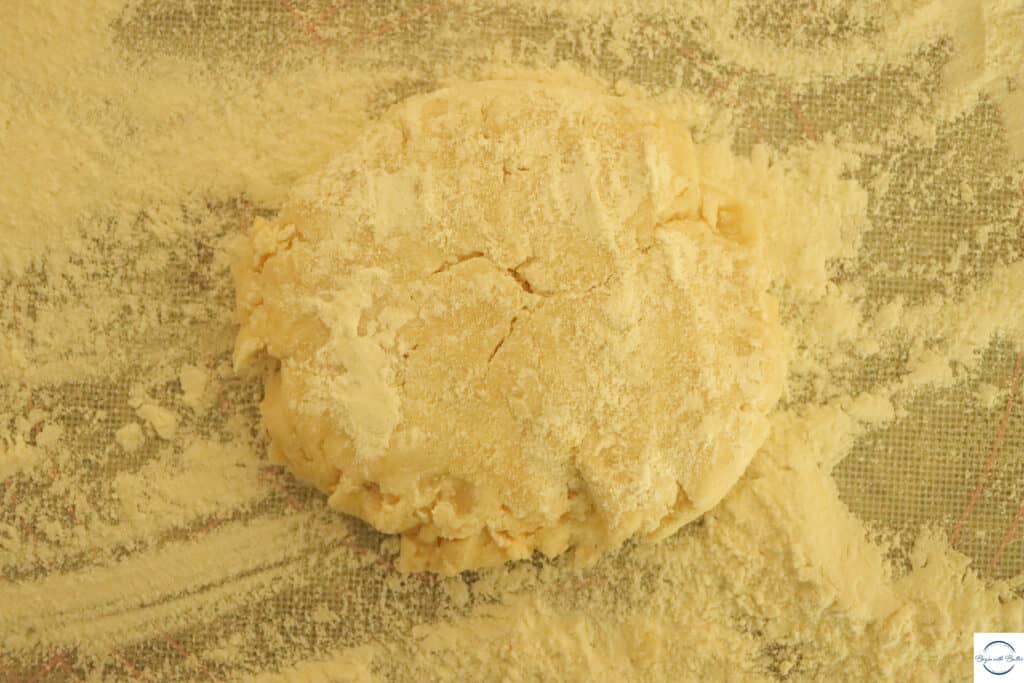
Generously flour a pastry mat or a clean surface. When I say “generously”, I mean “generously”! You don’t want your dough to stick to the surface!
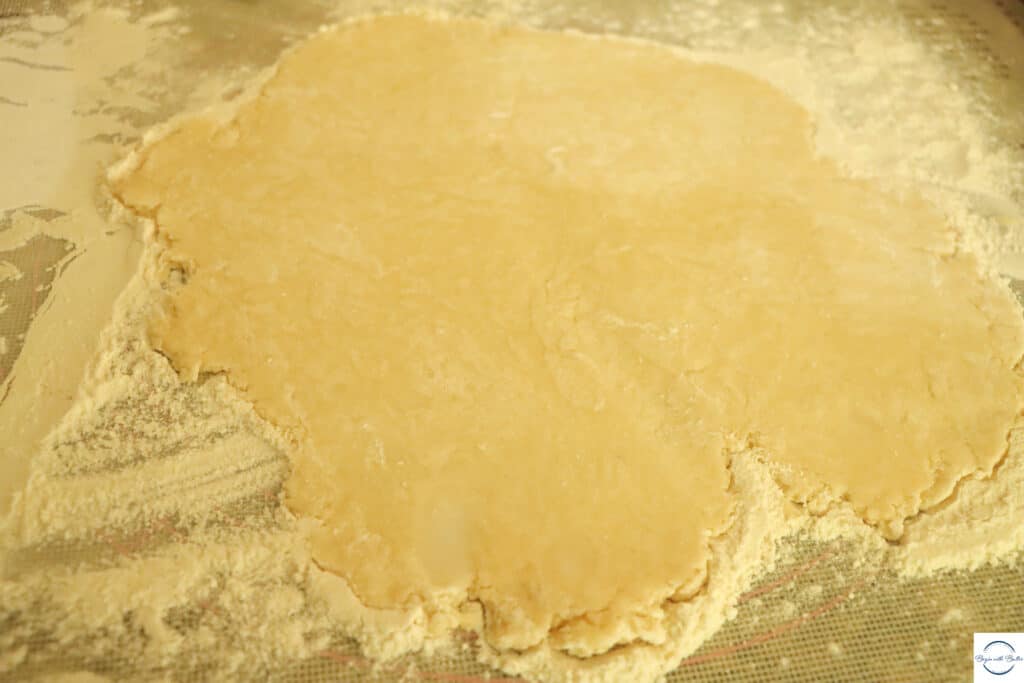
Flour the top of your dough and your rolling pin, and roll the dough to about a 1/4″ thickness. The dough will be soft this go-round, so be super gentle with this step! And don’t worry!
This next step is where the money resides. This is where you laminate. You’ll laminate your dough by folding it in half twice, then rolling it out again to 1/4″ thickness.
Want to know how I accomplish this step? Here’s a video!
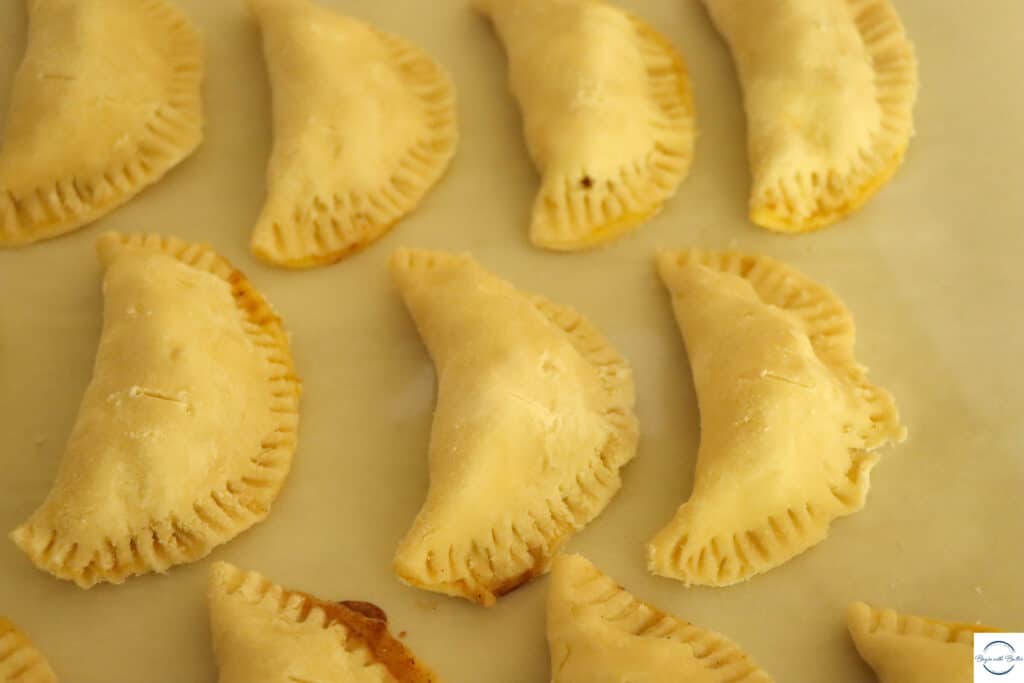
Once you’ve rolled the dough the second time, you’re ready to use a 4.25″ biscuit cutter to cut as many circles as you can. Try not to leave too much space between the dough circles, since you can only roll out the excess dough one more time.
Add 1.5-2 tablespoons of your apple mixture to each dough circle. Brush egg wash on the bottom of each dough circle and close each dough circle gently. Then, gently use a fork to crimp the edges of each hand pie, and place them in the refrigerator while your heat your oven to a true 400°F convection setting.
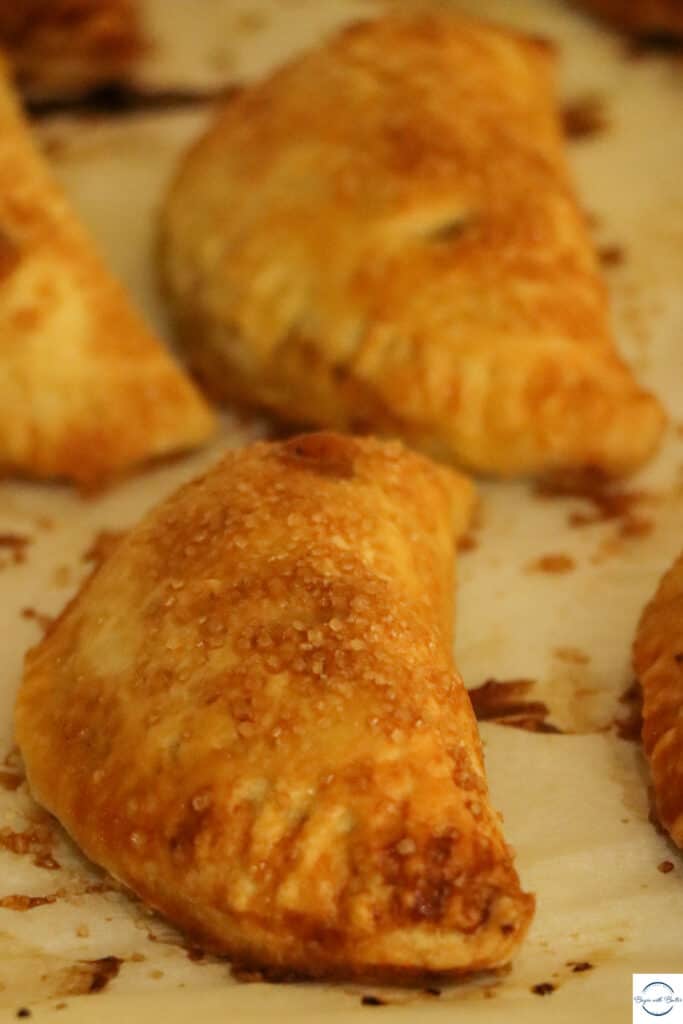
Once you’re ready to bake (about 30-45 minutes after you start your preheat), vent the top of each hand pie with a sharp knife. Brush the top of each hand pie with egg wash, then finish by sprinkling the top of each hand pie with turbinado sugar. Bake the hand pies for 18-24 minutes, or until the top of the hand pies are a deep golden brown.
Pro tip: you might want to turn your pan during the baking time! Keep an eye out to see if the hand pies are browning evenly during the bake!
Once these hand pies are done, remove them from the oven and place them immediately on a cooling rack. They cool surprisingly quickly and will be ready to eat within 15-30 minutes!
Equipment Used to Make These Apple Hand Pies
There are a couple of pieces of equipment that you’ll need to make these hand pies…don’t be intimidated! You might have most of these already! These are affiliate links, but I really use these pieces of equipment in my kitchen!
Once you have these special pieces of equipment, you’ll be ready to make these amazing hand pies! And it will be worth the investment!
These hand pies are a hit everywhere they go. If they need to travel to an event, I simply pack up the cooled hand pies, and then reheat them in an oven (NOT A MICROWAVE) at 300°F for about 6-8 minutes. And viola! I have brand new hand pies.
Frequently Asked Questions
How “solid” does the coconut oil need to be?
The coconut oil that you use for this recipe needs to be solid, and not melted. It doesn’t need to be “refrigerator cold”, but it does need to be firm enough to scoop without it being liquid. Room temperature coconut oil is perfectly fine to use, as long as it has not started to melt.
Can I refrigerate the dough once I make it?
Yes! However, you’ll need to allow it to return all the way to room temperature before you roll it out.
Can I make a double-crust pie with this recipe?
You absolutely can! This dough is enough for a double-crust pie. I would recommend quadrupling the filling amounts though.
Why can’t I roll out the excess dough multiple times?
The more you roll out excess dough, the more tough the final product will be. The first re-roll is fine, but I wouldn’t recommend rolling out excess dough over and over again. Just make sure that you make your dough circles close together with your biscuit cutter, and you won’t have a huge problem with this.
What kind of apples do you use for these hand pies?
It’s totally up to you! You do want a firm, semi-sweet apple (so no Red Delicious please), but whether you like Fuji or Honeycrisp or Granny Smith, it’s totally your preference! My favorite mixture for these hand pies is one Honeycrisp apple and two Granny Smith Apples.
These Apple Hand Pies are so delicious and make me feel like a kitchen boss. To go from total ineptitude in the baking kitchen to making my own pie dough? Well, that just feels incredible to me. I hope you love this recipe and that you enjoy it for years to come!


")