Blueberry Buckle Pound Cake

Besides, he was thrust into this Girl Dad thing after having two boys, so this is kinda my ongoing apology for my adult baby daughter behavior. 😂

About this Blueberry Buckle Pound Cake

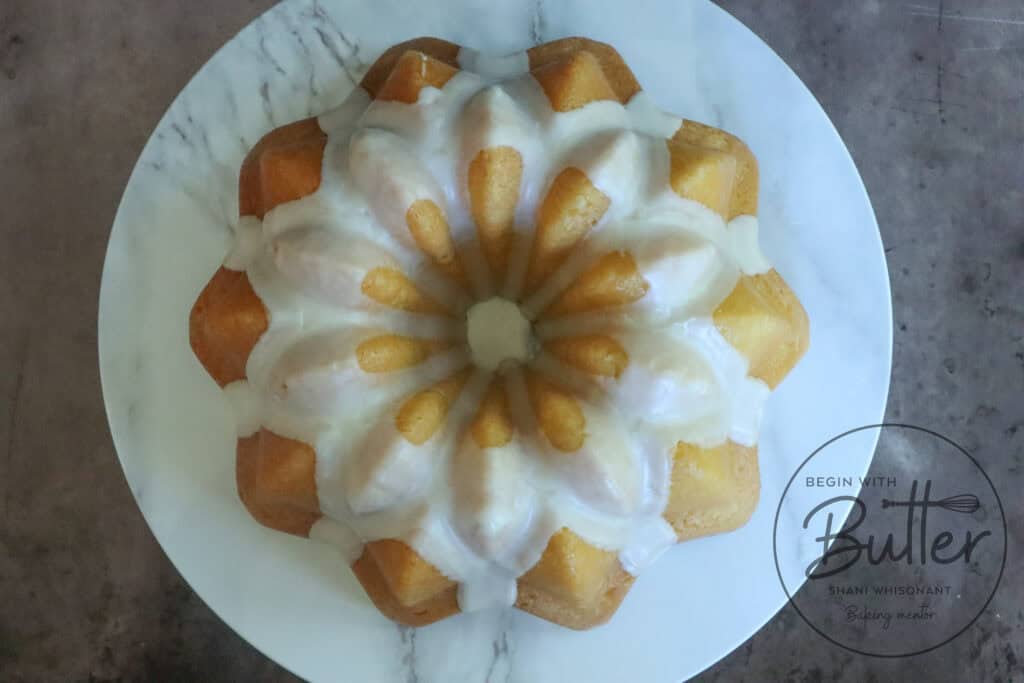
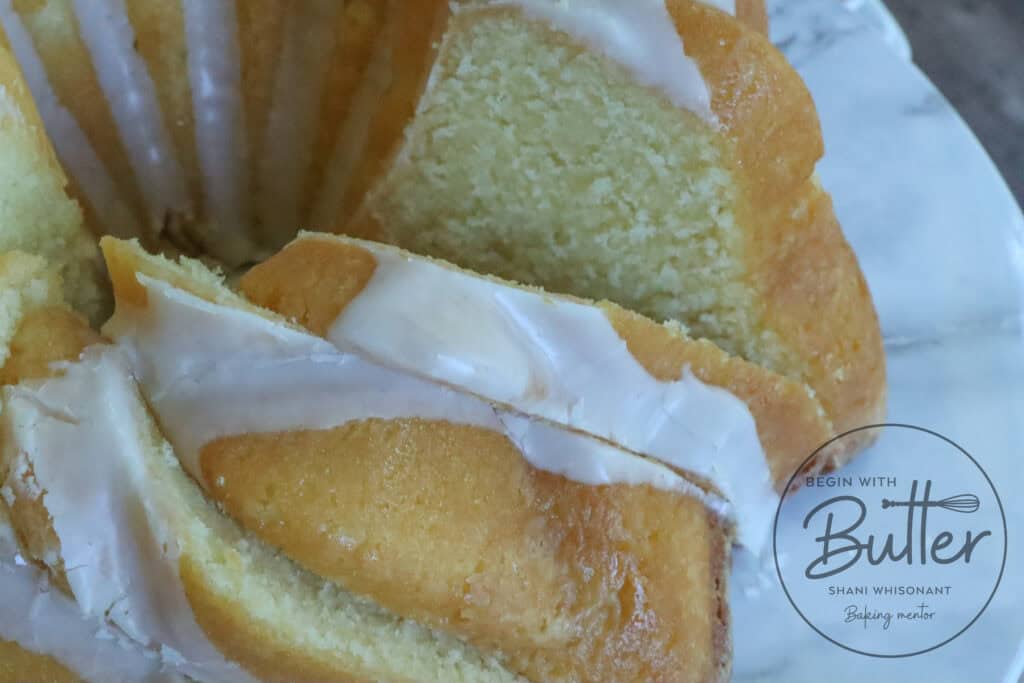
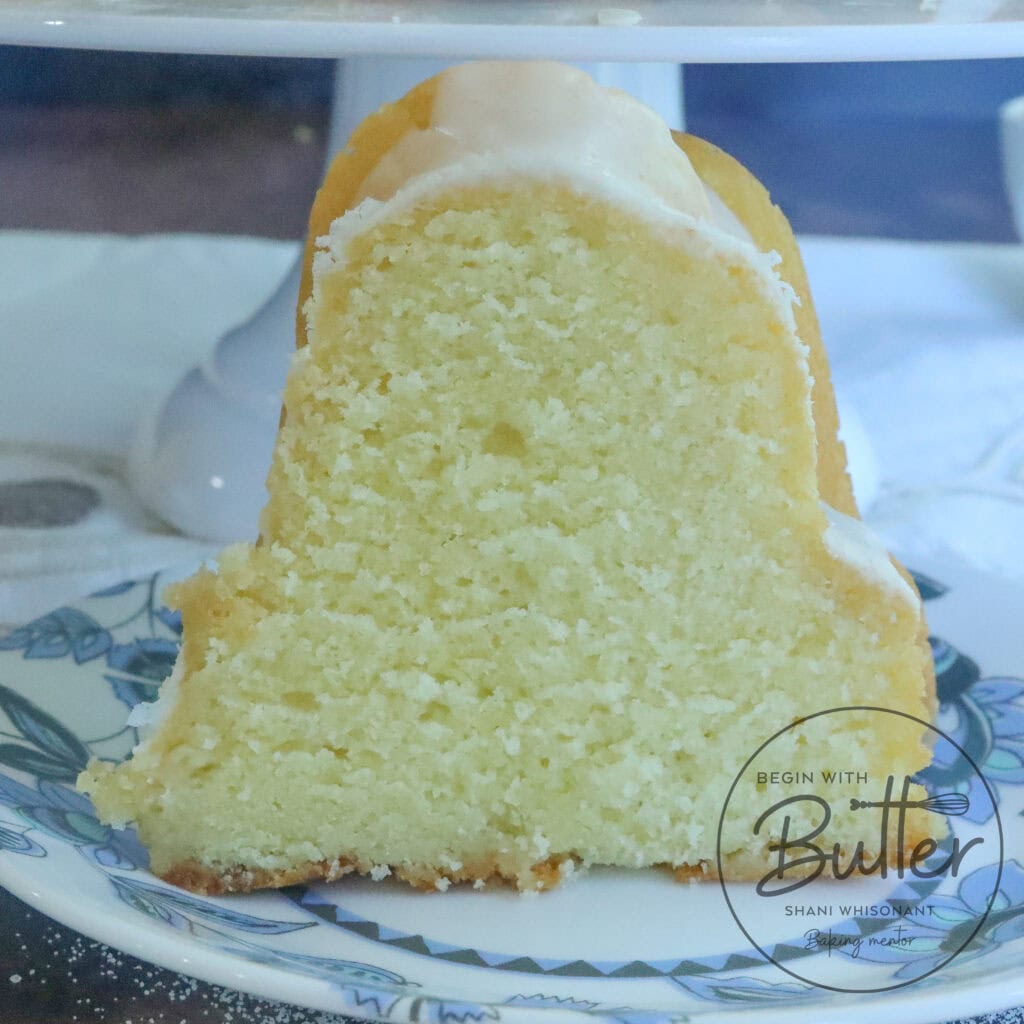
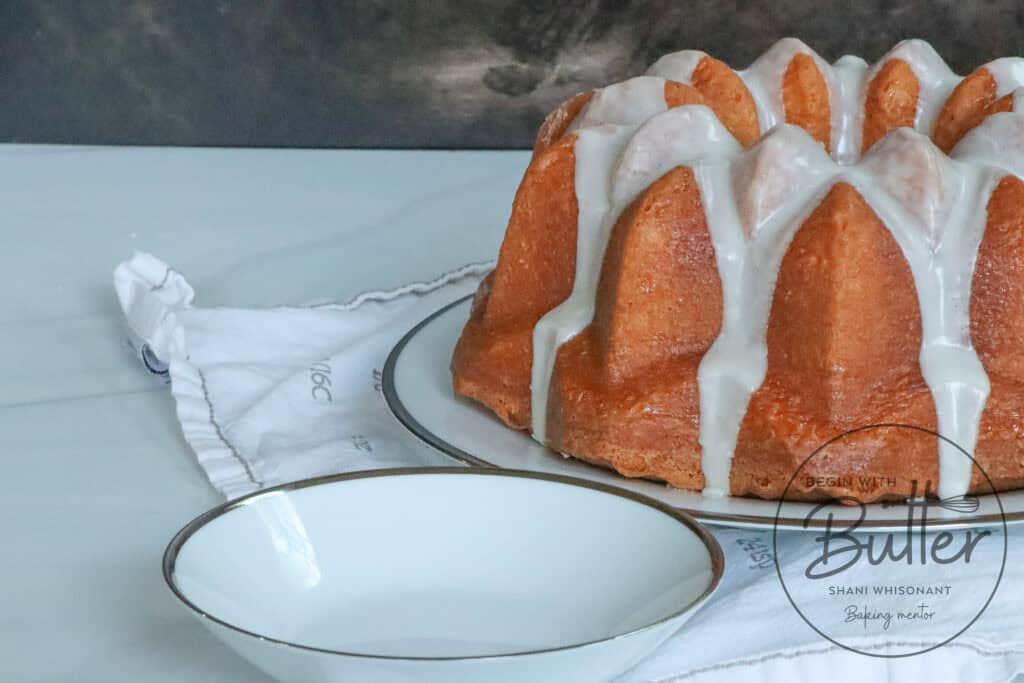
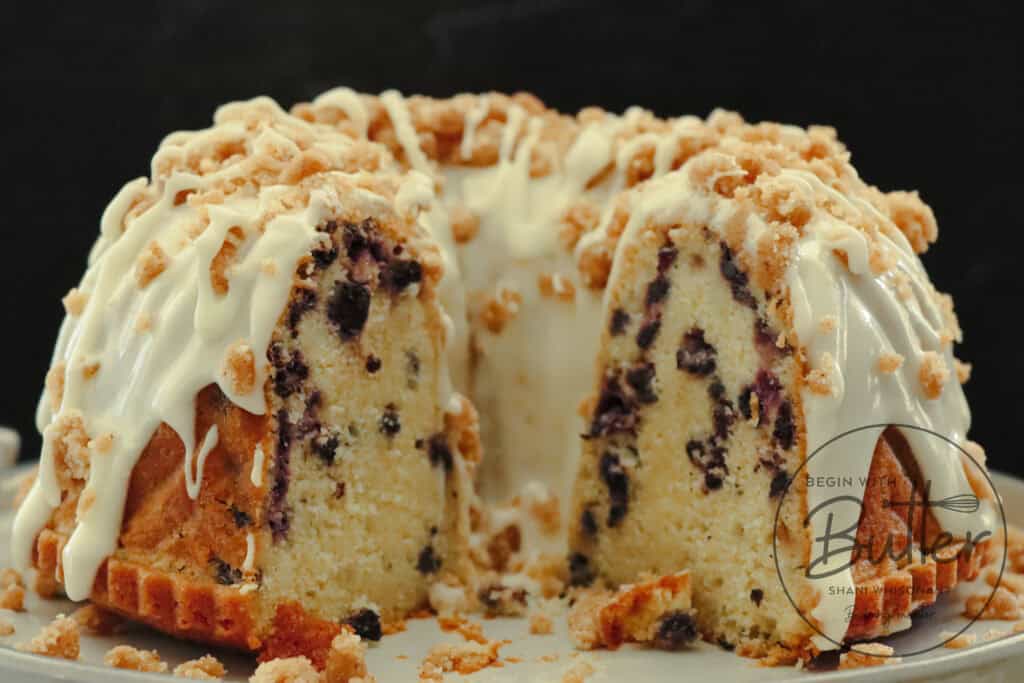
Not only is this Blueberry Buckle cake positively delicious, with all of the blueberry goodness inside, it is incredibly impressive when it’s cut.  Loads of bountiful blueberries dot the landscape of this cake, making it a treat to see and eat.  The wonderful texture, made even more special with a combination of unsalted butter and cream cheese, lends a melt-in-your-mouth goodness that complements the sweet *pops* of blueberry that punctuate every bite. To finish this delectable dessert, there’s a dreamy cream cheese glaze and cinnamon streusel topping that takes it to the next level.

Sounds incredible difficult, but it’s actually extremely easy to make this crazy impressive dessert.

Blueberry Buckle Pound Cake Ingredients

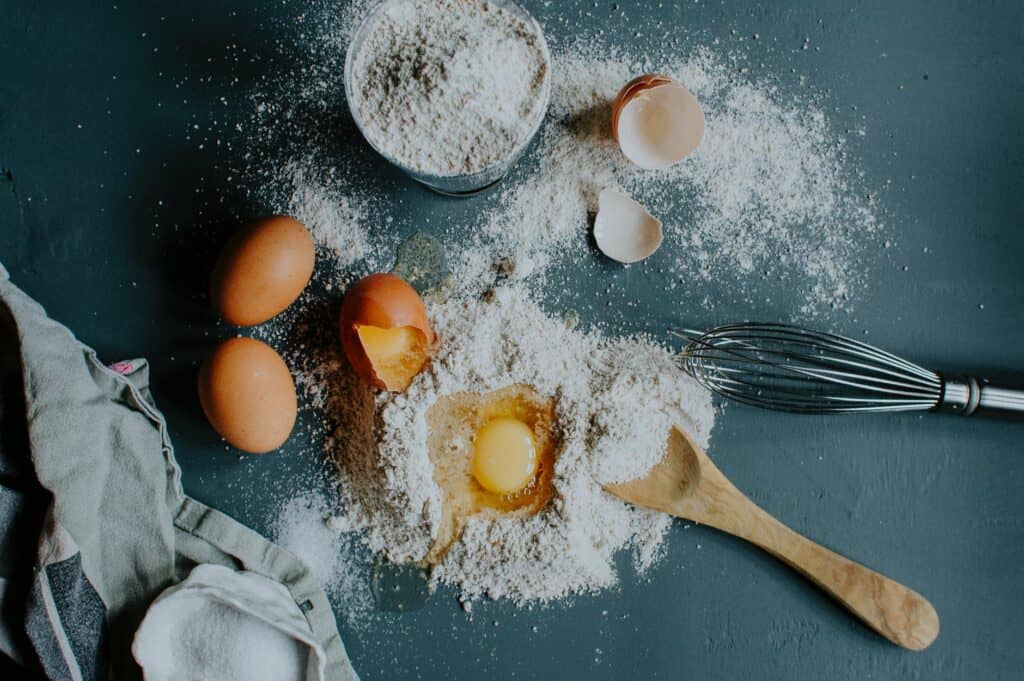
All Purpose Flour: I love the pleasantly plump texture of a good pound cake, and this Blueberry Buckle Pound Cake recipe is no different. That beautiful texture largely comes from a higher-protein all-purpose flour; combined with the baking soda and kosher salt, this flour mixture creates an utterly perfect Blueberry Buckle Cake. I find that lower-protein cake flour doesn’t give the same rise and texture to pound cakes, so that is why I don’t use it in mine. My favorite all-purpose flours for pound cakes are King Arthur Baking’s All-Purpose Flour and Bob’s Red Mill’s All-Purpose Flour.

Baking Soda: This Bluebery Buckle Pound Cake contains sour cream and blueberries, both of which are naturally acidic. The sour cream is acidic in nature, so baking soda is the proper leavening for this Blueberry Buckle Pound Cake.

Kosher Salt: Salt is very important in any dessert; it balances the sugar and keeps the dessert from becoming overly sweet. It doesn’t take a lot of salt to balance the sugar in a cake recipe, so measure this ingredient very carefully. If you’re using table salt or fine sea salt for this recipe, make sure cut the amount in half.

Unsalted Butter: As usual, butter has a staring role in this cake! It gives wonderful special flavor, and also the creaming process creates the absolutely necessary air pockets that help this cake to rise. Additionally, the fats in the butter are needed to tenderize the powerhouse protein molecules in your all-purpose flour and egg whites. This ingredient does a lot of work! Make sure that your butter is room temperature before you begin. I set my butter out for at least two hours before baking time. If you don’t have two hours, 10-20 minutes in your waistband or pocket (or, as my mother would say, in your bra over your heart) will do just fine.

Cream Cheese:  Listen…if you want luxury in a pound cake, a little cream cheese will get you there right quick.  There’s a very luxurious quality to this cake that makes it different from typical bluerry pound cakes. It’s because of the cream cheese! That additional fat element helps give your taste that melt-in-your-mouth quality without sacrificing wonderful flavor.

Granulated Sugar: The sugar in this recipe adds a nice sweetness to this cake, and it also helps with caramelization! That gorgeous crust on the outside of your cake is largely due to the granulated sugar in this Blueberry Buckle Pound Cake recipe!

Eggs: The protein in the eggs adds structure to the cake, while the fatty yolk adds delicious flavor. This recipe calls for six eggs, which might seem like a lot. Trust me, it’s perfection.

Pure Vanilla Extract: Pure vanilla extract gives this cake a beautiful warm flavor; vanilla is a natural complement to the sweet blueberries! Make sure to use the good stuff, like Nielsen-Massey, for this incredible recipe! Whatever brand you use, make sure you use pure vanilla extract.  If you want to use vanilla bean in this recipe, you’ll use the vanilla beans from a whole vanilla bean pod and combine it with the sugar before .  That lends beautiful flavor and a visual texture that is even more appealing!

Sour Cream: I love sour cream for this recipe. The signature tang of the sour cream plays off of the sweetness of the blueberries absolutely perfectly, and adds a special je ne sais quois that cannot be topped.  I love when people who taste my pound cakes cannot place what makes them so special.  Full-fat sour cream also tenderizes the proteins in the flour and egg whites beautifully, creating a gorgeous crumb.

Blueberries: The literal star of the show!  Blueberries dot the landscape of this incredible cake, and, considering there are 1.5 cups fresh blueberries in this cake, it’s no wonder that they’re so prominent!  This Blueberry Buckle recipe wouldn’t be half as good without all of these blueberries vying for position in this incredible sponge.

Beginners Start Here

If you’re new to baking, or if you want to learn how to do some of the more tricky baking techniques, here are a couple of super helpful articles from the BwB site that will help you get set up for success with this Blueberry Buckle Pound Cake.

These resources are super helpful to help you build consistency and confidence on your baking journey. Happy Reading!

Important Tools Used in this Blueberry Buckle Pound Cake

So happy to announce that Begin with Butter has its own Amazon Storefront, where you can find all of the amazing equipment that I used in this special cake! Want even more specific links? Check out the recommendations, below.

I do get paid a commission when you purchase, but these are the tools that I use all the time in my own kitchen.

If you have these tools already, great! Think of this as a checklist to help you build the confidence that you’ll need to execute this recipe!

Frequently Asked Questions About This Blueberry Buckle Pound Cake

How do you prevent blueberries from sinking to the bottom of the cake?

To keep blueberries from sinking, combine with them with two tablespoons of all purpose flour immediately before folding them into the batter.  The additional flour will ensure even distribution without allowing the blueberries to sink to one spot on your cake…the bottom. 

Why do you use baking soda instead of baking powder for this cake?

This is one of those science-y things that I consider every time I’m making a recipe, but since you asked…😊 

It’s all about balance.  🙏 

Baking soda is the leavening agent that we use when we have acidic ingredients in our cake.  The blueberries and sour cream in this cake make baking soda the right choice.  When combined with the acidic ingredients, the baking soda reacts chemically, releasing carbon dioxide that helps cake rise.

Don’t worry, the carbon dioxide evaporates in the oven.

Want to know more about this fascinating topic?  Lucky for you, I wrote a whole article about it!

What is Blueberry Buckle Cake? And how is this one different?

Blueberry buckle is traditionally a coffee cake, loaded with blueberries and topped with a cinnamon streusel.  I mean…YUM.  This pays homage to the classic blueberry buckles of my youth, while giving it a signature BwB turn in the pound cake spotlight.

It also has a cream cheese glaze for a little razzle dazzle, because there is literally not a bad time for a cream cheese glaze.

Why does this take longer to bake than other pound cakes?

The fresh fruit in this cake emits a lot of water as it bakes.  Blueberries are about 85% water, and some of that water leeches out into the batter during the bake.  That added moisture makes this cake take just a bit longer to bake than other pound cakes, but we’re talking single-digit-minutes, not 10-15 minutes more.

This Blueberry Buckle Pound Cake is going to be the talk of the summer holidays, BBs!  It’s so easy to make, and so gorgeous on the dessert table, that you’ll be tempted to make it over, and over, and over again! (Just don’t lick all of the batter off of the beater and bowl; get everything into that bundt pan so that you can bake it up beautifully!)

Enjoy!

Red Velvet Marble Cake

One of the reasons why this Red Velvet Marble Cake recipe took so long to come to the blog is that I was never happy with the different textures between the cakes. If the vanilla cake was perfect, then the chocolate cake was usually underdone. To get a perfectly fudgy, delicious chocolate cake, the vanilla cake would end up DRY.

This is a photo of a red velvet marble cake.

Because I was determined not to post an imperfect recipe on this site, I made this cake many, many times. I wanted to figure out the minutiae techniques that would yield the best results with this dual-textured cake.

And the secret is:

Your digital kitchen scale.

In this Post:

About this Red Velvet Marble Cake

To fix the problems that are attendant with marble cake, the digital kitchen scale is key. When everything is weighed with a digital kitchen scale (and you use metric measurement!), the result is an amazingly decadent, moist vanilla and red velvet marble cake.

Without a digital kitchen scale, there are a multitude of places where these cake batters could go south on you. The ingredient measurements for your dry mixtures and your milk mixture make a huge difference in your outcomes; if you have too much dry mixture in either of your cake batters, that cake will be dry and the other too moist. Too much liquid in one cake batter will yield the same result, causing one batter to flood and split and the other to be too dry.

This is a photo of a red velvet marble cake.

Done correctly, this cake is an utter scientific and gastronomic marvel. For this reason, I highly recommend avoiding the measuring cups and I strongly recommend using that digital kitchen scale. The results will be more than worth it!

Oh. And there will be lots of dishes. Like a lot a lot. But again, worth it.

Red Velvet Marble Cake Ingredients

All-Purpose Flour: I love the pleasantly plump texture of a good pound cake, and this Red Velvet Marble Cake recipe is no different. That beautiful texture largely comes from a higher-protein all-purpose flour. I find that lower-protein cake flour doesn’t give the same rise and texture to pound cakes, so that is why I don’t use it in mine. My favorite all-purpose flours for pound cakes are King Arthur Baking’s All-Purpose Flour and Bob’s Red Mill’s All-Purpose Flour.

Baking Soda: This Red Velvet Marble Cake contains whole milk and white vinegar, which together create buttermilk. The buttermilk is acidic in nature, so baking soda is the proper leavening for this Red Velvet Marble Pound Cake.

Kosher Salt: Salt is very important in any dessert; it balances the sugar and keeps the dessert from becoming overly sweet. It doesn’t take a lot of salt to balance the sugar in a cake recipe, so measure this ingredient very carefully. If you’re using table salt or fine sea salt for this recipe, make sure cut the amount in half. Also, please remember; the kosher salt is divided, so you’ll add half of your kosher salt to the first flour mixture, and the the other half to the flour/cocoa powder mixture. Again, the salt needs to be added to each mixture separately so that each cake will have the right amount of this necessary element.

This is a photo of a red velvet marble cake.

Cocoa Powder: Using natural cocoa powder is what gives red velvet marble cake its amazing flavor and signature color. It’s like adding a special ingredient that makes the cake taste extra chocolatey and delicious! Natural cocoa powder is the way to go for this recipe – it’s the secret to making your cake turn out just right.

Unsalted Butter: Once again, butter has a staring role in this cake! It gives wonderful special flavor, and also the creaming process creates the absolutely necessary air pockets that help this cake to rise. Additionally, the fats in the butter are needed to tenderize the powerhouse protein molecules in your flour and egg whites. This ingredient does a lot of work! Use good butter for this cake, and make sure that it’s room temperature before you begin. I set my butter out for at least two hours before baking time. If you don’t have two hours, 10-20 minutes in your waistband or pocket (or, as my mother would say, in your bra over your heart) will do just fine.

Neutral Vegetable Oil: Vegetable oil adds additional moisture to this cake. One tablespoon is more thanenough to make sure that this beautifully moist cake stays that way. I love avocado oil for baking, but any vegetable oil will do.

Granulated Sugar: The sugar in this recipe adds a nice sweetness to this cake, and it also helps with caramelization! That gorgeous crust on the outside of your cake is largely due to the granulated sugar in this Red Velvet Marble Cake recipe!

Eggs: The fatty yolks add flavor to this amazing cake, while the protein-rich egg whites assist with the texture and rise. Be sure to use large chicken eggs for the best results, and be sure that your eggs are room temperature before adding them to the batter.

Pure Vanilla Extract: Pure vanilla extract gives this cake a beautiful warm flavor. Make sure to use the good stuff, like Nielsen-Massey, for this incredible recipe! Whatever brand you use, make sure you use pure vanilla extract.

Whole Milk: Whole milk makes cakes more moist and tender, giving them an even more gorgeous texture. The milk also enhances the flavor of this cake, making it taste richer and more indulgent. Plus, whole milk helps create a beautiful golden-brown crust on the outside of the cake, making it look more appealing. By adding white vinegar to whole milk, you create a buttermilk substitute that combines the richness and creamy texture of whole milk with the tangy acidity of buttermilk, giving you the best of both worlds in one ingredient!

Vinegar: Adding white vinegar to whole milk creates a tangy and acidic mixture that’s essential for making the red velvet layer of this Red Velvet Marble Cake recipe. This homemade buttermilk adds a rich and creamy texture to the cake, and helps create the distinctive flavor that sets red velvet apart. The “buttermilk” is also perfect for the vanilla cake layer as well! With this simple trick, you can easily make the buttermilk you need to create a stunning and delicious red velvet marble cake with a beautiful swirl of red velvet and vanilla.

Red Food Coloring: Liquid red food coloring adds a vibrant and intense color to the red velvet portion of this marbled cake, creating a beautiful red hue that’s characteristic of traditional red velvet. Unlike gel food coloring, which can create a more subtle and pastel color, liquid food coloring produces a bright and bold color that really stands out against the accompanying vanilla cake. When you add liquid red food coloring to your cake batter, it distributes evenly and consistently, ensuring that every bite of your red velvet marble cake is a gorgeous red.

Beginners Start Here

If you’re new to baking, or if you want to learn how to do some of the more tricky baking techniques, here are a couple of super helpful articles from the BwB site (and a resource from the BwB Home Baking Academy!) that will help you get set up for success with this Red Velvet Marble Cake recipe.

These resources are extremely helpful to help you build consistency (and confidence) in your baking. Need more help? Feel free to send me an email at bakingbestie@beginwithbutter.com!

Important Tools Used in this Red Velvet Marble Cake Recipe

Below, you’ll find a list of tools that I used for this amazing cake. You can find all of these tools (and more!) in my Amazon Storefront!

This is a photo of a red velvet marble cake.

**I get paid a small commission if you purchase directly from my Amazon Storefront, but these are truly amazing products that you’ll find in my kitchen.**

When you’re ready to test the doneness of your Red Velvet Marble Cake, I highly recommend using an instant-read thermometer instead of a toothpick. While a toothpick can give you a *very general* sense of the cake’s doneness, an instant-read thermometer provides a precise measurement of the internal temperature at the specific point of the bake. For this recipe, you’ll want to aim for an internal temperature of 212°F, to ensure that both the vanilla and red velvet layers are perfectly baked. Using an instant-read thermometer helps avoid overbaking or underbaking, resulting in a flawlessly moist and tender cake. It’s a small but hugely impactful technique that can make a big difference in the final outcome of your delicious marble cake.

This cake requires a little more attention, but you will be rewarded for your efforts! Following the instructions (and using a digital kitchen scale) will help you make the absolute best marble cake of your life. Happy baking BB!

I hope you love this cake! Enjoy and make sure to tag @beginwithbutter on Instagram when you make it!

Last-Minute Cookout Desserts

0

And, bonus, you won’t have to spend a ton of time making these desserts. These easy additions will give you more time to lay out your clothes for the important early season cookouts (because first summer impressions matter), and will allow you to take center stage in the dessert display.

Just channel my Mommy when you place it on the table and be as dramatic as possible. 😂 The OG wrist flourish as you remove the top is still an effective move. (Don’t ask me how I know this.)

Onto the recipes!

My dear B(aking) B(estie), I promised quick and impressive for these last-minute cookout desserts, and it’s my hope that you find one (or fifteen) dishes on this list that will have the honor of gracing your summer tables.

Happy baking, BB! Don’t forget to follow Begin with Butter on Instagram and subscribe to the Begin with Butter YouTube channel to get the absolute most out of your BwB experience!

Vanilla Pound Cake

How do I know that it can come together that quickly? Because that’s exactly how it came together in the Whisonant House.

Picture it: Spring 2024. Sunday dinner plan is 🤌🏾. The plan is a family favorite: chicken parmesan and caesar salad. The Instacart order is done. It’s 2:00 in the afternoon, and you’ve *just* gotten to sit down to a lively game of Mario Kart with your kids. Life is good.

Until you remember that you promised a vanilla pound cake to your Vanilla Cake-loving son to accompany his meal. 😑

So you use pantry staples, put the butter in your bra strap like your mama told you to do, and pull something together as quickly as you possibly can. And he LOVES it and asks for it over, and over, and over again. So you make it over, and over, and over again. 😊 And you realize that your dearest readers might like the recipe too.

That, Friends, is the frenetic story of how this Vanilla Pound Cake came to be. 😂

This is an overhead photo of a Vanilla Pound Cake

About this Vanilla Pound Cake

This Vanilla Pound Cake maximizes speed, efficiency, and knock-it-out-of-the-park taste and texture. Every scientific element of every ingredient is working at maximum capacity in order to get the gorgeous flavor, texture, and caramelization that we love in our Vanilla pound cakes.

But you don’t have to think about all that. You just need to gather your pantry staples and prepare to knock everybody’s socks off.

This is a photo of a sliced Vanilla Pound Cake

Vanilla Pound Cake Ingredients

All-Purpose Flour: I love the pleasantly plump texture of a good pound cake, and this Vanilla Pound Cake is no different. That beautiful texture largely comes from a higher-protein all-purpose flour. I find that lower-protein cake flour doesn’t give the same rise and texture to pound cakes, so that is why I don’t use it in mine. My favorite all-purpose flours for pound cakes are King Arthur Baking’s All-Purpose Flour and Bob’s Red Mill’s All-Purpose Flour.

Baking Soda: This Vanilla Pound Cake contains buttermilk, which has active cultures added to give it its signature tangy flavor and texture. These active cultures transform the milk into a beautifully acidic component, so baking soda is the proper leavening for this Vanilla Pound Cake.

Kosher Salt: Salt is very important in any dessert; it balances the sugar and keeps the dessert from becoming overly sweet. It doesn’t take a lot of salt to balance the sugar in a cake recipe, so measure this ingredient very carefully. If you’re using table salt or fine sea salt for this recipe, make sure cut the amount in half.

Unsalted Butter: Butter has a staring role in this cake! It gives wonderful special flavor, and also the creaming process creates the absolutely necessary air pockets that help this cake to rise. Additionally, the fats in the butter are needed to tenderize the powerhouse protein molecules in your flour and egg whites. This ingredient does a lot of work! Use good butter for this cake, and make sure that it’s room temperature before you begin. I set my butter out for at least two hours before baking time. If you don’t have two hours, 10-20 minutes in your waistband or pocket (or, as my mother would say, in your bra over your heart) will do just fine.

Granulated Sugar: The sugar in this recipe adds a nice sweetness to this cake, and it also helps with caramelization! That gorgeous crust on the outside of your cake is largely due to the granulated sugar in this Vanilla Pound Cake recipe!

Eggs: The fatty yolks add flavor to this amazing cake, while the protein-rich egg whites assist with the texture and rise. Be sure to use large chicken eggs for the best results.

Vanilla Extract: This cake calls for a tablespoon of vanilla extract. Vanilla gives this cake a beautiful warm flavor. Make sure to use the good stuff, like Nielsen-Massey, for this incredible recipe! Whatever brand you use, make sure you use pure vanilla extract. If you’d prefer to use vanilla beans instead, you should try my Very Vanilla Pound Cake!

Buttermilk: I love buttermilk for this recipe. Particularly because, if you don’t have buttermilk, you can use 250 g (1 c) of whole milk and a tablespoon of vinegar (white vinegar or apple cider vinegar both do an admirable job). You’ll get great results.

This cake tastes too good to be this easy. Yet easy it is. ❤️ So, prep your mise en place and let’s get to work!

This is a photo of a slice of Vanilla Pound Cake

Beginners Start Here

If you’re new to baking, or if you want to learn how to do some of the more tricky baking techniques, here are a couple of super helpful articles from the BwB site (and a resource from the BwB Home Baking Academy!) that will help you get set up for success with this Vanilla Pound Cake.

These resources are extremely helpful to help you build consistency (and confidence) in your baking. Need more help? Feel free to send me an email at bakingbestie@beginwithbutter.com!

Important Tools Used in this Vanilla Pound Cake

Below, you’ll find a list of tools that I used for this amazing cake. You can find all of these tools (and more!) in my Amazon Storefront!

**I get paid a small commission if you purchase directly from my Amazon Storefront, but these are truly amazing products that you’ll find in my kitchen.**

This cake has already become a family favorite. For me, it’s because the ease with which it comes together and the warm vanilla flavor that seemingly happen instantly. That, coupled with the sheer ease of this cake, make it perfect as a base for ice cream or trifle, or a strong standout on its own.

I hope you love this cake! Enjoy and make sure to tag @beginwithbutter on Instagram when you make it!

Sifting: Quick Technique. Huge Impact.

0

Sifting? Really?

Yes! Sifting flour may seem like an extra step in the baking process, but it can actually make a huge difference in the end result of your baked goods. Here’s why:

  • Sifting helps break up any lumps or clumps in flour, ensuring that it is evenly distributed and incorporated into your batter or dough.
  • It aerates the flour, giving your baked goods a much lighter, melt-in-your-mouth texture.

In our too-rushed world, it’s easy to skip over the allegedly “old-school steps” because we think they’re outdated and have no place in the modern kitchen. But trust me, taking a minute to sift your flour can transform your baked goodies from the ones with several pieces left after a function (womp womp…) to the ones that people call dibs on, even before they’re served.

If it ain’t broke…

flour and broken eggs on table before dough kneading
Photo by Flora Westbrook on Pexels.com

A Quick Look Back

Back in the day, sifting wasn’t just about getting air into your flour for baking; it played a crucial role in ensuring that certain elements, such as bugs (🤢) or other unwanted bits, were removed from the flour before it was used in baking.

However, beyond this very practical purpose, bakers stumbled upon an interesting revelation while sifting – the process of sifting made the flour lighter. This lighter flour, in turn, contributed to the creation of softer and airier baked goods, enhancing the overall texture and quality of the final products (cue happy dramatic music here). It’s fascinating how a simple act of sifting, initially used to clean flour, inadvertently led to a delightful outcome that bakers and consumers alike appreciate to this day.

What Sifting Really Does

Sifting is one of the secret sauces of baking:

  • Light and Fluffy Bakes: That air you add? It expands when it heats up, giving you that oh-so-good airy texture. Think…Limoncello Layer Cake or even Very Vanilla Pound Cake!
  • Mix Like a Pro: Sifting helps mix your dry ingredients evenly, so every bite is just right.
  • No More Clumps: Want your cakes to be smooth and perfect? Sifting is the answer to avoiding those unwanted dense spots and clumps of dry product in your cakes and cookies.

Ingredients That Demand Sifting

Now that we’re on the subject of making our bakes lighter and better, some ingredients are just begging to be sifted. Take cocoa powder and bleached flours, for example. Cocoa powder, because of its fine and dense nature, tends to clump up like it’s holding onto secret baking grudges! And as for bleached flours, their processing makes them more compact and prone to sticking together.

**Want to learn more about the Five Flours that I Keep Handy in My Kitchen? Click here!

Cocoa Powder Clumps: The Culprit of Uneven Chocolate Goodness

When you skip sifting cocoa powder, those stubborn clumps can sail right through your batter, leaving you with uneven chocolate flavor in your bakes. Imagine biting into a cake expecting a smooth, rich chocolatey experience, only to find a lump of unsweetened cocoa powder. This is…not a surprise that anyone wants.

Bleached Flours and Their Sticky Situations

Bleached flours, light and fine as they are post-processing, tend to compress in storage. Failing to sift these guys can lead to dense, unappealing spots in your bakes—like finding tiny flour islands in your sea of cake. We’re aiming for melt-in-your-mouth textures, not a treasure hunt in your dessert!

My Go-To Method

Here’s a little tip from me to you: always measure your flour first, then sift. Why? Because sifting fluffs up the flour, and if you sift first, you might end up with less than you need.

Also, I sift just before adding my dry ingredients to my mixture. I want to take full advantage of all of the air that I’ve pumped into that flour mix!

Tools of the Trade

While there’s something charming about those hand-crank sifters, I’m all about using a fine mesh strainer. It gets the job done and can be used for a number of baking tasks.

  • Want the fine mesh strainer set that I love? Try this set from OXO!
  • I love a good old-fashioned hand crank like my Mommy had. This one satisfies my nostalgic side when I’m wanting to feel close to her in my baking kitchen.

These inexpensive tools make a huge difference in your baking. While I do get a small commission if you purchase either of these products, I truly believe in them for home bakers.

The Bottom Line

Skipping the sift often leads directly to uneven mixes and also to clumps in your finished baked goods. Clumps mean that your treats might not only look less appealing, but they could have inconsistent textures and flavors and fail to reach their full rising potential. The moral of the story? Sift, sift, and sift some more! It’s a simple step that ensures every bite is as perfect as the last.

Bringing sifting back into your baking isn’t just about following a step in a recipe; it’s about connecting with a practice our mamas and grandmamas did when creating those special family recipes that we know and love. It’s the difference between baking something good and creating something extraordinary.

Happy baking, friends! And remember, it’s all about enjoying the ride – and the delicious results. 🍞🎂🥐