Tropical Cake with Mango Ginger Glaze

About this Tropical Cake with Mango Ginger Glaze

This cake is banana trees and mango trees and pineapple shrubs, wrapped up in love and presented to your friends and family. This cake developed one fine day as I was sitting during my assigned “stare out the window” time, when I was positively transported back to a special birthday trip to St. Lucia. It was there that I experienced the most gorgeous and flavorful bananas and mango I’d ever had in my life to that point.

When I was transported back to that place from my makeshift kitchen office, I could feel the ocean air on my skin. I could see the banana trees everywhere as we traveled all over the island (there’s a story about a taxi day that gives my hubby heartburn to this day 😂).

This, Friends, is the love offering that I have for you, from my travels and my heart to yours.

Tropical Cake Ingredients

All-Purpose Flour: I love the pleasantly plump texture of a good pound cake, and this Tropical Cake is no different. That beautiful texture largely comes from all-purpose flour. I find that cake flour doesn’t give the same rise and texture to pound cakes, so that is why I don’t use it in mine. Additionally, this Tropical Cake contains has a LOT of moisture (3 cups total!) so flours with lower protein content (e.g. cake flour, White Lilly Flour) won’t be able to support it and will likely end up too dense.

Baking Soda: This cake contains pineapple as one of the components for its liquid. Because pineapple tips the acidity scale, baking soda is the proper leavening for this pound cake. Bananas and mangoes are also mildly acidic, which also makes baking soda the right choice.

Kosher Salt: Salt is very important in any dessert; it balances the sugar and keeps the dessert from becoming cloyingly sweet. It doesn’t take a lot of salt to balance the sugar in a cake recipe, so measure carefully. If you’re using table salt for this recipe, cut the amount in half. Kosher salt also balances all of the naturally occurring sugars from the fruit, so you’re left with a positively perfect balance of sweetness and warmth.

This is a picture of a Tropical Cake with Mango Ginger Glaze.

Ginger: Ginger adds a beautiful, warm element to this wonderful cake. It’s the perfect compliment to the pineapple, mango and ginger, and it is the perfect element to marry those flavors into a tropical combination. The ginger might *seem* like it’s a lot, but it’s truly the perfect amount!

Allspice: Allspice is a super agent in the spice world. It’s a berry that has elements of black pepper, nutmeg, clove, and cinnamon. It’s a big job and that lil’ allspice is up to the task. Allspice is common in Caribbean cooking, and it is a perfect complement to the big fruit flavors in this cake.

Unsalted Butter: Butter is a star in this cake! It adds special flavor, and also the creaming process creates the absolutely necessary air pockets that help this cake to rise into the special Tropical Cake of your dreams! Use good butter for this cake, and make sure that it’s room temperature before you begin. I set my butter out for about two hours before baking time.

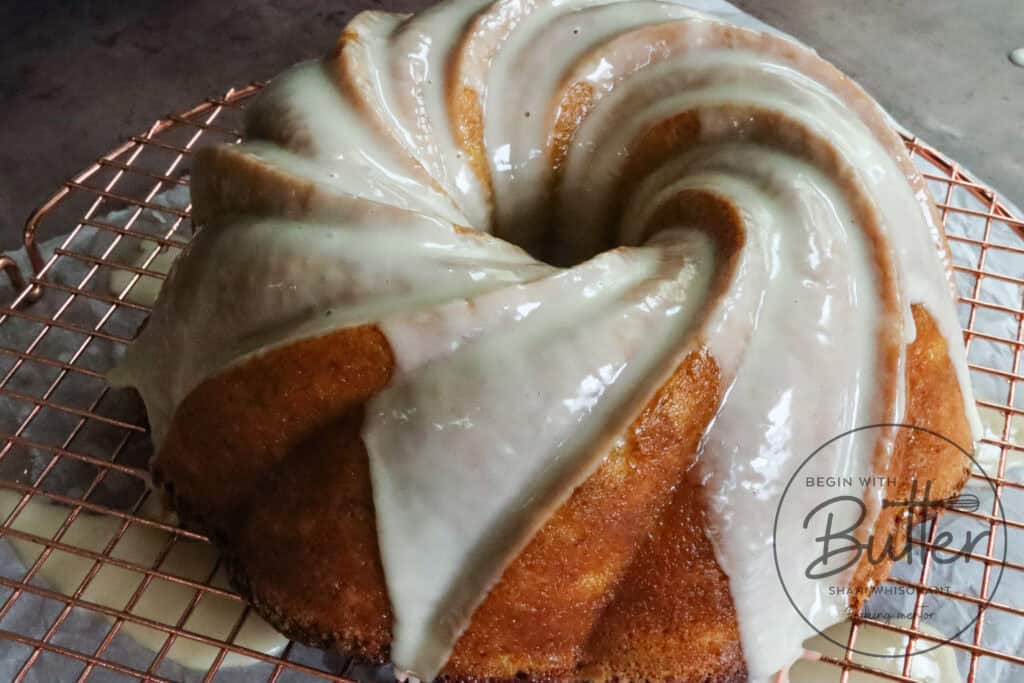
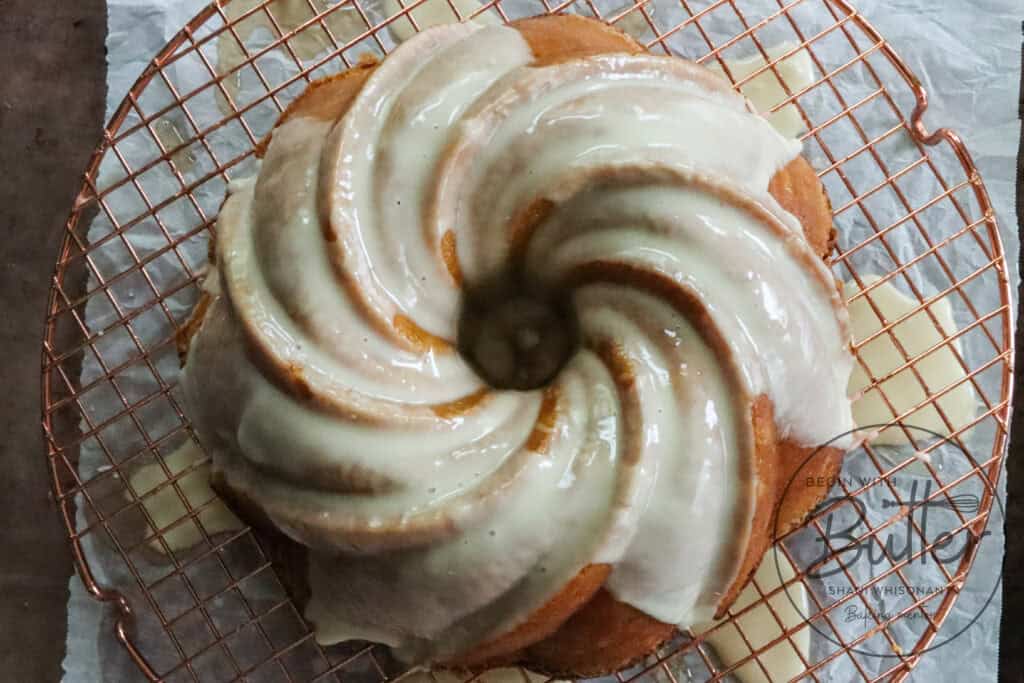
Granulated Sugar: While the natural sugar from the fruit does an admirable job of sweetening this cake, that sugar is offset by the water content of those fruits. For that reason, granulated sugar comes in and adds a nice sweetness to this cake, and it also helps with caramelization! That gorgeous crust on the outside of your cake is largely due to the sugars in this recipe!

Vanilla Bean Pod: The mighty vanilla bean pod does so much in this cake. It truly plays above its weight and adds beautiful warmth and vanilla flavor. If you’re substituting vanilla extract, use two teaspoons. You won’t get the full vanilla flavor that I intended with this recipe, it it will still be over-the-top amazing.

Eggs: The fatty yolks add flavor to this amazing, while the protein-rich egg whites assist with the texture and rise. Be sure to use large chicken eggs for the best results.

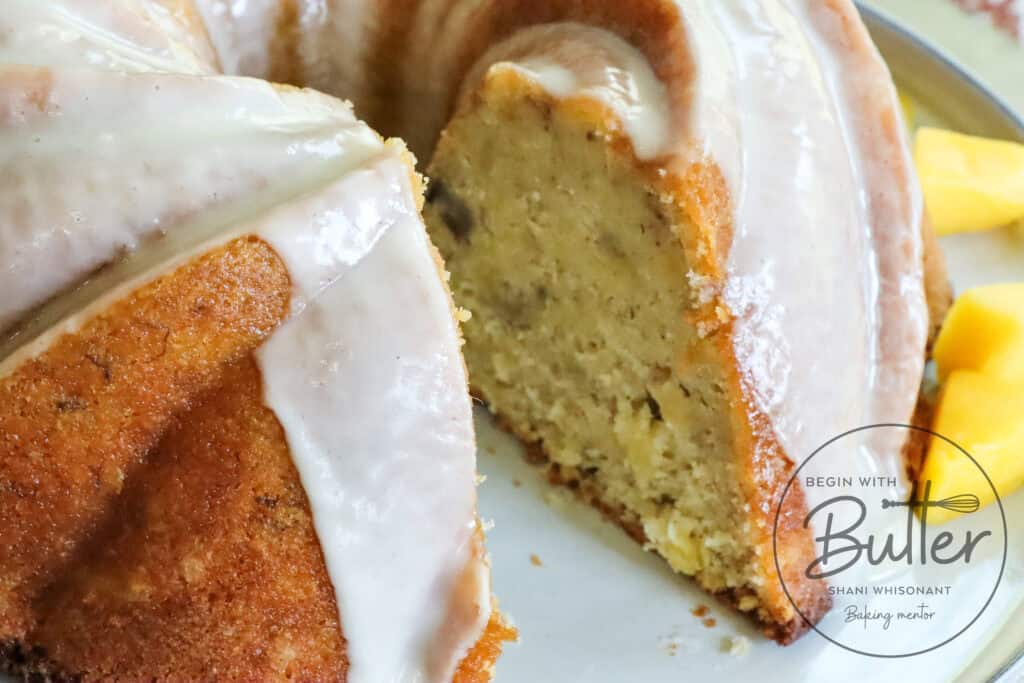
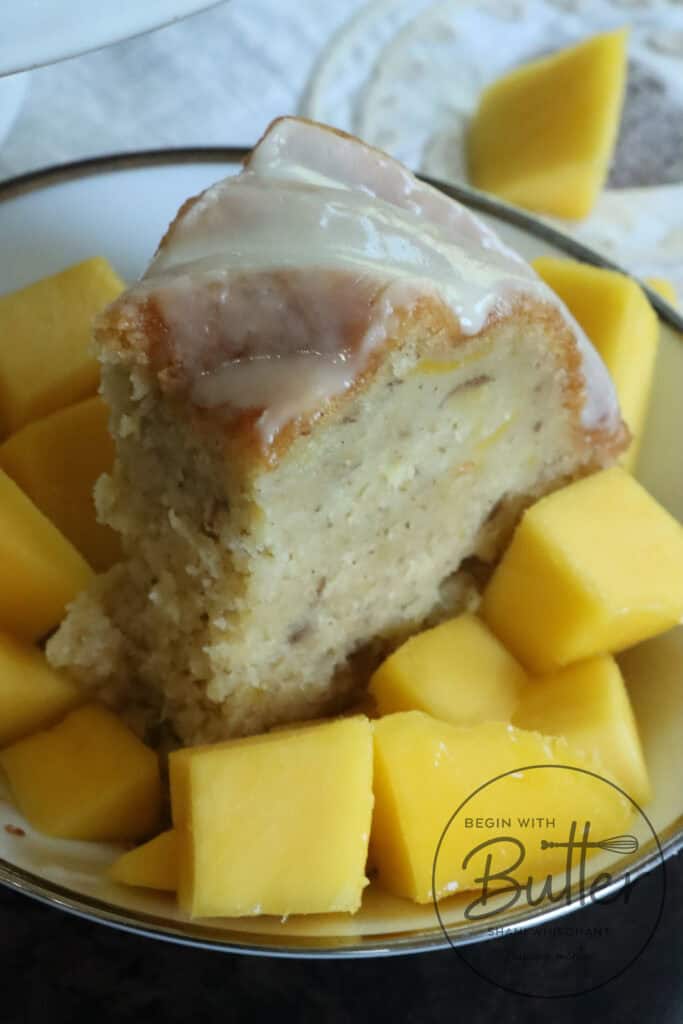
Crushed Pineapple: Use the juice and the pineapple for this cake! The sweet-tart flavor is truly an excellent addition. Once you have what you need for the cake, you can reserve some of the juice for the pineapple glaze, if you’re electing to do pineapple instead of mango glaze.

Mashed Banana: Ripe, mashed banana is a must have for this incredible cake. If you don’t have ripe bananas on hand, put some yellow bananas on a parchment-lined sheet pan and cook at 325°F for 30-40 minutes. Let them cool and voilà! Perfectly textured and sweet bananas for mashing. For this recipe, you’ll need two large or 3 medium bananas.

Canned Mango: Friends, you can use a ripe mango from your fridge if you’d like for this recipe, BUT you won’t get the mango juice that is the absolute star of the show in that mango glaze. (Of course, you can purchase it separately though!). I love canned mango that I can then mash up easily with a fork and mix with the pineapple and banana for the liquid in this cake. It’s just…bliss.

Once you’ve done your mise en place, this cake is deceptively simple to put together!

This is a picture of a Tropical Cake with Mango Ginger Glaze.

Beginners Start Here

If you’re new to baking, or if you want to learn how to do some of the more tricky baking techniques, here are a couple of super helpful articles from the BwB site (and a resource from the BwB Home Baking Academy!) that will help you get set up for success with this Tropical Cake.

These resources are extremely helpful to help you build consistency (and confidence) in your baking. Need more help? Feel free to send me an email at bakingbestie@beginwithbutter.com!

Important Tools Used in this Tropical Cake with Mango Ginger Glaze

Below, you’ll find a list of tools that I used for this amazing cake. You can find all of these tools (and more!) in my Amazon Storefront!

**I get paid a small commission if you purchase directly from my Amazon Storefront, but these are truly amazing products that you’ll find in my kitchen.**

This cake takes me to one of my favorite regions in the whole wide world. It’s perfect for any season and accessible to any level of baker. And it is impressive, friends. It will be the talk of your next function. And in the absolute best way possible.

I hope you love this cake! Enjoy and make sure to tag @beginwithbutter on Instagram when you make it!

Classic Recipes for Easter

0

Whether you’re an experienced baker or just starting, we’ve got something to light up your Easter table. And remember, we adore seeing your own twists on these classics, so don’t hesitate to share your Easter recipes and traditions in the comments section, and join our vibrant email community while you’re here.

Here’s our lovingly curated list of top BwB Easter recipes—with a little surprise at the end!

With these delectable recipes at your fingertips, you’re all set to stun your awestruck Easter guests! Whether you make one recipe or all ten, this will truly be a holiday to remember.

Which recipe will grace your table first this Easter? Share your stories, family traditions, and your take on these tantalizing treats in the comments below. Your blend of nostalgia and the joy of baking creates the sweetest concoction.Happy Baking, Happy Easter, and Happy Spring! 🌷🍰

Have questions about any of the recipes? Can’t figure out which one to make first (or whether to just go ahead and make all of them)? Reach out to us at bakingbestie@beginwithbutter.com! We are happy to help!

I hope this helps take some of the stress out of prepping for this tremendous holiday. Happy baking BBs! And Happy Easter!

42 Must-Make Ideas for Valentine’s Day

0

Hi Friends! Love is in the air and romance is on the horizon this Valentine’s Day! To make this special occasion even more delightful, my amazing friends Britney (from Britney Breaks Bread), Cheryl (from Bakes by Brown Sugar), Anina Belle (from Le Chef’s Wife), and I (your humble leader right here at Begin with Butter) have collaborated to bring you an abundance of incredible recipes: our 42 Must-Make Ideas for Valentine’s Day!

Are you in need of an appetizer? Look no further! Craving something deliciously savory to pamper your sweetheart? My talented friends have got you covered with can’t-miss appetizers and main courses. From mouthwatering appetizers to an exquisite cheese course, and even a delightful coffee-infused dessert, we have meticulously planned your entire Valentine’s meal.

Let’s embark on this culinary adventure together and indulge in pure deliciousness!

With love and culinary delights,

Shani, Britney, Cheryl and Anina Belle

Appetizers

Soups

Bread

Main Courses

Cheese Course

Dessert & Cocktails

From all of us to all of you, we hope you have an amazing Valentine’s Day celebration with your loved ones!

ABOUT THE AUTHORS

BRITNEY BROWN- CHAMBERLAIN

Britney Breaks Bread began with a passion for food, love of family, and the yearning to create fun and flavorful recipes for everyone to enjoy! I am also an avid traveler and draw inspiration from the foods I’ve eaten all across the world in my own kitchen. My mission is to bring approachable, impressive, and delicious recipes to the dinner table, no matter how experienced the cook!

Since I began my blog in October 2019, I have worked with brands such as Food52, Duluth Trading Company, Sur La Table, and have been featured in The Washington Post, The Pioneer Woman, Buzzfeed and many more!

CHERYL NORRIS

Cheryl Norris

Hello Everyone!  My name is Cheryl and I’m the owner and creator of the food blog, Bakes by Brown Sugar.  I being this blog out my passion and love for baking and my desire to share recipes with others.  My goal is to educate and inspire you with beautiful and tasty baking recipes and to make sure you’re successful in the kitchen.  You’ll find everything from a simple buttery shortbread cookie to a beautiful orange tart.

If you like what you see in this recipe roundup please subscribe to Bakes by Brown Sugar Baking Newsletter to get free and delicious treats delivered to your inbox.  And connect with me on Instagram and tag me @bakesbybrownsugar to share your recipe remake photos.

SHANI WHISONANT

Shani Whisonant

Hello My Friends!  My name is Shani, and I’m the Chief Butter Ambassador and Owner at Begin with Butter and the Begin with Butter Home Baking Academy.  It’s my mission to help people become better bakers, whether they’re making one of my recipes or one of the recipes of my esteemed friends!  To that end, I’ve created the Begin with Butter Home Baking Academy, where you can learn baking techniques that will help you become a better, more confident baker and have an amazing time!  There’s also tons of free content right here on my blog, beginwithbutter.com.  Feel free to get cozy with a cup of tea and check it out!

My absolute favorite social circle is on Instagram, but you can find me on YouTube and Facebook as well!

ANINA BELLE GIANNINI

Bonjour! I am Anina Belle. I translate the fancy cooking of my Michelin-star trained French Chef Husband, Le Chef, into easy to make dishes that busy people with no culinary training (like me!) can make at home. We have two young kids (5 and 2) and I have a full time job in hospitality in addition to this blog. I strongly believe that busy people deserve to eat well at home.
I share our French home cooking on Instagrampinterest and tiktok. Sign up for my newsletter to be the first to receive my new recipes and have advance access to cooking classes. I look forward to cooking with you!

Biscoff Cake

My dear friends, there is a cookie that has taken both the internet and the skies by storm. If you have ever traveled internationally (or even on occasion domestically-I’m looking at you Delta!😍), you are surely familiar with what I am about to describe: the unparalleled Biscoff Cookie. And, naturally, it was an absolute must for me to create a Biscoff Cake worthy of its legendary reputation – a pound cake that lives up to its illustrious name.

This is a photo of a Biscoff cake.

Behold…the one. This pound cake embodies the exquisite flavor of the legendary Biscoff cookie, coupled with the unmistakable texture that defines my special cakes. It truly is a harmonious fusion, and now, the recipe is yours.

About this Biscoff Cake

The Biscoff Cake is an exquisite pound cake dessert that delights with its rich, buttery base and distinctive spiced caramel flavor. Each slice is dense yet tender, infused with the deep sweetness of Biscoff cookies. The crowning glory of this cake is the crumbled Biscoff texture on top — a crunchy contrast to the moist crumb beneath, offering a satisfying bite that echoes the nostalgic taste of Lotus Biscoff biscuits in each decadent forkful.

Not only does this cake excel on its own, but it is also accompanied by a delectable Biscoff glaze. For those craving the unrivaled allure of the buttery and subtly spiced Biscoff cookie, this cake version is everything you desire and beyond.

Biscoff Pound Cake Ingredients

All-Purpose Flour: I love the pleasantly plump texture of a good pound cake, and the Biscoff Cake is no different. That beautiful texture largely comes from all-purpose flour. I find that cake flour doesn’t give the same rise and texture to pound cakes, so that is why I don’t use it in mine.

Baking Soda: This cake uses buttermilk for the liquid component. Because buttermilk is naturally acidic, baking soda is the proper leavening for this pound cake.

Kosher Salt: Salt is very important in any dessert; it balances the sugar and keeps the dessert from becoming cloyingly sweet. It doesn’t take a lot of salt to balance the sugar in a cake recipe, so measure carefully. If you’re using table salt for this recipe, cut the amount in half.

Unsalted Butter: This particular cake has an amazing balance of sweet and savory, and it really needs salt to balance the whole thing. That being said, it’s important to really control the amount of salt in this recipe, since the salt can quickly overwhelm the other flavors. That’s why I recommend using unsalted butter for this recipe. Also, butter helps this cake become lighter! Specifically, the process of creaming butter and sugar creates air pockets that assist with cake rise.

Biscoff Cookie Butter: You can’t have that distinctive flavor without Biscoff! I used Biscoff cookie butter for this recipe, to give it a fully authentic flavor and texture.

Vegetable Oil: Vegetable oil adds additional moisture to this cake. Two tablespoons is plenty to make sure that this dense, moist cake stays that way.

Eggs: Eggs add structure and texture to any baked good, including this cake. They also act as a binding agent, helping all of the ingredients come together. Make sure your eggs are at room temperature before adding them to the batter.

Granulated Sugar: The sugar, of course, adds sweetness to the cake. Additionally, granulated sugar is also responsible for caramelization! That beautiful crust on the outside of your pound cake? It is largely because of the sugar in your recipe!

Vanilla Bean: I think it’s the worst kept secret ever that I am obsessed with whole vanilla beans right now. The taste is unparalleled in baked goods, and who doesn’t like seeing those cute, tiny flecks of vanilla bean in their baked goods? In this recipe, you’ll use the vanilla beans and also the vanilla bean pod, to maximize the wonderful flavor that it provides.

Buttermilk: I love buttermilk for this recipe. The signature tang of the buttermilk complements the Biscoff taste perfectly, and adds a special je ne sais quois that cannot be topped.

Let’s Talk About This Biscoff-Infused Milk

The recipe for this amazing cake calls for you to make a Biscoff-infused milk. You have two options (a “Choose Your Own Adventure”, as it were): you can use it for the glaze and use 250 g of the Biscoff-infused milk in the cake batter itself (instead of the 250 g of buttermilk), or you can use buttermilk for the cake batter, and then use the Biscoff-infused milk for the glaze.

My husband and his cohorts report that the Biscoff-infused milk is great for sipping alongside the actual cake. I cannot confirm this finding. 😂

Beginners Start Here

If you’re new to baking or simply looking to boost your confidence with pound cakes, you’ll find invaluable resources on the Begin with Butter site and the Begin with Butter Home Baking Academy. While not obligatory, I assure you that perusing a few of these articles will greatly enhance your baking skills and leave you feeling more self-assured in the kitchen.

These invaluable resources will greatly assist you in developing consistency and confidence on your baking journey.

This is a photo of a Biscoff cake.

Important Tools Used in this Biscoff Cake

Listed below are the essential tools I employed for crafting this delectable pound cake. These are the very instruments that I have in my own kitchen!

**I get paid a small commission if you purchase directly from some of these links, but they are truly amazing products that you’ll find in my kitchen.**

If you already have them, wonderful! Consider this checklist as a valuable tool to cultivate the confidence necessary for successfully executing this recipe.

Indulge in the decadence of this Biscoff Cake that harmoniously blends the delectable essence of the classic Biscoff cookie with the irresistible texture cherished by pound cake enthusiasts. With its delightful balance of sweet and savory flavors and its luxuriously moist and tender crumb, this cake is guaranteed to be the star of any gathering you host.

Easy Date Night Banana Pudding

When it comes to creating a special date night at home, there’s nothing quite like a sweet treat to set the mood for romance. This Easy Date Night Banana Pudding recipe is designed for just that, offering a blend of nostalgia and thoughtful preparation that’s certain to win hearts.

This is a photo of banana pudding in a shot glass

Easy to create and impossibly creamy in texture, this dessert is a sophisticated take on a classic that reflects both your culinary finesse and your affection for your significant other. If you’ve seen my Panna Cotta with Strawberry Sauce, you already know that my silky smooth custards and puddings are having a moment right now. 😊

The Art of Tempering and Texture

One secret to the divine texture of this dessert is the careful technique of tempering egg yolks. The process, usually reserved for custards, lends this Easy Date Night Banana Pudding a velvety smoothness that is luxurious to the last bite. By adding flour and just the right amount of sugar, the pudding’s consistency is perfected—no lumps, no guesswork, only perfection.

Personal Touches That Make a Difference in this Easy Date Night Banana Pudding

Individual servings of banana pudding add a touch of intimacy to your date night. As you layer semi-ripe bananas, rich pudding, banana liqueur-infused whipped cream, and the buttery crumble of mini Nilla wafers, you’re creating a bespoke treat that is tailor-made for the one(s) you love.

This is an overhead photo of banana pudding

Oh, and this makes six servings, so there will be plenty for you and your beloved!

Whipped Cream: A Light Crown for a Regal Dessert

For a less complex yet equally indulgent topping, whipped cream infused with the essence of banana liqueur sits delicately beneath and atop the luxurious vanilla pudding. It’s a choice that not only lightens the dish in terms of density but also in preparation, ensuring that even those new to the culinary arts can create a dessert that’s both striking and delicious.

This is a photo of banana pudding in a dessert cup

Make-Ahead Elegance, Tableside Charm

The beauty of this recipe is its flexibility—it can easily be made ahead of time, right down to the last layer of whipped cream. But for a truly special presentation, put the finishing touches on the pudding for your loved one tableside. Your guest will appreciate not only the gesture but the visual delight of watching you assemble their dessert. ::swoon::

Moments to Savor

I absolutely ADORE this recipe, Friends. I plan to 100% serve this to my husband and kiddos on Valentine’s Day this year, and am looking forward to seeing the delight on my everyone’s faces when I’ve presented this dessert at the close of our family Valentine’s Day dinner. And as any good cook knows, the sounds of contented sighs and appreciative murmurs from across the table are the best reviews you could possibly receive.

This is a photo of banana pudding in a shot glass

But this Easy Date Night Banana Pudding is also perfect for a romantic dinner for two. Serve it as the grand finale to a home-cooked meal or surprise your partner with it as breakfast in bed the next morning. The possibilities are endless, just like the love you share. So go on, whip up this delicious dessert and create some sweet memories with your special someone.

For an evening that feels both lavish and intimate, take on this easy recipe for a date night to remember. Whether it’s Valentine’s Day, an anniversary, or simply a spontaneous night of romance, the delicately layered banana pudding will be the perfect sweet ending to your shared meal. It’s a culinary creation that is not just about the taste, but the feelings it evokes, making it a truly wonderful expression of your love.

Crafting the Vanilla Pudding Base for this Easy Date Night Banana Pudding

Creating the vanilla pudding base is a simple yet critical part of the process. Start by combining sugar, flour, and a pinch of salt in a saucepan. Then, gradually whisk in milk, ensuring a smooth mixture devoid of lumps. The magic begins when you place the saucepan over medium heat, constantly stirring until the mixture thickens and begins to bubble slightly. Remember, patience is key here; rushing could result in a pudding that is too thick or, worse, scorched. And make sure you’re getting the corners of your saucepan!

Once the base (or “Bae” 😂 sorry) milk mixture reaches about 165°F (you can use an instant read thermometer for the best accuracy, or you can grab my favorite instant read thermometer right here), it’s time to carefully remove the vanilla bean pod and temper the egg yolks. In a separate bowl, whisk the room-temperature yolks until their color lightens. Slowly add a small amount of the hot milk mixture to the yolks while continuously whisking. This process gradually raises the temperature of the yolks, preventing them from scrambling when combined with the hot mixture.

This is a photo of several servings of banana pudding

Once tempered, place a fine mesh strainer over your saucepan and then pour the yolks into the saucepan through the strainer, stirring until fully incorporated. Return the saucepan to heat until the mixture achieves a custard-like consistency.

Friends. Hear me here. Do NOT skip the fine mesh strainer. If you don’t have one, you can grab this OXO one that I love to death. The best tempering effort can leave some egg solids in your tempered egg yolks. You don’t want a single one of those egg solids in this pudding. This step guarantees smooth success with this pudding. 😊

To finish off the vanilla pudding base, remove the saucepan from heat and stir in the butter . The butter adds a rich creaminess to the vanilla pudding and is a must-have ingredient for this beautiful dessert. Once complete, place in a heat-proof bowl and place plastic wrap directly on top of the pudding to prevent a skin. Allow the pudding cool before layering with the other ingredients. Remember, the key to a gorgeous vanilla pudding base lies in careful attention to detail, patience, and, of course, love.

Crafting the Banana Liqueur-Infused Whipped Cream

Making banana liqueur-infused whipped cream is quite a simple process, and the result is a light, fluffy cream with a hint of banana flavor that perfectly complements the rich, creamy vanilla pudding. Start by pouring heavy cream and confectioner’s sugar into a chilled bowl. Beat the cream mixture until soft peaks form – this is usually best done with an electric mixer on medium speed, or you can do this with a ballon whisk and a vibe.

Once you have soft peaks, it’s time to add the whipped cream with the banana liqueur and pure vanilla extract (NOT vanilla “flavoring”). Continue to whip the mixture until it reaches stiff peaks.

This is a photo of banana pudding

Once the liquids are fully incorporated, your banana liqueur-infused whipped cream is ready to be layered onto the pudding. This unique whipped cream not only adds a crowning touch to the pudding but also enhances the overall banana flavor of the dish.

Building the Individual Banana Puddings

Creating individual servings of banana pudding enhances the personal touch of this delightful dessert. Begin by selecting small, clear glass serving dishes that showcase the appealing layers. Start by placing a layer of the vanilla wafers at the bottom of each dish. Next, spoon a small amount of whipped cream over the Nila wafers.

This is a photo of banana pudding

After the wafers and the whipped cream comes the good part. Place banana slices around the sides of your glass dish, and then add a generous amount of the cooled vanilla pudding to the dessert cup, ensuring that the bananas are completely covered. Finally, add a lavish amount of the banana liqueur-infused whipped cream to the top of the dish. Garnish each pudding with a few additional wafers or banana slices. Remember, the ultimate goal is not just taste but also a visually stunning dish. Create with love, serve with pride.

This Dessert: A Symphony of Contrasts

I sincerely hope you will love this dessert as much as I do. It’s an elevated take on a traditional favorite, infusing it with a sense of nostalgia that transports you back to simpler times. The harmony of sweetness and decadence in this dessert is unparalleled, creating an indulgent treat that is just the right amount of rich. But perhaps its most intriguing quality is its inherent dichotomy. It’s a platonic dessert — simple, unpretentious, and homely — yet there’s an undeniably sexy appeal to it, a subtle allure that lies in its layers, textures, and flavors. It’s a dessert that tells a story, a sweet tale that unfolds with each bite. Enjoy this symphony of contrasts, and may it add a dash of sweetness and a hint of allure to your special moments.

Happy Valentine’s Day/Date Night/Galentine’s Day/Sunday brunch/Any occasion really! ❤️