Sunday Session #4: Melt-In-Your-Mouth Apple Pie!

0
Home » Featured Recipes » Page 38

Tip #1: You should really, and I do mean really, think about whether it’s a good idea to make pie crust when it’s 90 degrees outside and nearing 80 degrees in your kitchen.

Welcome to the most recent Sunday Session! This week, I wanted to do something I haven’t done in a while: make pie with all-purpose flour instead of pastry flour. If you saw my most recent post about flour, you know that I typically use pastry flour as my personal cheat code for pie because the lower protein content contributes to a more flaky crust.

I’m excited! Let’s get started.

Looking for something specific in this post? Feel free to use the hyperlinks to go straight to it!

In this post:

The Beginning

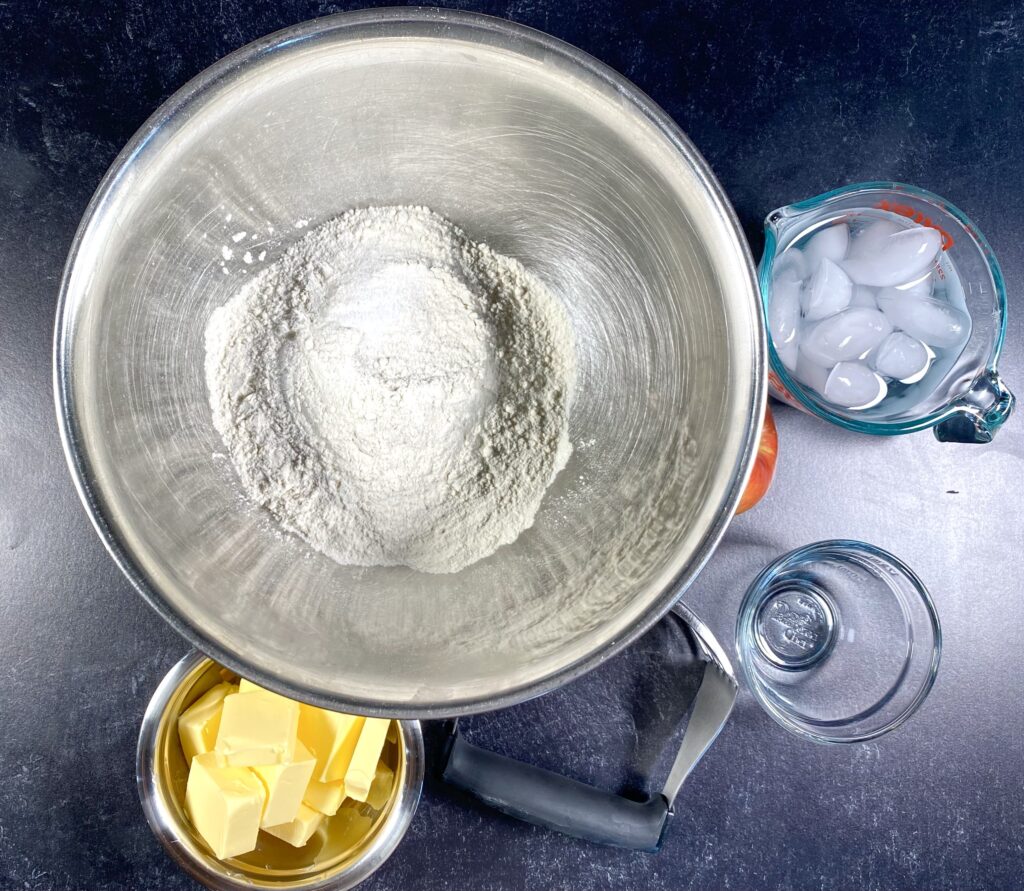
When making pie dough from scratch, it’s really important to start with very cold ingredients. The morning that I started this experiment, I prepped the ingredients and then put the ingredients and tools in the freezer while I went to do something else for about thirty minutes.

Pictured: Flour, Salt, Water, Butter, Pastry Cutter, and a corner of an apple. Photo Credit: Begin with Butter.

Please don’t ask what I did for thirty minutes. I honestly don’t remember. But I know I was gone from the kitchen for a period of time and that, Friends, is a notable fact.

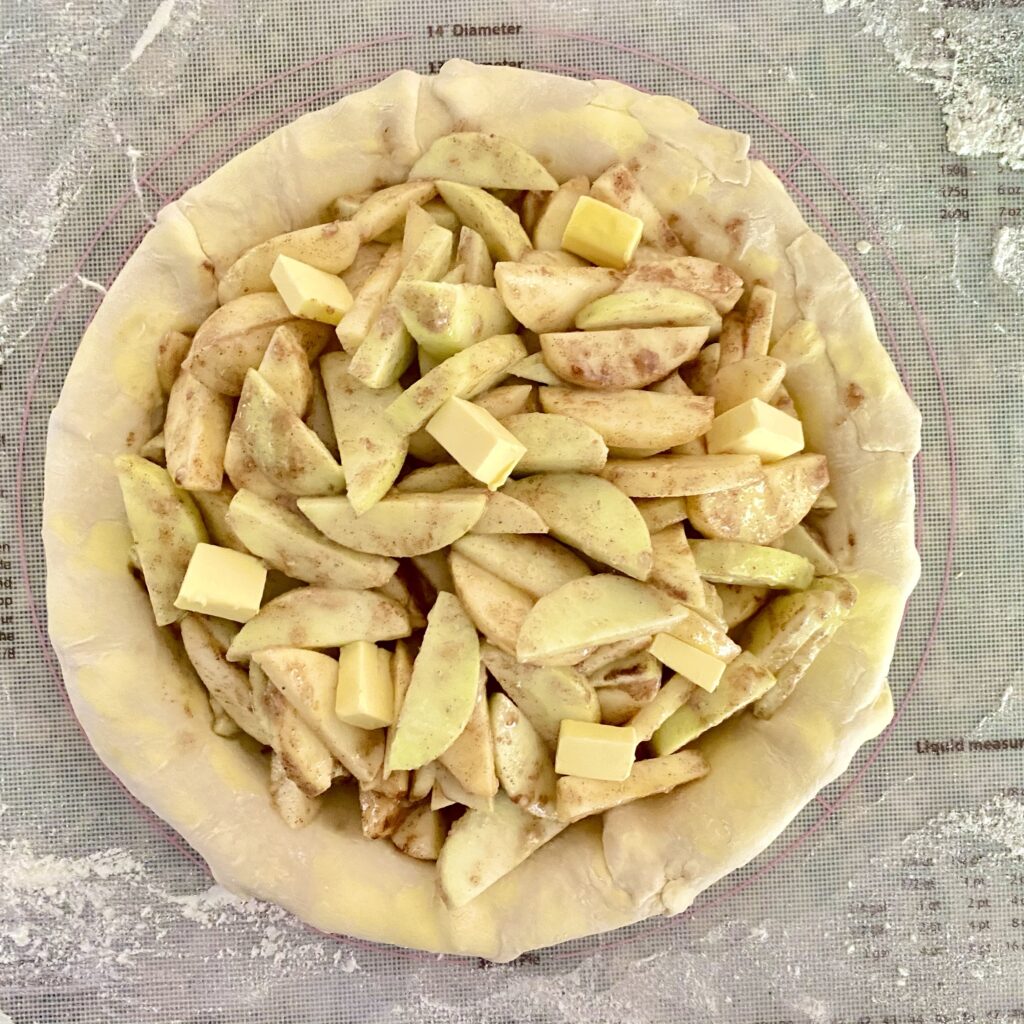
I also had to prep apples, since that stuff in a can is an abomination:

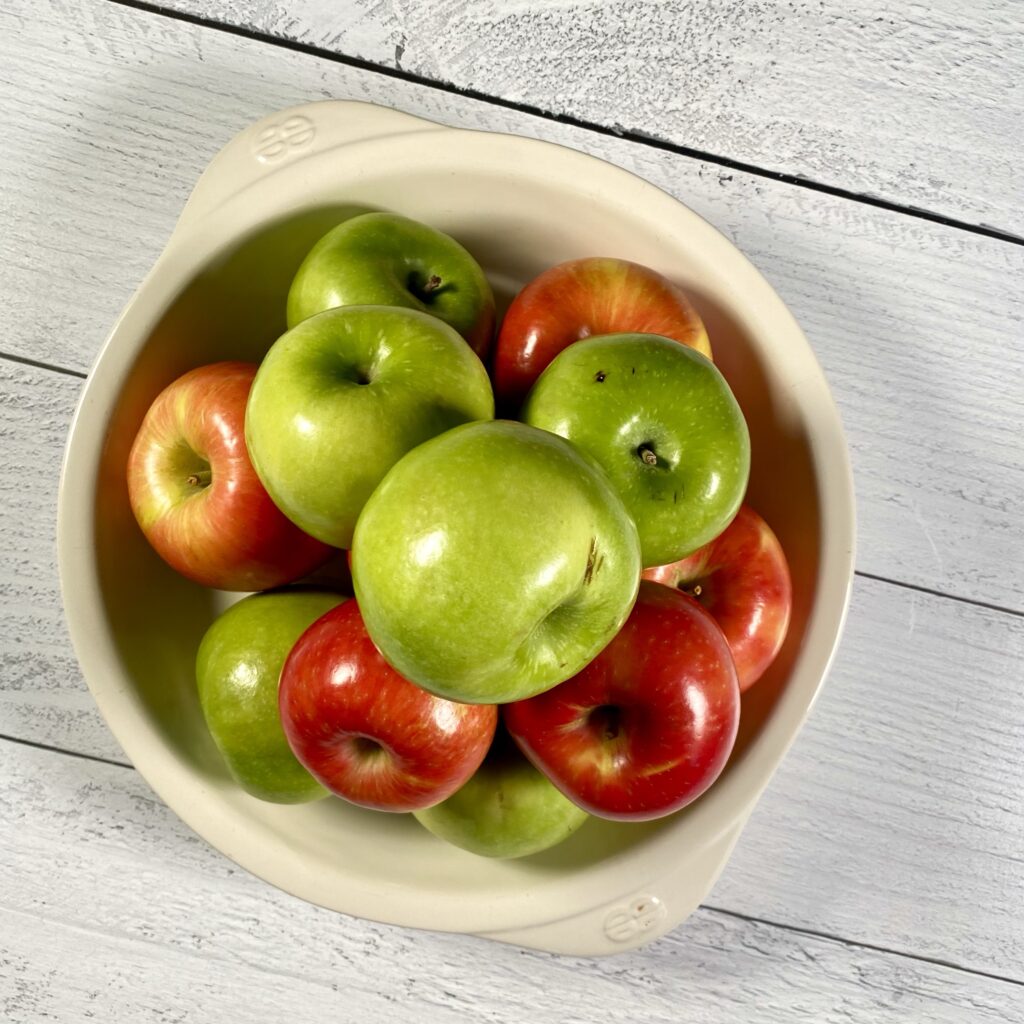
There were many, many apples harmed in the making of this pie. All told, I prepped about 11.5 cups (by volume) of apples. For apple pie, I prefer a very sturdy apple since baking softens them significantly, so I mixed Granny Smith (the consummate baking apple) and Honeycrisp (for both its texture and natural sweetness) for this pie.

I am so glad I mixed those two apples because the Granny Smith apples in this pie were as tart as lemons!

The Need for Speed

Regardless of the weather, it’s always important to work as quickly as possible on pie crust. The best way to build your speed is to practice making pie crust over and over again! Win!

The reasons for speed are two-fold: first, because you’re cutting fat into flour to make the crust, you don’t want the fat to melt from being overworked. This would ruin your pie. #StartOver

Second, you have to introduce liquid (most people use water or vodka) into the mix and stir it in order to create structure, but you don’t want to create too much structure and do too much stirring because you’ll end up with a tough pastry crust from too much gluten development.

Speed comes from practice, Family. Please don’t be discouraged if your first pie attempts don’t meet your expectations!

The Method for Making Pie Crust

It was almost 80 degrees in my kitchen by the time I started making this pie dough. Luckily, my ingredients were nice and cold when I started working.

Still, since it was warm in my kitchen, I knew I was on borrowed time. Cold ingredients or not, butter will eventually get very soft once it’s exposed to room temp air.

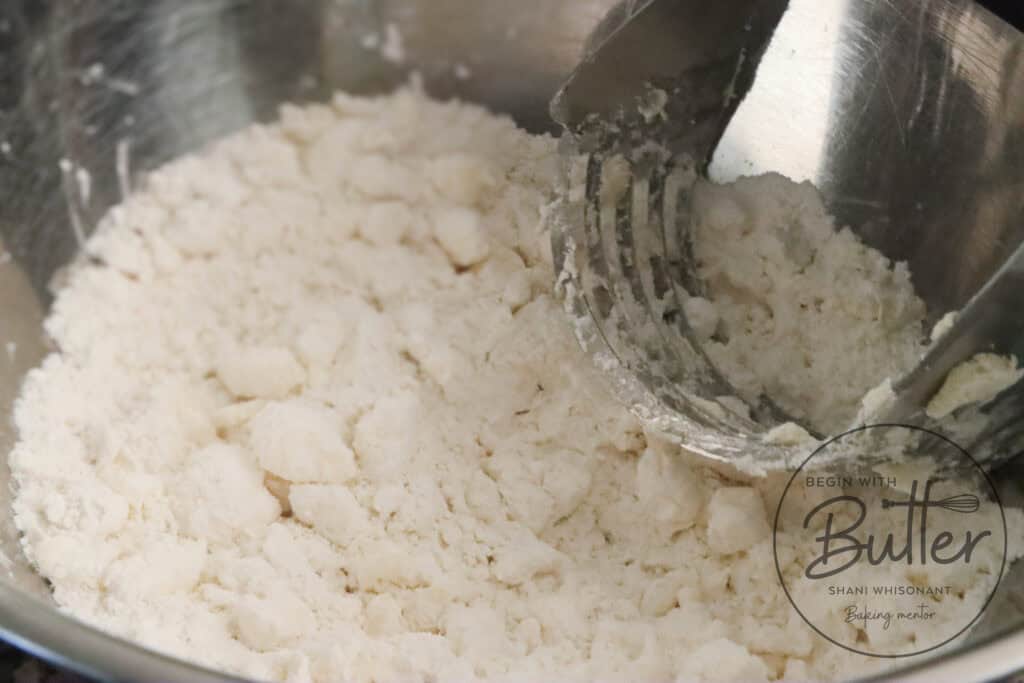
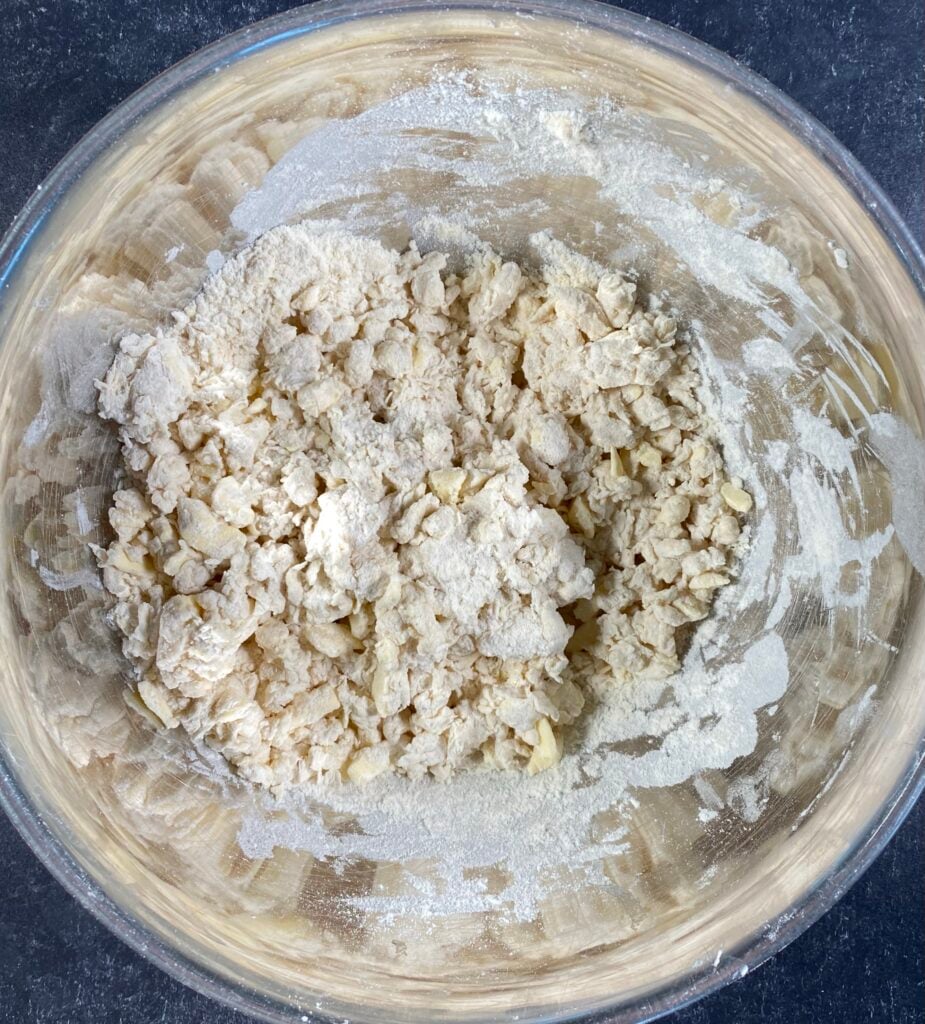
This pie crust recipe (from the amazing Kate McDermott’s The Art of the Pie) is very straightforward. To begin, I added fat (butter) to a mixture of flour and water. Then, I used my pastry cutter to cut the butter into pieces about the size of fat spring peas. Because speed is a bit more important than precision, though, some pieces of butter were larger or smaller than others, and that’s okay!

For a demonstration about how to use a pastry cutter, feel free to take a look at this video:

Once I was done cutting the butter into smaller pieces, I added water to wet the dough just a little bit. It’s important to remember that the dough shouldn’t look wet at this point. You want just enough water to help the dough stick together. It shouldn’t look like a batter or cookie dough:

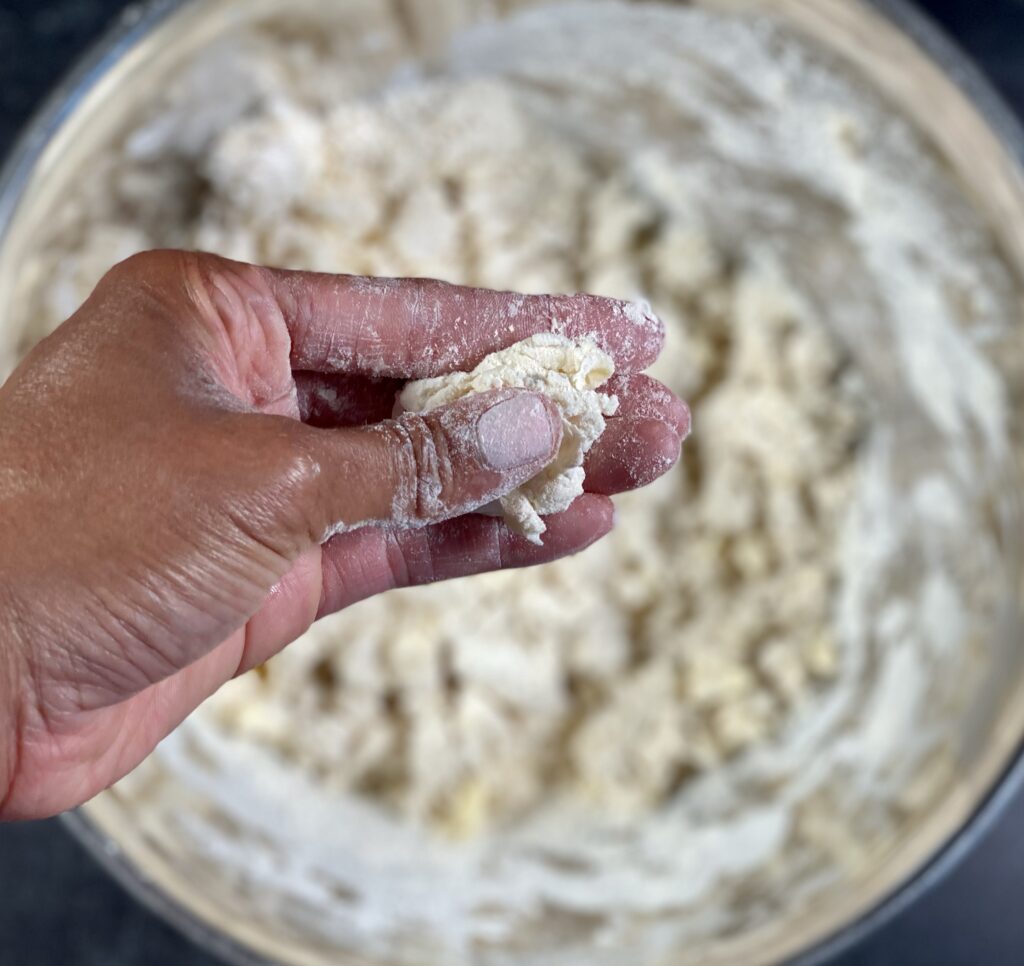
Three more tablespoons of water later and it was done!

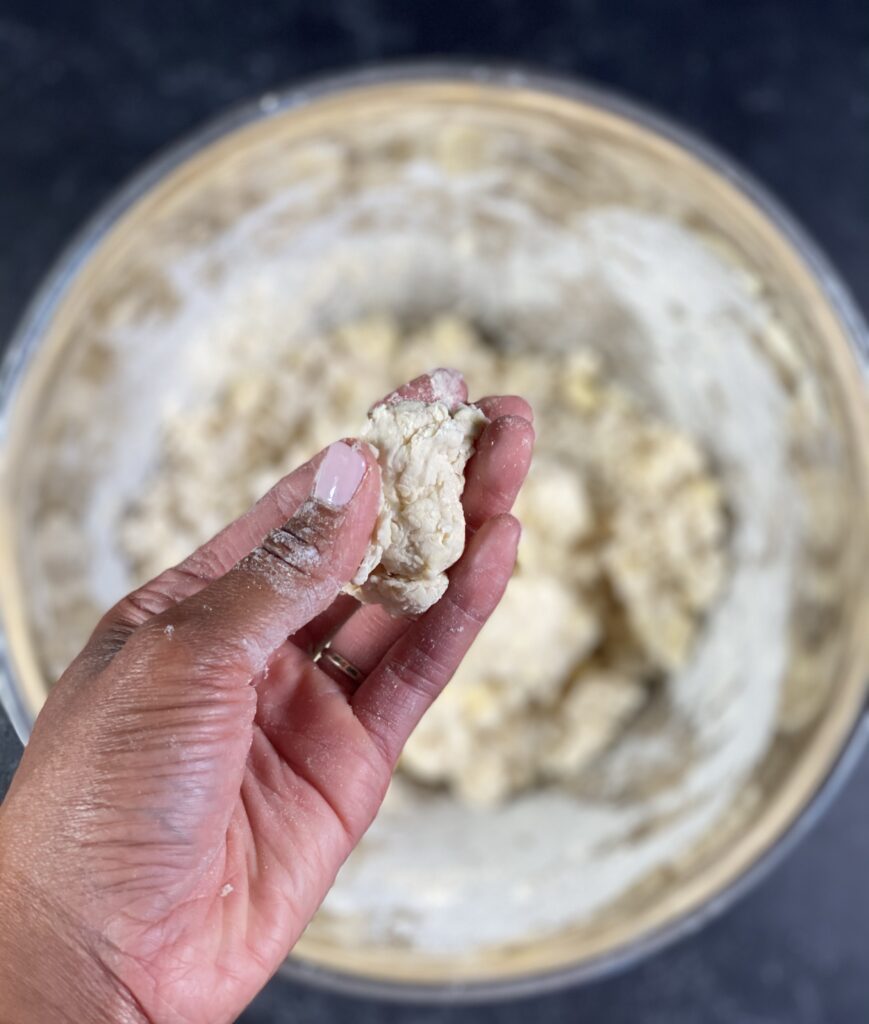
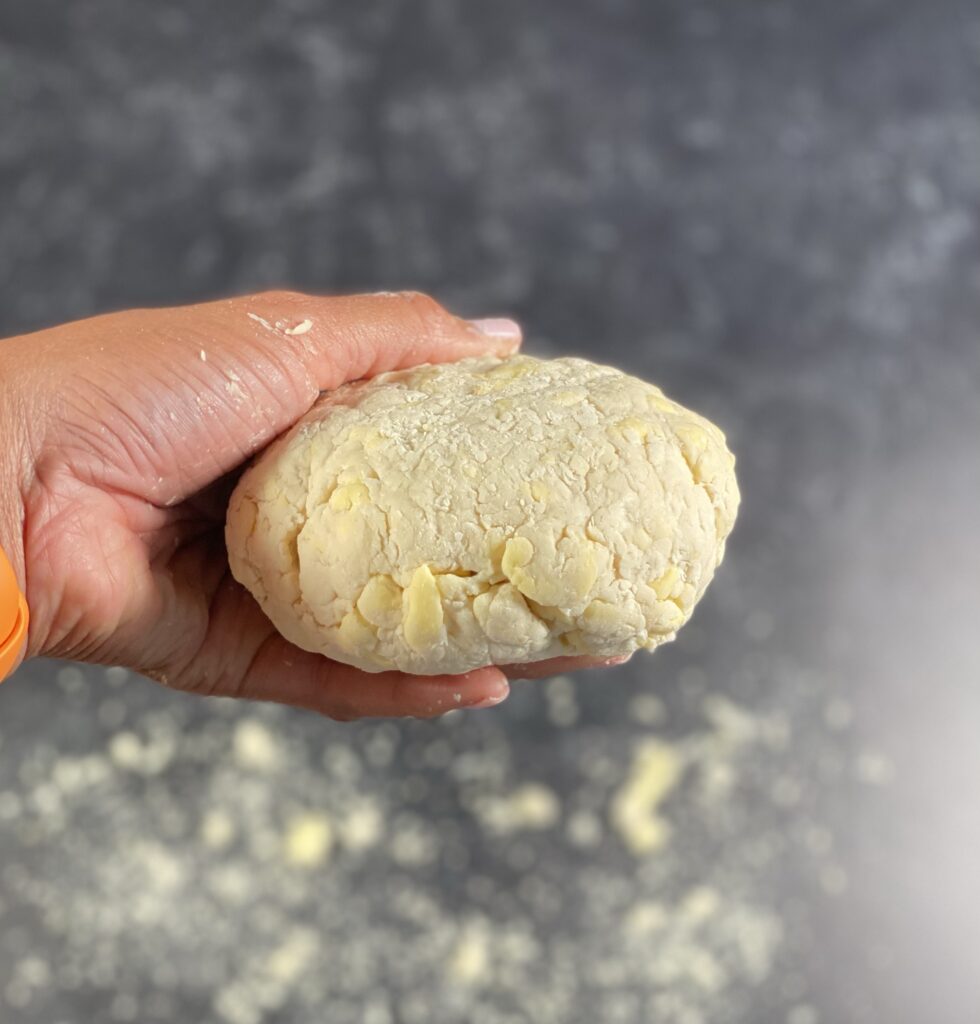
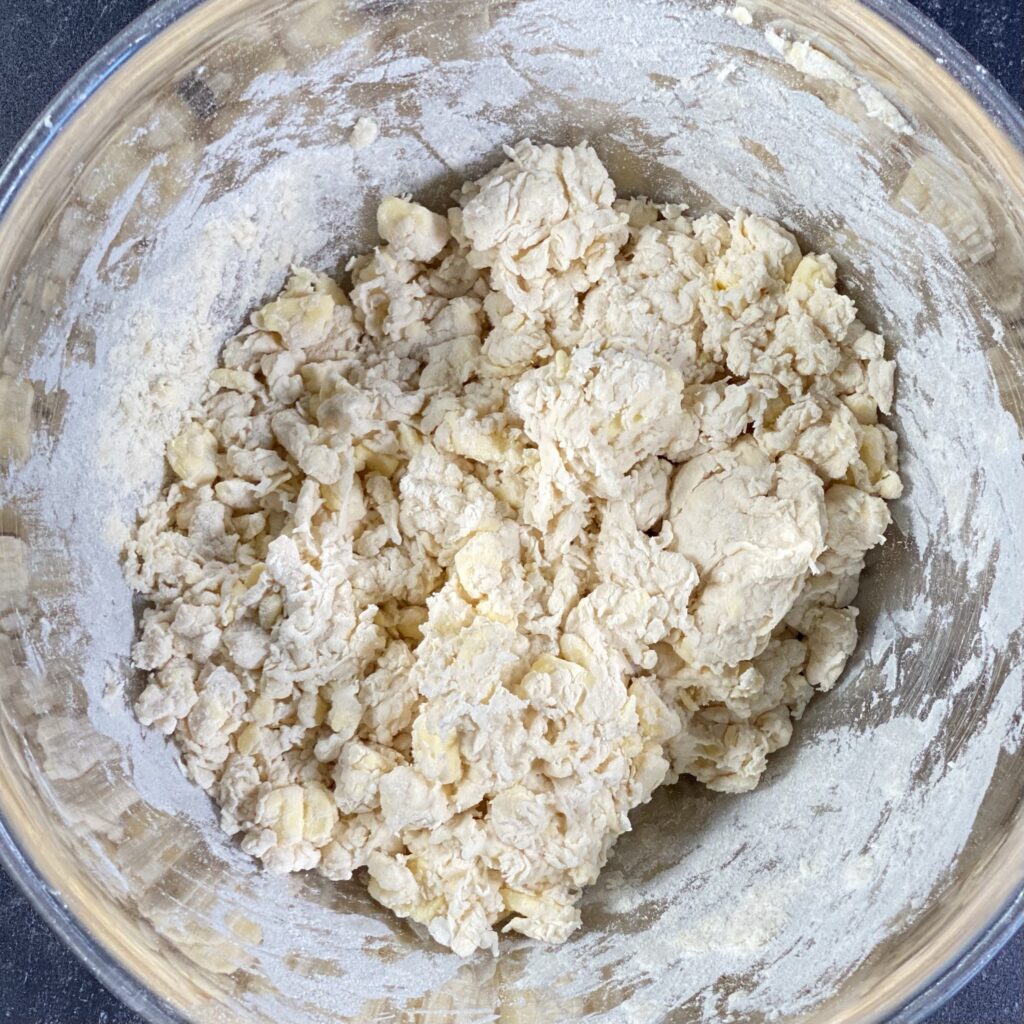
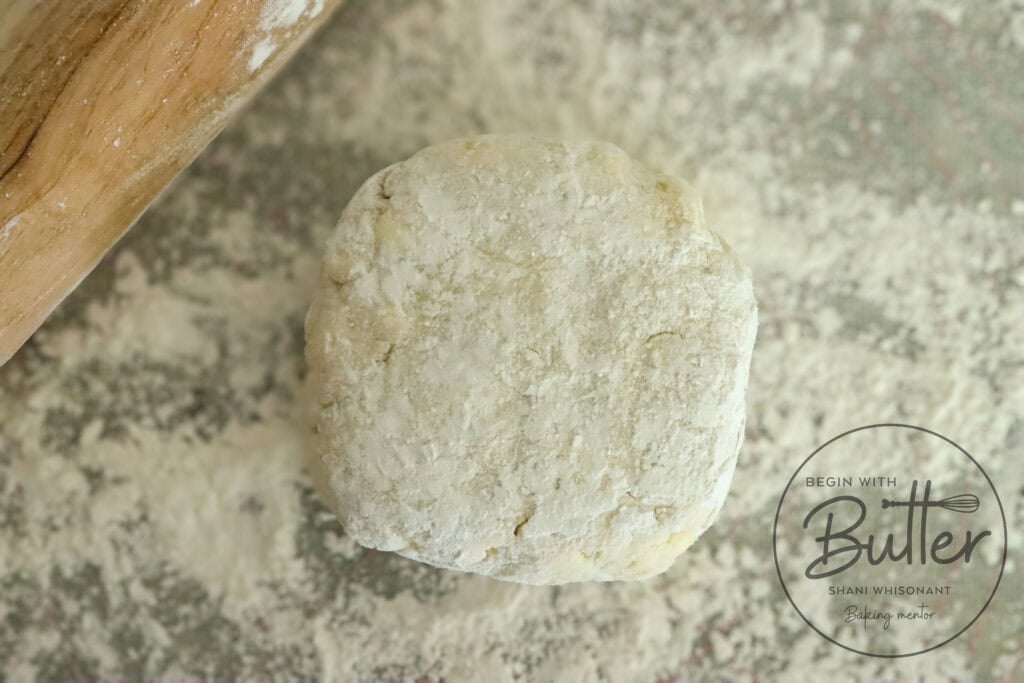
The finished dough was still a dry, shaggy-looking mess, but it was beautiful in its own way. Pie dough is complete when it comes together just to the point that it stays together when it’s squeezed between your fingers.

I separated the dough into two balls, flattened each into a thick disc shape, and then wrapped each disc in plastic wrap to go into the fridge and rest.

You want to see big chunks of fat in your pie dough! Photo Credit: Begin with Butter

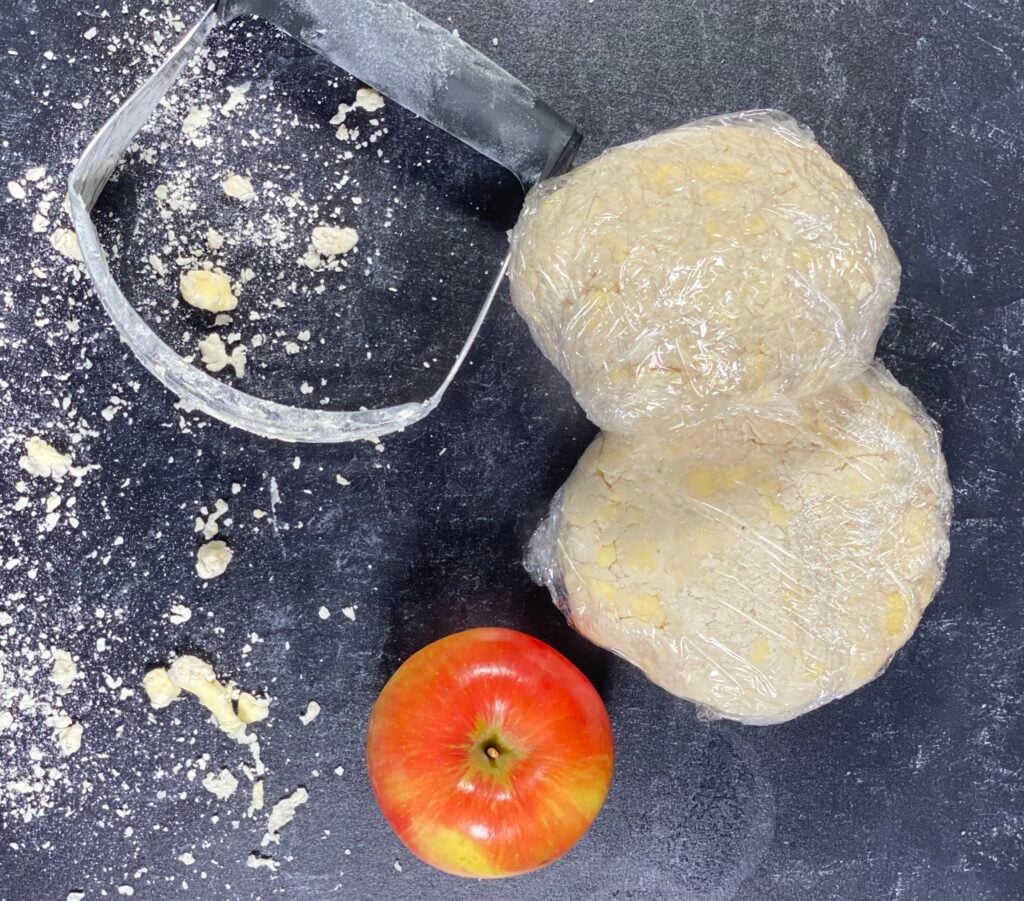
I usually let these dough discs rest in the refrigerator for at least an hour. Because it was so hot in my kitchen, I let it rest for several hours before moving onto the next step.

Roll Out

There are a couple of tricks that can help you roll pie dough on a hot day:

  • Fill a zip-top bag with ice and cold water, then lie it the surface where you plan to roll out your dough for 5-10 minutes;
  • Put your rolling pin in the freezer; and/or
  • Use a marble rolling pin and pastry board, like this one (not an ad).

I used none of those tips when I rolled out this dough:

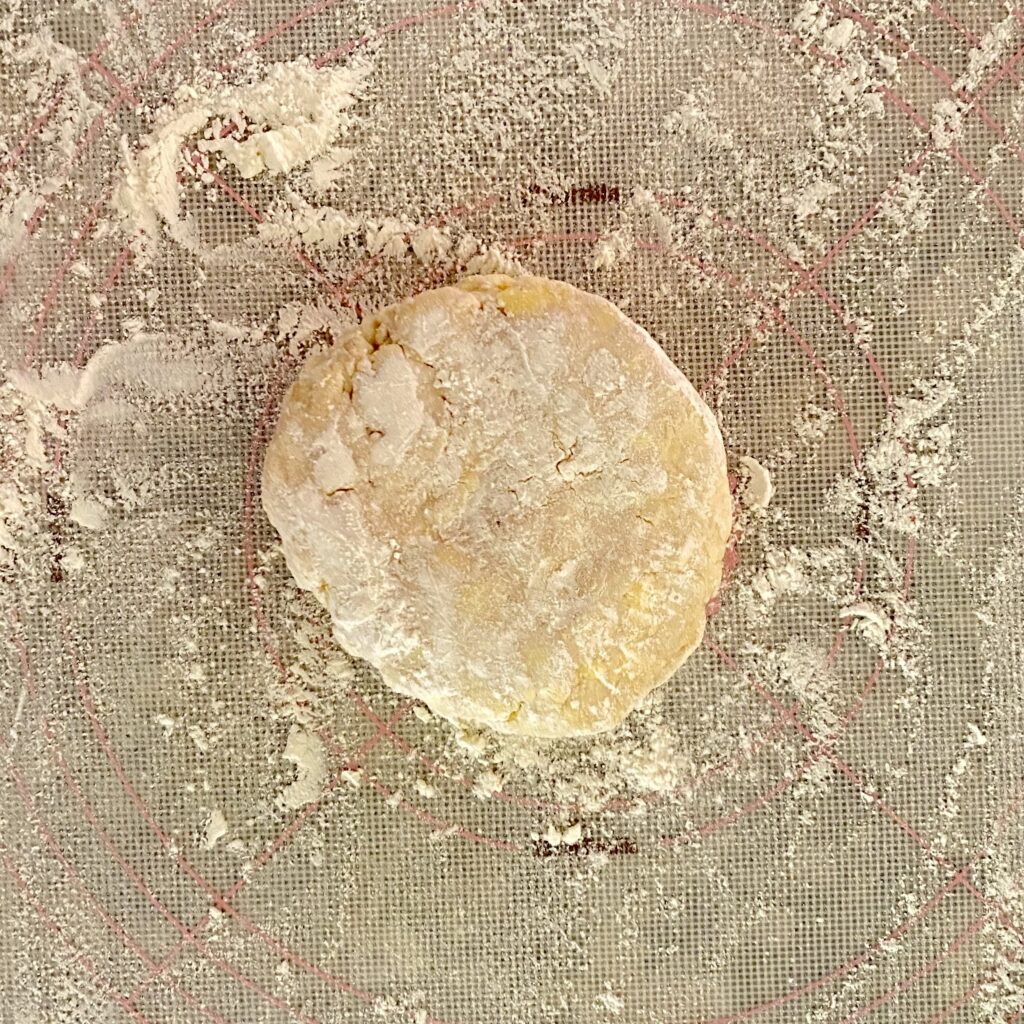
Just threw caution to the wind and took my chances. So I had to work fast fast.

I have no excuse for being so reckless with this dough.

When rolling dough, you can use as much flour as you need to avoid the dough sticking to the rolling pin. For that reason, I used a lot of flour on this day.

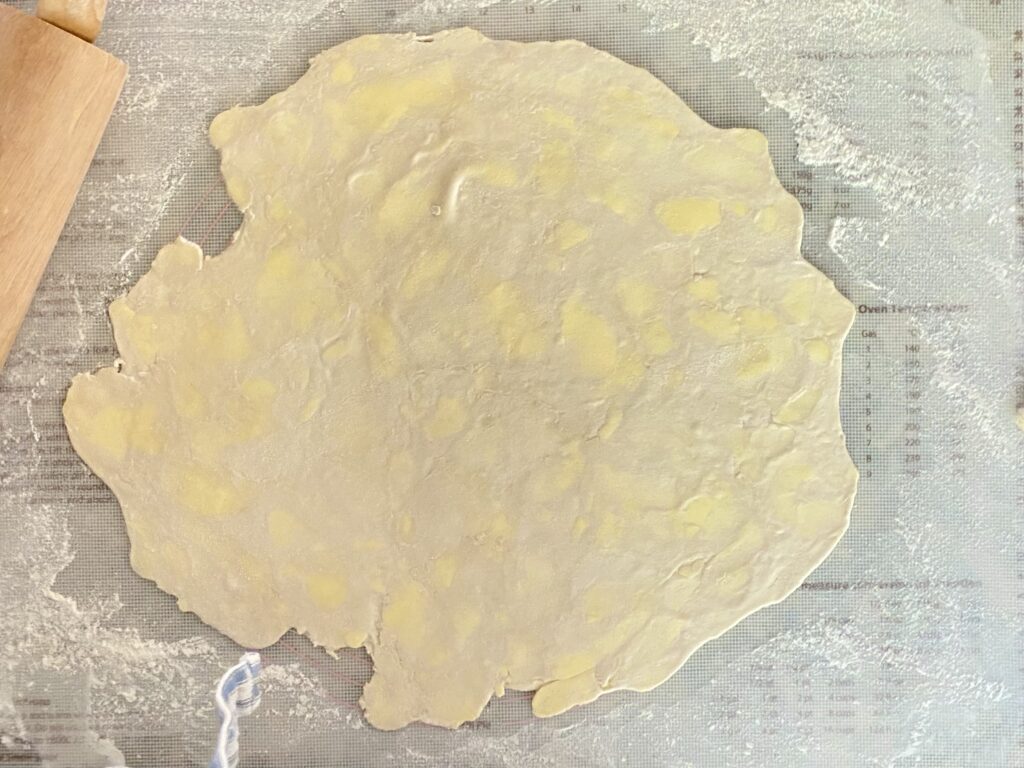
To roll dough into a roughly even circle, I always roll my rolling pin away from my body, turning the dough in quarter turns after 3-4 passes with the rolling pin. I also turn over the dough a couple of times during the rolling process to make sure that the bottom isn’t starting to stick to the surface.

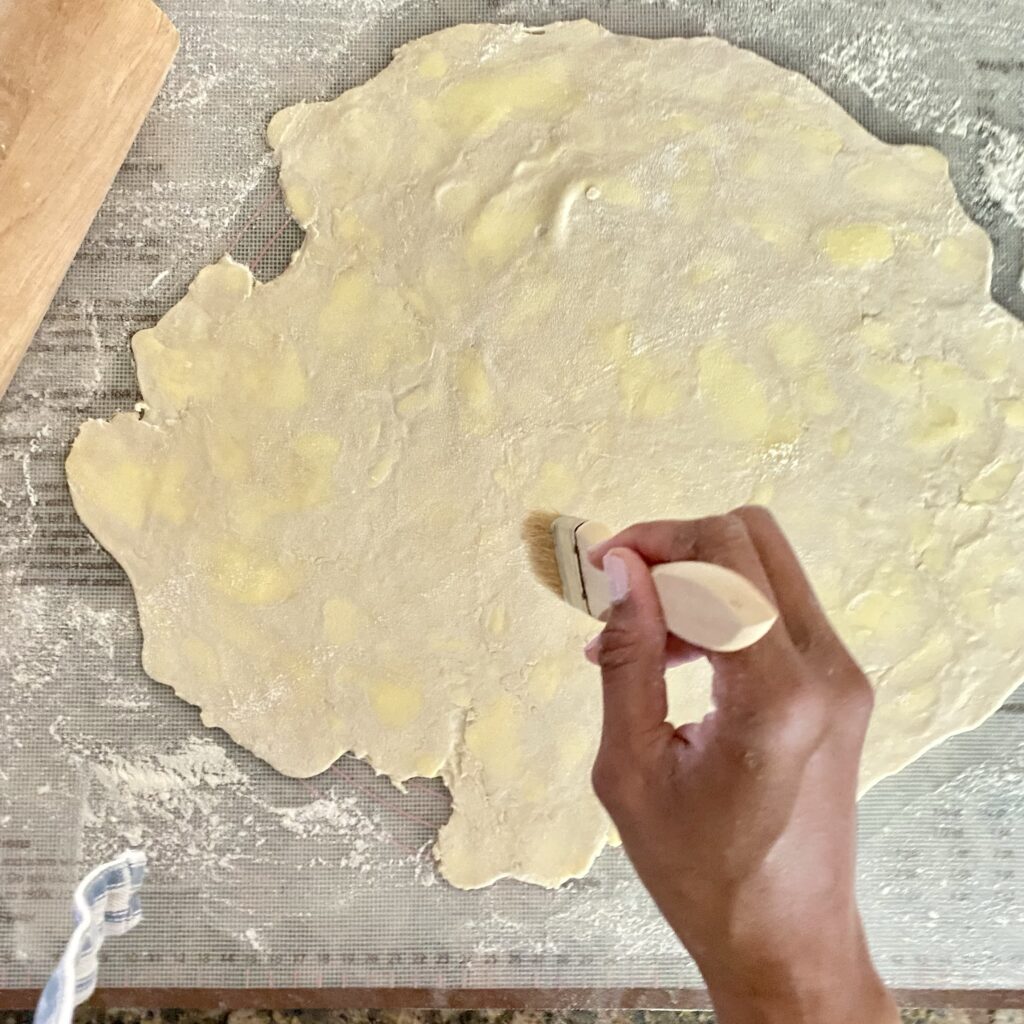
That technique helped me achieve the rough circle that you see, below. After rolling the dough into that rough circle, I brushed excess away the excess flour and was left with this:
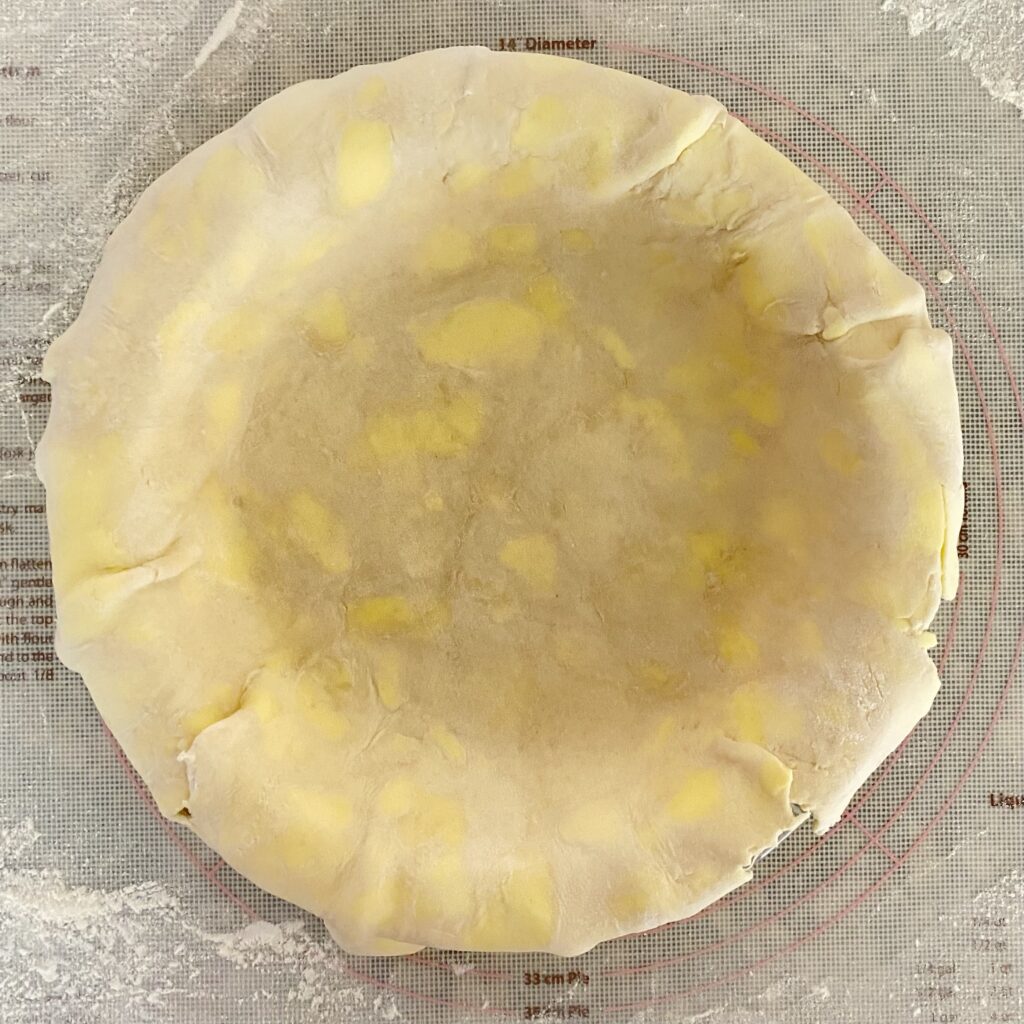
Pie Construction

True story: it’s only when I get to the filling that I feel like my pie has a chance of not failing.

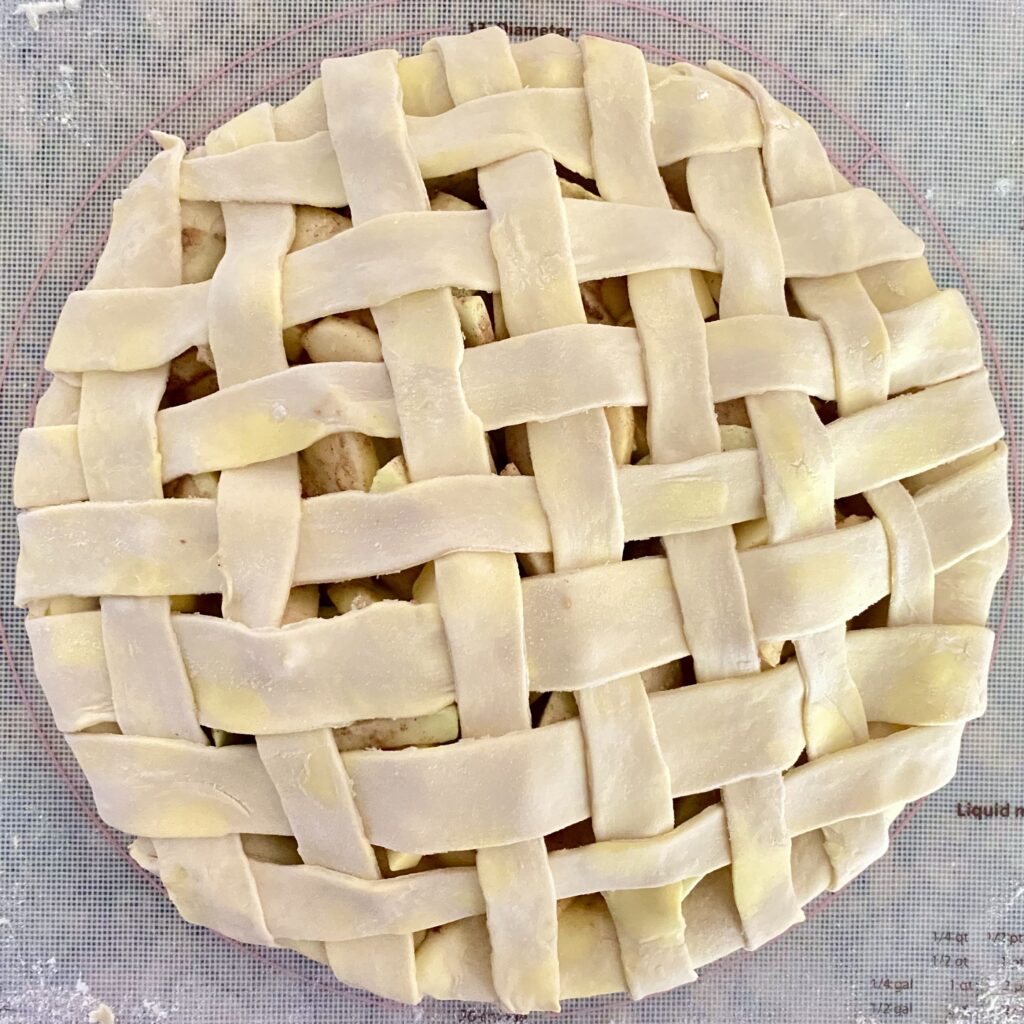
Once filled, the pie went back into the fridge so that I could work on the top crust. As a cute mom gesture, I asked my daughter how she’d like me to decorate the top crust. Of course she chose a lattice top. Of course she did:

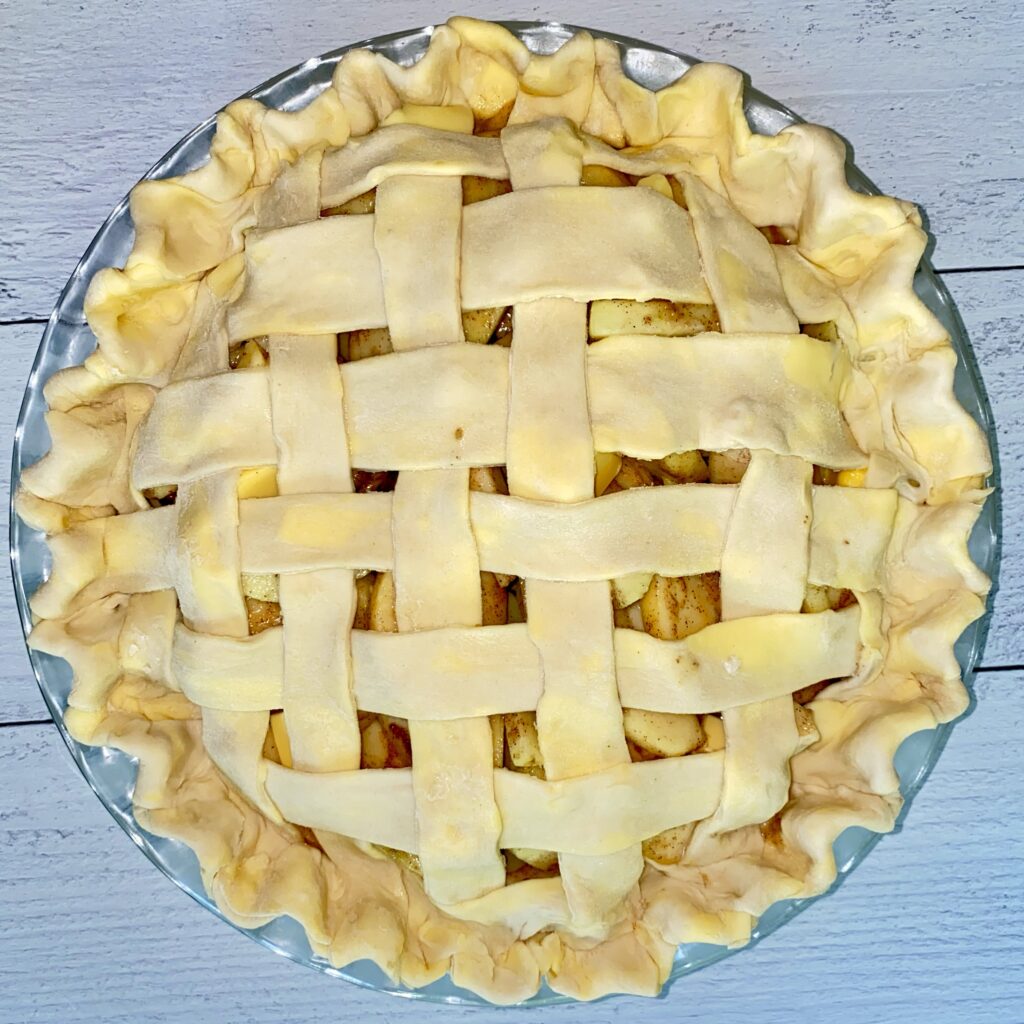
I put the pie into the refrigerator before finishing the edges, just as a last bit of insurance against melting. This was also the time that I warmed up the oven.

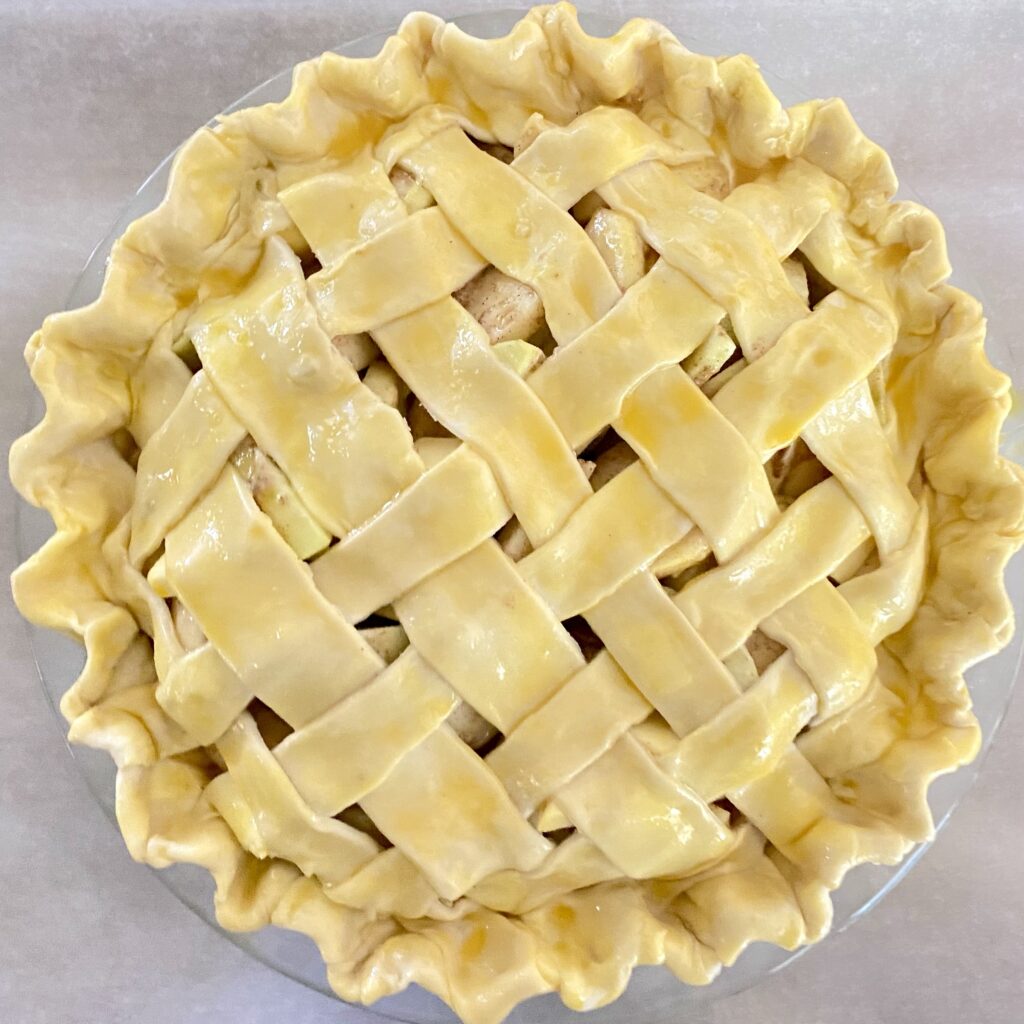
After another half hour, I removed the pie from the refrigerator, crimped the edges and added egg wash. At this point, the DJ in my head started playing Stevie Wonder’s “Isn’t She Lovely” on repeat.

The oven wasn’t finished warming completely (my oven is a habitual liar when it comes to temperature, but that’s another story for another day), so the pie went back into the fridge. Again.

The Bake and the Conclusion

This apple pie baked in my oven for a total of 55 minutes. I added some demerara sugar (Sugar in the Raw) for the last ten minutes of baking in order to give it a last special touch.

Here she is!

Y’all. This pie stressed me out. But I am so proud of how it came out. The crust was perfectly flaky and left telltale flaky crumbs on the table after our family dessert session. My daughter–who previously refused every pie I ever offered her–DEVOURED it.

I think it’s safe to say that pie with all purpose flour was an amazing success. While I did notice a slight difference in the flakiness of the pie, I think I was the only one (of the five of us who ate it) who even thought about it.

Do you find video tutorials helpful? Feel free to comment, below! And don’t forget to subscribe so that you can get weekly updates about everything BwB!

Join the List

Subscribe to get a free video lesson and our latest content by email!

    We won’t send you spam. Unsubscribe at any time.

    Five Flours I Keep Handy in my Kitchen

    Friends. When I say I’ve been waiting for this day. Because today, we’re getting into flour.

    Well, not literally getting into flour. That would truly be messy and awful, since flour is more invasive than sand. But we’re going to talk about flour.

    First, I’m going to do just the teeniest tiniest discussion about the science of flour, and then I’m going to tell you about the five (yes, FIVE!) types of flour that I keep in my kitchen at all times. For ease of reference, I’ll even hyperlink to specific sections in this article, in case there’s specific information that you seek!

    In this Post:

    Let’s get busy.

    What Does Flour Do?

    Think of the cake you’re baking as a house.

    Hear me out. This will end up making a lot of sense.

    Like I said, the cake that you’re baking is a house. The flour isn’t the bricks and mortar, it’s the invisible, interior wooden framing that keeps everything upright. Flour is the thing inside your cake that gives it shape and structure, much like the wooden framing creates the internal structure for your home.

    Without framing, your home would collapse inward because there’s nothing inside to give it structure. Flour does the same thing. Except, you know, in cake. And cupcakes. And bread. And pizza.

    You get the point.

    What is Gluten?

    When flour meets its best friend, liquid, the combination of the two begins to make a gluey, sticky mess. That mess is the beginning of gluten development. It’s the foundation of your cake or bread.

    Gluten development simply means that combination of flour and liquid have begun to form a honeycomb-like structure in your batter or dough. The purpose of that structure is to create tiny cellular “walls” to trap the carbon dioxide that’s been created by your leavening. The gas forces the honeycomb to open, which is what causes baked goods to rise.

    Photo by Sharon McCutcheon on Unsplash

    Once the delicious pastry or bread in the oven reaches a certain internal temperature, the gas…goes away. It just evaporates. But the inflated holes created by the gas remain.

    For information about carbon dioxide and why it’s LITERALLY NO BIG DEAL in your baking, click here to learn about leavening.

    TL;DR version: leavening creates gas that fills the gluten honeycomb and makes your baked goods rise. This gas is not nefarious. It is your friend.

    Protein (Not the Lean Meat Kind)

    The strength of the gluten network (or honeycomb, because I like that foodie visual), is determined by the protein content in your flour. That, in a nutshell, is why there are different types of flour for different types of baked goods.

    Flour with a higher protein content is created from “hard wheat” (in the U.S., this is typically grown in the Midwest) and creates a stronger gluten network, which allows for a higher rise in your baked goods. However, a stronger gluten network means a more chewy finished product. That’s why high protein flour is typically used for things like bread and pizza dough.

    Higher protein flour encourages gorgeous, huge holes that you see in your favorite artisan bread because the strong gluten network holds onto the leavening (yeast or starter) longer, so the leavening can do more work and create more rise in the dough. The stronger gluten network that’s created by the high protein flour also creates a beautiful chew for your breads and pizza doughs. Typically, high protein flour has a protein content of anywhere between 12 and 15 percent.

    Photo by laura adai on Unsplash

    Low protein flours do the exact opposite. Low protein flour is created from “soft wheat” (in the U.S., this is typically grown in the South). This type of flour creates a more delicate, crumbly texture for whatever it is that you are baking. For this reason, low protein flours are the choice for cakes, pie crusts, and pastry; these have a protein content of anywhere between 5 and 9 percent.

    Middle-of-the-road protein content flours can play both above and below their weight class. Which is to say, they can make good bread and also good cakes, and are good for “all” purposes (see what I did there?). The versatility of all purpose flour is the reason why it is so popular; because flour is a perishable ingredient, it’s not always practical to stock your kitchen with multiple types of flour, unless you bake very frequently and are want to make every product the absolute best it could ever be.

    It truly is. But it’s still not cost-effective.

    All purpose flours typically have a protein content between 9 to 12 percent.

    Onto the fun part! Next, we’ll look at the five types of flour that are always present in my kitchen.

    Flour #1: Cake Flour

    Cake flour is just delightful. Coming in at the lowest protein content (usually 5 to 8 %), it makes the most spectacularly delicate cakes and cupcakes. Some people even use it for cookies, although I haven’t tried that yet.

    {runs to Begin with Butter “Bits and Bobs” notebook to write down experiment idea}

    Anyway…

    Things made with cake flour have the most delightful, light crumb. That gluten network is not strong, which leads to the most tender crumb of the bunch and the cake won’t rise as high. For a divine layer cake that’s just a little more special, cake flour is your best friend.

    #image_title

    I currently use White Lily All-Purpose Flour for my cake flour (coming in around 9% protein content), and I’ve been super happy with it!

    “But wait, Shani! This section is about cake flour and you just said you use an all-purpose flour for cake!”

    Friends, the reason why I use White Lily All-Purpose flour for my cake flour is precisely because of its lower protein content. In other words, it’s not the name that determines the use…it’s the protein amount. And White Lily is absolute perfection when it comes to creating the loose, beautiful crumb that I’m looking for in most of my layer cakes.

    Flour #2: Pastry Flour

    Some people like perfume and jewelry.

    Give me a croissant that shatters and makes a mess. Seriously.

    Pastry flour is typically a very low protein flour (between 8 and 9 percent). Because of the lower protein amount, the gluten bonds that form are not as strong. This means that the pastry will be much more tender and much much less chewy. It also means that you won’t get as high of a rise from it either, since the weaker gluten network won’t be able to contain the gas from the leavening as well.

    I use pastry flour for pie crusts mostly, but this stuff is THE BOSS for croissants and most French pastry.

    Photo by Kavita Joshi Rai on Unsplash

    I love Bob’s Red Mill White Fine Flour (8-9% protein content) for my pastry flour. It does an exceptional job when I’m making pie crust, as well as when I’m making flaky croissants.

    Flour #3: All Purpose Flour

    All purpose flour might not have the star power of the other flours, but at anywhere between 9% and 11% protein, it is the most solid performer of the bunch. If I am out of a specialty flour and I need a substitute, I can use it for just about anything.

    Even here, in this blog post, it’s literally…in the middle of the flours.

    It really is amazing when you think about it. A good all-purpose flour could make a very good bread or a very good pie. In ingredient science, it’s a marvel. It’s the best sixth man in the business.

    All-purpose flour creates a stronger gluten network (the honeycomb) than cake flour and pastry flour, so baked goods made with all purpose flour will be a touch more chewy than baked goods made with cake flour and pastry flour. Again, though, it won’t be enough for most people to notice the difference!

    And I’ll take a homemade cake with all purpose flour over anything on a store shelf with cake flour. #RealTalk.

    I was an unrepentant King Arthur Baking All Purpose Flour (11.7% protein content) fanatic for years. However, most recently, I’ve found myself reaching for Bob’s Red Mill All-Purpose Flour (10-12% protein content) more than any other. Even when they’re equally available, I’m finding myself reaching more for Bob’s Red Mill.

    Despite being on the very high end of the protein scale, they both make surprisingly delicate pie crusts and sponge cakes. With a protein content that high, you can imagine that they make very good bread as well. For Begin with Butter fanatics, you’ll be happy to know that I absolutely positively consummately adore Bob’s Red Mill’s All-Purpose Flour for all of my pound cakes. It makes my pound cakes look and taste absolutely amazing.

    Photo Credit: Begin with Butter. This is my Classic Lemon Pound Cake, made with Bob’s Red Mill All-Purpose Flour

    Yay for all purpose!

    Flour #4: Bread Flour

    I talk about cake and cookies a lot, but I have an equal crush on bread. There’s something both very primal and loving about making bread for people that you love.

    Bread flour is a staple in my kitchen because I make a LOT of bread and pizza dough. The Bob’s Red Mill Artisan Bread Flour that I use is just…*chef’s kiss*.

    I love love love a good chewy pizza crust on Friday night and a sturdy artisan boule on Saturday with giant holes in the middle to dip in soups, stews, and sautéed mushrooms in butter (and this flour is an absolute star in My Favorite Baguette too). Bread flour, with its wonderfully high protein content (12.5%-13.5%), will help you achieve both of those things. And bonus: bread made with bread flour holds its texture extremely well in those soups, stews, and sautéed mushrooms. So sop away!

    One caveat: when using bread flour, be sure to be careful about how much you add during the kneading process. There’s a very thin line between delightfully chewy and inedibly tough. Bread is a time investment and I’d hate to see you get frustrated!

    Want more information about bread techniques? Check out these BwB articles!

    Flour #5: White Whole Wheat Flour

    Though I don’t tend to use it all that often, white whole wheat flour is an amazing addition to my flour lineup. It’s a nice middleman between bread flour and whole wheat flour, which I cannot cajole threaten beg encourage my children to eat.

    White whole wheat flour is a whole wheat flour, but it’s made from a different, milder type of wheat than traditional whole wheat flour. The difference is a milder taste; it’s more earthy than all purpose flour, but definitely less hearty than a whole wheat flour.

    I use King Arthur Baking’s White Whole Wheat flour, and it’s been an amazing addition to my repertoire. It comes in at 12.2% protein, so I wouldn’t bake anything but bread or pizza crust with this one.

    What kind of flour do you keep in your kitchen and what are you making? I’d love to know!

    I hope you found this tutorial useful. If you love what you see, feel free to subscribe so that you don’t miss a “beet”!

    Sunday Session #3: Spontaneous Blueberry Muffins

    2

    Spring. Hate the pollen (OMG the sneezing). Love the start of berry season.

    Friends. I woke up at 4:10 this fine Sunday morning (don’t judge) with blueberries on my mind. While a more healthy person might have put those blueberries in some Greek yogurt and moved on with their day, I decided that blueberries on the brain could only mean one thing:

    Blueberry muffins.

    While I did have a desire to bake blueberry muffins, because this was a spontaneous decision, what I did not have was fresh blueberries or the desire to go to anybody’s grocery store at 5:00 in the morning. Fear not, Family! There is ALWAYS a big box store-sized bag of frozen blueberries in my poorly-organized deep freezer. Crisis averted and onto the bake!

    Note: this is why I tend not to be spontaneous. LOL.

    While I have my own tried and true blueberry muffin recipe, I figured that today was just a good a day as any to try a new recipe. This morning, that was quite possibly my delirious mind at work.

    I do, however, generally believe that trying new recipes, even when we have Old Faithful recipes in our repertoire, keeps things fresh and can introduce us to flavor profiles that we can incorporate into our favorites.

    Or we can find new faves!

    Honestly, Saints, I have no idea what got into me with all this spontaneity!

    I hope it’s not catching.

    The Recipe

    I landed on the “Best Blueberry Muffins” recipe from Once Upon a Chef with Jenn Segal. This recipe offers Metric measurements for its ingredients, and if you read my most recent post, you’ll know that Metric is my primary love language when it comes to baking.

    I read the recipe from start to finish to determine the level of difficulty, and to see if I had all of the ingredients on hand. Aside from the fresh blueberries and almond extract (my baking is nut and nut-extract free), I had everything else. The recipe looked very simple so I was good to go!

    The Prep

    Of course I started by prepping my mise en place before I got started. Pro tip: when it’s early in the morning and you don’t want to prep your ingredients, that’s when you need to prep your ingredients the most!

    Intrigued about mise en place and what it means to actually prep your ingredients before you bake? No worries! You can check here for helpful tips that will help you become a more efficient, calm, and controlled baker in your home kitchen. Because nobody wants to be a frazzled mess during a baking session.

    The Method

    There are a few categories of muffin: the ones that use the creaming method and the ones that use an all-in-one method. The “creaming” method simply means that you mix your room temperature butter and sugar at high speed until the mixture is well blended. This method creates lovely air pockets that allow your leavening to do its work and create rise.

    Creamed butter and sugar look like this:

    I used Plugra for today’s muffins. Plugra is a great cultured butter that appeals to a lot of different palettes, so I knew I wouldn’t go wrong with it!

    The other common muffin type is the all-in-one muffin. In traditional baking, this usually means that the dry ingredients come together in one bowl and the wet ingredients in another, then the two are married and barely mixed before the batter goes into muffin cups. The fat in an all-in-one muffin can either be oil or melted butter.

    Each type of muffin has its own pros, and honestly I don’t prefer one over another. When I want a muffin, I want a great muffin, and both methods can deliver a great muffin.

    This recipe uses the creaming method, and it came together so quickly! Before I knew it, I was ready to take the batter off of the mixer stand and fold in the fruit by hand.

    Fun fact: fruit muffins (like this one) mostly come together without the fruit. Fruit typically gets folded into the batter at the end of the mixing phase, when there are still a few streaks of unincorporated flour. That’s what I did here.

    Sorry. No pictures of that! BUT if you want to see an example of what a completed batter with “unincorporated” flour looks like, as well as a technique for folding ingredients into a batter, take a look at this literally-totally-unrelated-but-totally-relevant-on-this-point video about pancakes (around the 2:45 mark):

    Prepping the Pan (and a Surprise Technique!)

    Batter finished, I prepped my muffin pan for the bake. For fruit muffins, this means using both paper muffin cups and nonstick spray.

    I mean, unless you like scraping muffins from a pan and toasting the muffin carcasses to make parfait…forget that cooking spray, Saints, and that is exactly what you’ll be doing.

    No hate! I like parfait too! (Let me write that down, though, for the next time I stick muffins to the pan.)

    Tip: when making blueberry muffins, I carefully fold three quarters of the blueberries into the batter itself and save the other quarter to drop on top of each muffin right before I bake them. This gives me glorious blueberry color and texture throughout the entire muffin!

    That’s exactly what I did here:

    Before I put these in the oven at 350, I sprinkled some demerara sugar (I used Sugar in the Raw) over the top of each muffin for additional texture.

    The Bake

    I am…not patient. This was a long 35-minute bake. But it was totally worth it when these came out of the oven:

    I burned my mouth eating that half of a muffin! But listen, Family. it was SO WORTH IT. These muffins are delicious and so easy to make. Including the time for mise en place, I spent a total of 25 minutes of active time working on them. The rest was waiting, and waiting, and UGH waiting…

    So much waiting.

    I hope you enjoyed this Sunday Session! Don’t forget to subscribe and tell me what your favorite muffins are to eat!

    Join the List

    Subscribe to get a free video lesson and our latest content by email!

      We won’t send you spam. Unsubscribe at any time.

      Baking 101: How to Measure Ingredients

      Home » Featured Recipes » Page 38

      Recently, I wrote a post about my favorite kitchen utensil: my digital food scale. If you missed it, you can check it out here!

      Y’all. I do love a pretty KitchenAid, but it’s not my most favorite kitchen tool in the whole wide world.

      She sure is pretty.

      This post is a kind of companion to that post, to continue our walk down the path of baking enlightenment.

      This post is for the “I can’t bake because it’s too hard” crowd. I see you and dedicate this one to you.

      Want to become a baker in one baking session? Do you have one chance to execute a brand new recipe and need to get it right in order to avoid family ridicule? Then ditch the U.S. Customary Measurement System for measuring ingredients.

      To break it down: to get better in one session, the best way to measure ingredients is to use the International System of Units.

      Y’all right now:

      The Metric System. The International System of Units is just a fancy, upgraded way of saying the Metric System.

      I grew up saying the Metric System and that term is still widely used, so I’ll use it in this article. I cannot overstate how much and how quickly the Metric System will change your baking.

      Why is this Important for Baking?

      Be forewarned: this topic ignites my inner and outer supernerd, so feel free to skip to the section titled How to Measure Using the Metric System in Baking if you’re just here for the nuts and bolts of how to use metric measurement in baking. It’s all here for you!

      It’s true that cooking and baking are very different kinds of way to prepare food. It’s also true that baking demands much more precision than cooking, and that that precision starts with how accurately you measure your ingredients. The margin for error is much slimmer for baking than it is with cooking.

      If we start there, then we understand that the first best way to become successful with baking is to use tools that help measure ingredients most accurately.

      In other words, the system with the smallest uniform measurement units gives the most accurate measurements for baking and leads to an immediate impact on your baking results. That, Friends, is the Metric system.

      The demand for accurate measurement is the single biggest thing that frustrates new bakers. Especially people who are good cooks who are used to being able to spontaneously modify a recipe. (This was me.)

      If you’re a new baker, you’ll do yourself a favor by letting go of that spontaneity for a bit. It’s humbling but I promise you’ll be able to resume tinkering once you know the basics.

      In order to understand which measurement system you should use for baking, it’s useful to understand the differences between the two so that you can make a decision about which one is a more objectively accurate measurement system.

      If you’re shook, I understand. When you grow up cooking and baking using U.S. Customary System (like I did), and you think that that system is absolute, it’s a bit of a shock to learn that you’ve been doing it the hard way (and unnecessarily so) your entire life.

      Okay here we go.

      The U.S. Customary System

      The U.S. Customary System is an entire system of measurement that comes from –wait for it– Great Britain. After U.S. Independence, when the U.S. was getting on its feet, the leaders realized that they needed to formally adopt a system of weights and measures, mainly for manufacturing and trade.

      Since the English colonists brought the British Imperial System when they originally arrived and colonized the country, that system was already established once the colonists gained their independence from Britain. So they kept it mostly the same and renamed it the “U.S. Customary System”.

      That is to say, the U.S. Customary System is a holdover from a time of British rule. And, kicker, even the British left it behind, phasing it out in the mid 1960s.

      The U.S. Customary System uses inches, feet, yards and miles to measure length. It uses ounces, pounds and tons to measure weight. And finally, the U.S. Customary System uses fluid ounces, cups, pints, quarts and gallons to measure volume.

      For baking, the most common measurements from the U.S. Customary System are cups (volume) and ounces (weight).

      What is the Metric System?

      The Metric System is a standardized system of measurement that…most of the world uses.

      Let me be clear: there are three whole countries on the entire planet that use some form of the British Imperial System.

      The Metric System is a system of weights and measures that creates smaller units than the units created by the U.S. Customary System. While the U.S. Customary System uses ounces for weight measurement, the Metric System uses grams. There are about 28.4 grams in one ounce. So, using grams to weigh ingredients will give you a much more precise result.

      In addition to using the gram for weight, the Metric System uses the meter for length, and the liter for volume.

      Metric is so exact. So oddly comforting. Like a precise, meticulous hug.

      Photo by William Warby on Unsplash.com

      Most of the metric weight measurements you’ll see in modern recipes use grams. If you ever need a kilogram of an ingredient, you’re “doing the most” as my sister-in-law would say. This can happen easily if you’re scaling recipes to make more servings though!

      Weight vs. Volume Baking

      Bakers in the United States tend to use weight measurements (ounces, pounds) and volume measurements (cups) more than any other types of measurement. “Weight measurement” just means that you are actually using a digital kitchen scale to weigh the ingredient. “Volume measurement”, on the other hand, means the amount of space that an ingredient takes up in a container.

      Volume = Container. Weight = Scale. Photo Credit: @beginwithbutter

      When you fill a measuring cup to the top with flour and then put that flour into your recipe, you’re using volume measurement. You’re allowing the shape and size of the vessel (the measuring cup) to determine the amount of the ingredient in the recipe. In other words, you are living on the edge.

      Using weight measurements (ounces, pounds, grams) is a more accurate way of measuring ingredients, regardless of whether you choose to use the U.S. Customary System or the Metric System. When you weigh ingredients, you have complete control over how much of an ingredient goes into a recipe. Because the amount of an ingredient and its proportion to other ingredients will always impact the final product, weighing ingredients gives you much more control over the outcome.

      Volume measurements are fickle and can leave you twisting in the wind if you don’t know what you’re doing. Shoot, even if you do know what you’re doing, volume measurements can take you down. Whether you’re a non-baker or a veteran baker, there’s just no way to know how much of an ingredient you’re using unless you weigh it.

      Even a measuring cup is often not uniform. When you’re making a recipe that calls three cups of flour and you’re scooping flour out of a container, those three “cups” of flour could each vary by 30 grams or more.

      Hello frustration. Nice to see you again.

      So, long story short: measuring by weight leads to accuracy and consistency. If you want to use the U.S. Customary System, pounds and ounces are your best bet. For the Metric System, grams is your new best friend.

      Enough with the history and math lessons. Let’s get to the good stuff.

      How to Measure Using the Metric System in Baking

      Well, first you need a tool. A handy dandy digital food scale scale is the right one for the job.

      For a quick tutorial on how to use a digital kitchen scale when measuring ingredients, check out the video, below. For specifics about what the tare button means, as well as a visual for how to use a kitchen scale in real life, fast forward to about 1:10.

      Once you’ve unboxed your scale, you’ll next need a recipe that’s written in metric units. For beginners, this is absolutely the best place to start. I’m noticing a wonderful trend in baking blogs lately; many of them are adding metric measurements to older recipes, which is super helpful for people who are just starting to bake.

      For intermediate and advanced bakers who are working with recipes written using the U.S. Customary System, it’s easy to convert the ingredients into metric measurement! Note: conversions can be tricky, so this takes some practice and can require some minor tweaks to the amounts of ingredients to get the recipe just right. It’s well worth it in the end, though, since you’ll end up with a very reliable recipe that you can reproduce over and over again. (Just remember to write down your tweaks!)

      For those of you interested in converting recipes from U.S. Customary to Metric measurement, a great resource is King Arthur Baking’s Ingredient Weight Chart. Note: there is some debate in the baking world about how many grams are in a cup of flour (120-130 grams) and a cup of sugar (195-210 grams). If you’re just starting with conversions, I’d ignore that debate completely and follow the guide.

      Basically, get comfy with doing conversions first; with practice, you’ll figure out where you land in the bigger discussion.

      What to Measure with Metric

      Family. We don’t have to measure everything on this digital kitchen scale. But…

      BUT…

      There are some non-negotiables. If I haven’t been clear so far, let me be clear right now: I always, ALWAYS weigh flour, butter, cocoa powder, and sugar (granulated and confectioner’s) on my digital kitchen scale. These ingredients can be absolute menaces to society and have the greatest ability to cause gremlin mischief in just about any recipe. It’s important to get these amounts correct.

      Photo by Tyler Nix on Unsplash

      Liquids are a different story, since technically liquids are measured according to volume and not weight (using milliliters). But I sometimes my digital kitchen scale to weigh liquid ingredients as well, especially if all of my liquid measuring cups are dirty.

      Hey, baking is still a very messy business and sometimes I just don’t want to stop mid-stream and wash a liquid measuring cup. #RealTalk #BakersLife

      Teaspoons and tablespoons are still commonly used worldwide for baking. Just remember to keep them level! Some recipes do measure things like baking powder and baking soda in grams, though. I would recommend following those instructions if the recipe developer wrote it that way.

      Why Use Metric Measurement?

      Great question. Here are five reasons why I made the switch to Metric weight measurement from U.S. Customary weight measurement:

      • It improves accuracy. When you use metric weight measurement, the units (grams) are the most exact in the measurement game. Grams are more exact than ounces because the increments for grams are smaller. So, the amount of an ingredient that you put into a recipe is literally exactly the amount that the recipe writer intended.
      • You’ll build consistency. When you use metric measurement consistently, you’ll start to see the same great results every time you bake. You’ll learn what to expect from a recipe and you’ll be able to execute it consistently every time. Which leads to my next point…
      • It improves confidence. When you use metric measurement consistently, you’ll gain confidence when you repeatedly start to see beautiful finished products. Like a clean shot in golf or a hot shooting hand in basketball, once you know you can do it, you want to do it over and over again. You can be confident that you’ll get the result that the recipe developer intended (unless you burn it up in the oven…but that doesn’t have anything to do with measuring).
      • It saves money. Left to our own devices, we tend to be very heavy-handed with ingredients. Metric takes the guesswork out of measuring and ensures that you only use what you need and no more. After a time, those extra grams of sugar really add up!
      • It is easy. You just need a kitchen scale and the will to bake good food.

      I hope this post leaves you feeling knowledgeable and empowered and looking forward to your next baking project! Don’t forget to subscribe while you’re here so that you can get notified of new posts as soon as they go live!

      Join the List

      Subscribe to get a free video lesson and our latest content by email!

        We won’t send you spam. Unsubscribe at any time.

        Sunday Session #2: Mother’s Day Butter Battle

        6
        Home » Featured Recipes » Page 38

        I recently posted about the science behind butter. If you missed that post, no worries! You can catch it again right here.

        The reason why I wanted to post about the science behind butter was because I already had this fun project planned for a follow-up. Because cake. Seriously.

        For this Sunday Session, I put my absolute-favorite-in-the-whole-wide-world Kerrygold to the test against three other butters, to see if Kerrygold would stay at the top of the butter hierarchy.

        Let me lead today with this: any and all of the butters I tested this weekend yielded cakes that are spectacularly better than anything you could buy in a store. That is to say, I did not test a “bad” butter.

        I did have a clear favorite though.

        Onward!

        The Contenders

        For this particular taste test, I chose Land O’ Lakes (The Classic), Vermont Creamery (The New-to-Me Kid), Plugra (My Sister’s Choice) and Kerrygold (my favorite). I used all salted butter for this experiment.

        You can immediately see that the Kerrygold butter has a richer, deeper yellow color than all of the others. It looks luxe right out of the packaging. I wondered if that gorgeous color would translate to a deeper color in the finished product.

        Everyone in the same photo.

        Butter chosen and prepped, I got right to work.

        Initial Impressions

        Initially, I looked at the butter and tested the texture between my fingers. I also checked the smell of the butter, since cultured butter typically has a more prominent smell than sweet cream butter.

        The Land O’ Lakes butter was firm to the touch, even after coming to room temperature for a much longer time than any of the other butters. The smell was neutral; it didn’t excite me but it didn’t turn me off either. The color was a pretty, barely-there yellow that reminded me of Gerbera Daisies. (Note: I love yellow flowers, so I’m going to wear this analogy out).

        The Vermont Creamery Butter passed this initial test with flying colors. This butter feels velvety even right out of the refrigerator, and it has an amazing tangy smell that tells you right way that it’s a cultured butter. The color had a more golden hue that made me think of daffodils.

        The Plugra butter also has a rich texture right out of the refrigerator; the higher butterfat content means that it will melt right in your fingers. The smell is fairly neutral, even though it is a cultured butter, but that could have been because my nose was still recovering from the wonderful shock and awe campaign waged by the Vermont Creamery butter. I did notice a slight tang to the butter, but it was still more neutral than tangy. Color-wise, the Plugra butter reminded me of the soft yellow hyacinth.

        When I say that my camera had a hard time capturing the color of the Kerrygold…

        Y’all. It kept sending my lens out of focus. I finally got a shot but boy is it aggressively golden, almost like one of the pansies in my garden:

        The Kerrygold smell fell somewhere between the Plugra’s hint-of-tanginess and Vermont Creamery’s out-of-this-stratosphere tanginess. Which is to say that it was pleasantly tangy, but the smell is very balanced with the other sensory elements. Texture-wise, this butter was about the same as the Plugra and it was soft right out of the refrigerator.

        Each of them was impressive in its own way during initial impressions. I was prepared for how Kerrygold would perform because I’ve used it for years and years. The Vermont Creamery butter made an unbelievable first impression though and my interest was piqued!

        The Method

        Most people test butter by baking one loaf of really good bread, slicing it as soon as it’s warm-but-done, and spreading butter over the warm bread.

        This is an amazing way to test butter. If I’m being honest, it’s probably the best way to test butter because it’s easier.

        I decided to bake four cakes. Because apparently the hard way is in my DNA. But honestly, I wanted to see how each butter performed in baking, so I actually needed to bake something (and why not cake?). Eating butter and baking with butter can be very different experiences.

        Each cake used exactly the same techniques and ingredients. The only difference between the four was the butter. That way, I could be sure that any difference in each cake was the result of the butter that I used.

        Onto the fun!

        In the Mix

        I started by creaming each butter with sugar. Creaming is the process of basically whipping butter and sugar together, right at the beginning of baking, in order to create wonderful air pockets that aid in the rising process. During creaming, you’re looking for the butter to become lighter in color and create a creamy mixture with the sugar.

        As much as I tried to cream the Land O’ Lakes butter on high speed, it would not come together like the other three butters. I have to admit, this made me kind of skeptical. But I grew up with Land O’ Lakes and it has a very special place in my heart, so I wasn’t ready to discount it.

        Texture-wise at this stage, the Vermont Creamery butter won the day by far. It creamed beautifully and easily in about eight minutes on medium-high speed. My second favorite was the Kerrygold butter, though Plugra did a great job as well.

        Batter Up!

        I wanted to compare texture and color of each batter once it was ready for the oven. Here’s are my findings:

        From left to right: Vermont Creamery, Land O’ Lakes, Kerrygold, Plugra.

        Honestly, aside from the Vermont Creamery, color-wise they all landed in about the same place. This was surprise number one for me during this process.

        The Vermont Creamery butter performed amazingly well in this part of the challenge. The color and texture of the batter were simply spectacular. While the tanginess of the butter was tamed by the other ingredients, the batter had a decidedly sharp taste to it.

        Look at me, out here risking salmonella poisoning for science.

        (please don’t try this at home. I trained for this moment by licking many beaters as a child.)

        Kerrygold and Plugra tied, because they both created the expected, silky texture that I’m used to working with in my kitchen. The Kerrygold had decidedly more butter-forward flavor, but the Plugra delivered an expected, pleasant flavor as well.

        The Land O’ Lakes batter was noticeably thicker than the other three, and was the most grainy of the four cake batters. It was not aggressively buttery when I tasted it.

        I’m happy to report that I’m writing this blog 48 hours after this test, and that no Butter Ambassadors (me) were harmed during this experiment.

        Onto the bake!

        Out of the Oven

        There are three smells that get me every time.

        My favorite food smell of all time is diced onions going into hot oil.

        A very close second is lemon pound cake coming out of the oven.

        Third (not that it matters but I wanted to do a gold/silver/bronze kinda thing here) is fresh bread baking. I mean holy…

        I say all that to say that this entire experiment almost went down the tubes when these cakes finished because my willpower was S T R U G G L I N G.

        Here they are!

        Vermont Creamery won this by a landslide. I mean come on! That color is poetic! I did take a huge chunk out of the Kerrygold cake while trying to get it out of the pan, but it otherwise carmelized very nicely. It achieved a very nice golden brown color, and as an added bonus, you can see the golden inside of the cake because I removed it from the pan too quickly and…that happened.

        You’re welcome.

        Between the Land O’ Lakes and Plugra cakes, I liked the Land O’ Lakes color better. That was surprise number two!

        The Taste Test

        For my “very scientific experiment,” I enlisted the help of my darling neighbors, one of my best friends, and my TTT’s (Tiny Taste Testers…aka my kids). Here’s what the “tasting portions” looked like:

        I wanted to be generous. Also, I had four cakes to dispose of.

        Results time!

        A was Vermont Creamery.

        B was Plugra.

        C was Land O’ Lakes.

        D was Kerrygold.

        I let everyone vote for their top two and tabulated the votes (I did not vote). The winner, with three first place votes, was VERMONT CREAMERY! Some of the comments were that the cake “had the best lemon flavor”, that there was “a really special taste that I couldn’t quite place” in this cake, and that “the buttermilk and lemon were really balanced”.

        I clearly have some advanced testers for friends and neighbors.

        I also have a new butter for lemon pound cake because I could not agree more with their assessment. And that was the biggest surprise of the day for me!

        Kerrygold was a very strong second with two first place votes.

        Land O’ Lakes and Plugra tied for third with one first place vote each. My daughter devoured the Land O’ Lakes cake, which triggered a food memory for me as a young girl.

        I should note that almost everyone (adults and children alike) in the experiment picked Plugra as their second fave. Plugra did deliver a truly delicious cake. It’s a smooth, creamy butter with a note of tanginess that definitely earned its place at the top of the butter hierarchy. Of the four butters, I would say that the Plugra butter was the most universally liked.

        Let me be very clear, Saints: any and all of the butters in this fun experiment delivered exceptional lemon pound cakes. I believe in home bakers and while I have my favorites, I will absolutely use Plugra and Land O’ Lakes again.

        Final Takeways

        If you’ve read this entire post, THANK YOU. I’ll be brief at this point.

        I’m choosing Vermont Creamery from this point forward. It’s an exceptional butter and it does a tremendous job emphasizing the citrus notes in this cake. The slight tang from the buttermilk is an amazing contrast to the sharp, acidic lemon, leaving a cake with perfect balance. I can’t wait to work more with this butter and I’m excited to have a new favorite!

        Also, I’m slathering Vermont Creamery butter on all the bread. ALL OF IT. For research of course.

        Thanks so much for going on this journey with me! I hope you’re inspired to go forth and bake!

        Join the List

        Subscribe to get a free video lesson and our latest content by email!

          We won’t send you spam. Unsubscribe at any time.