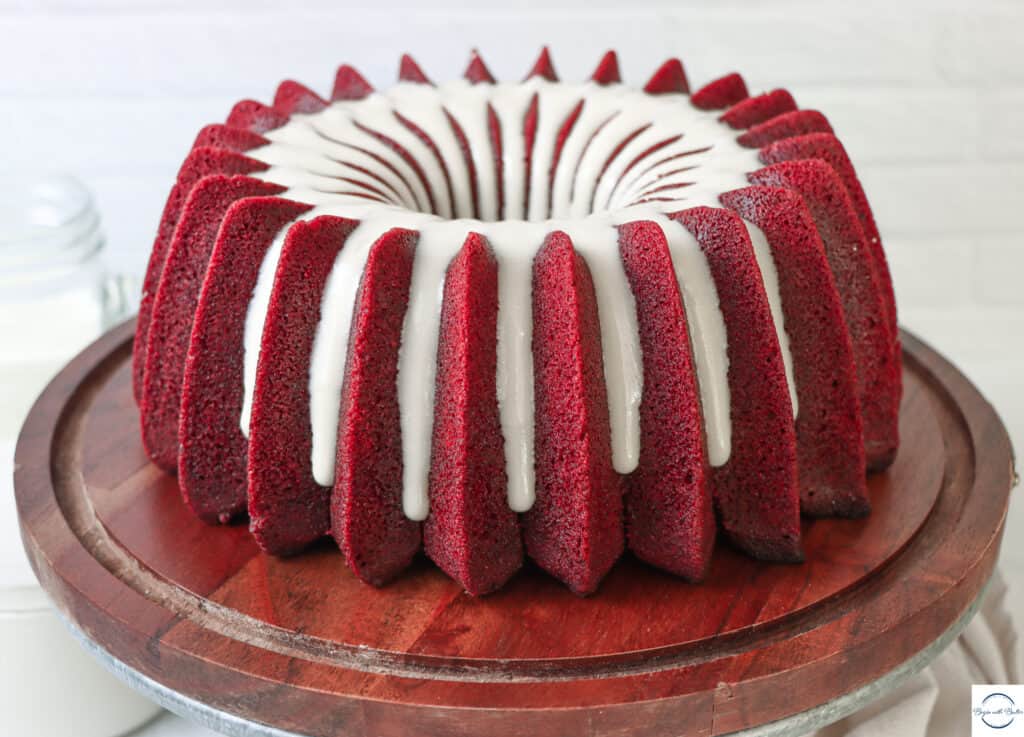
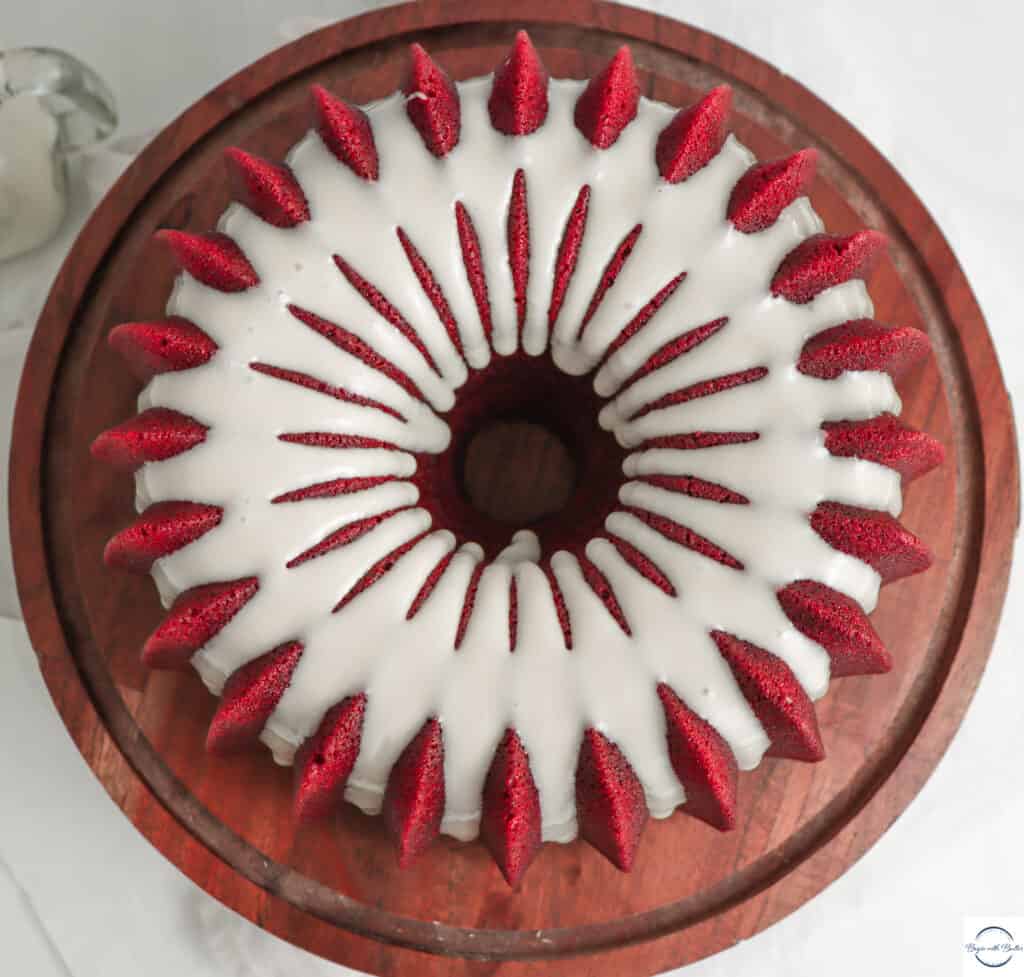
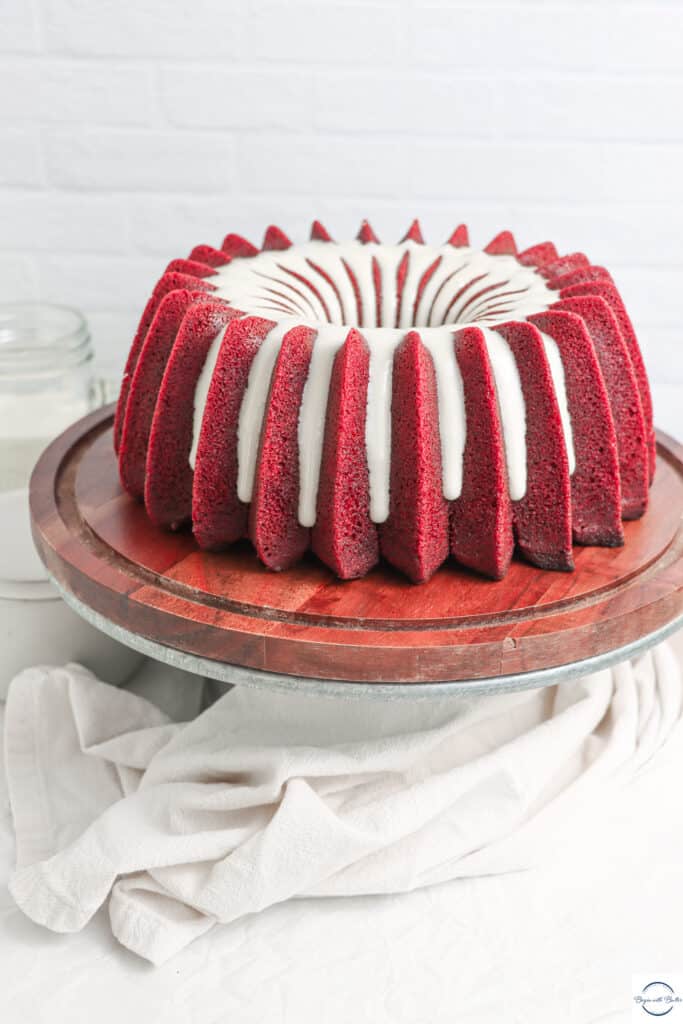
Friends, Ms. Ruby is back. And when I say that she is better than ever?
Ms. Ruby caused a stir on the Begin with Butter page last fall. So much so that I raced to get her dressed and ready for the website. Well, she was ready. And she was gorgeous.
But we recently spent a lot of quality time together…and she’s now something else.
I am so proud of this cake that I could literally burst.
Ms. Ruby’s Beginnings
Family, I live in Maryland, which is arguably the epicenter of all red velvet cake activity. Even as I was learning how to bake, one of the most requested item from friends and family was red velvet. Cupcakes. Layer cake. Cheesecake (who knew this was a thing?!). Red velvet marble cake. Red velvet ice cream cake.
You get the point. People here are very serious about red velvet.
I’m an equal opportunity cake eater, so red velvet is among the cakes that I like-a-whole-lot. But I can definitely appreciate the way that people love their red velvet cake. They go way out of their way to find good red velvet. As a baker, I have nothing but respect for red velvet super fans.
When I was developing a red velvet recipe, I knew it had to be unbelievable in order to satisfy discerning red velvet cake fans. So I toiled over this recipe for a while until I was ready to share it with the world. And then I spent the last six months figuring out how to make it even better.
Red velvet lovers, this one is for you.
Do you love baking cookies? Ever wonder why your cookies are sometimes perfectly, and sometimes a crumbly mess? Click here to download my FREE guide, “Five Easy Tips for Chewy Cookies!”
Beginners Start Here
If you’re new to baking or you’d like some additional information to refresh your baking, feel free to take a look at these resources on the BwB site! While they’re not mandatory reading, they will be really helpful for you to be successful with this cake!
With just a little prep, you’ll be ready to tackle this recipe head-on. I can’t wait to see your amazing creations! Don’t forget to tag @beginwithbutter on Instagram so that I can shout out your successes!
A Surprising Note
When I’m developing a recipe, I’m always looking for ways to improve upon what I did before. Always. This…does not help my perfectionist tendencies.
I really wanted to punch up Ms. Ruby’s flavor without sacrificing the flavor or texture. So, during the re-test for Ms. Ruby, I decided to do a few things:
I added oil to the batter. That tiny bit of oil creates big, delicious moisture in this cake. And that small amount of oil doesn’t interfere with the process of creaming butter and sugar. Like at all. It was entirely worth it, as red velvet cakes can be dry, and I’m willing to go the extra mile to avoid that sad fate.
I cut the amount of cocoa powder in the recipe. Red velvet cake is, indeed, chocolate cake. However, it’s always a very delicate balance, since the cocoa powder can overwhelm the red food coloring and render it meaningless. So, after multiple re-iterations of this cake, I’m happy to report that I reduced the cocoa powder in this cake, but did not sacrifice the flavor at all. I’ve also been lucky enough to receive the most incredible baking chocolate of my life from Scharffen Berger Chocolate, and I 10/10 highly recommend it for this wonderful dessert.
This one surprised even me. I used a baking spray to coat my pan, and brushed it on with my trusty pastry brush. I tried both cocoa powder and flour to grease my pan, Family, and I was never satisfied. I risked it all and used baking spray this time, and the outside of this cake caramelized perfectly. I still say that it is totally a matter of personal preference, but I can finally say that my aversion to baking sprays is over. ???? So you’ll see them from time-to-time.
Oh! There’s Video!
Want to see Ms. Ruby’s “IG Official” re-introduction into society? Check this out!
Friends, I have been having a BALL with pound cakes recently. So much so that I decided to do the Twelve Days of Pound Cakes Holiday Event. So much so that I’ve been baking and developing new pound cake recipes for that event for you.
Including the Ruby Red Velvet Pound Cake. She is gorgeous and she was going to be featured in that event.
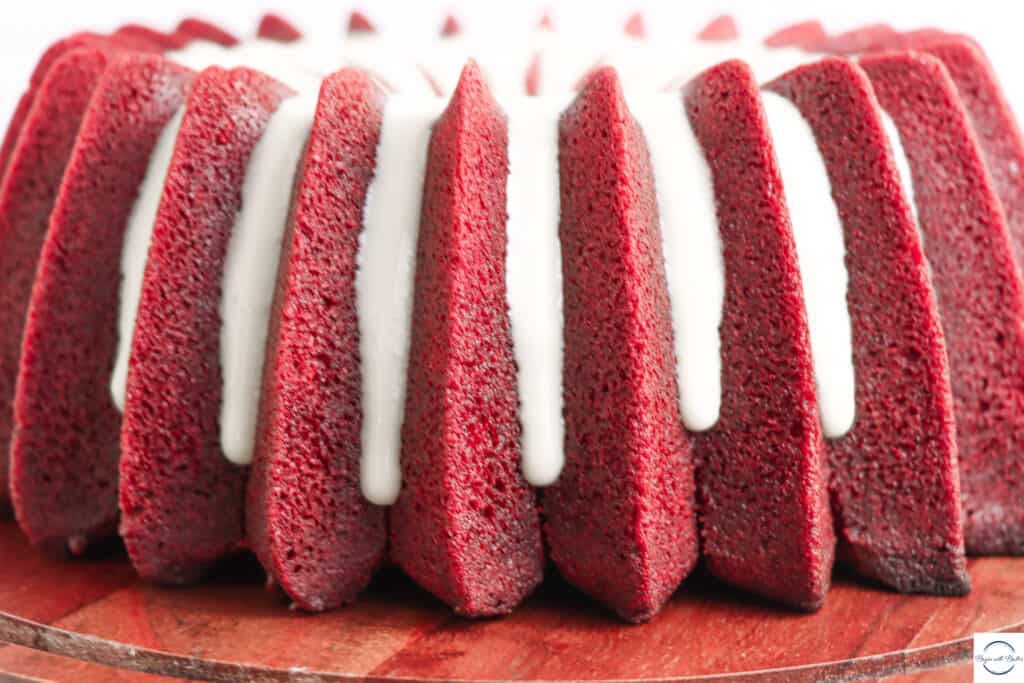
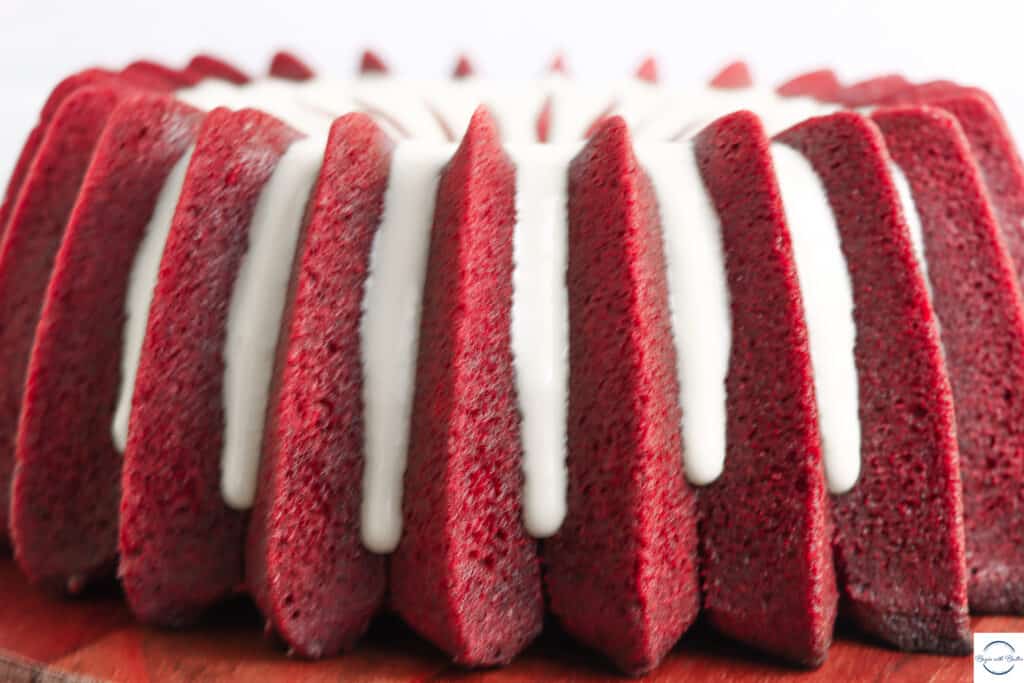
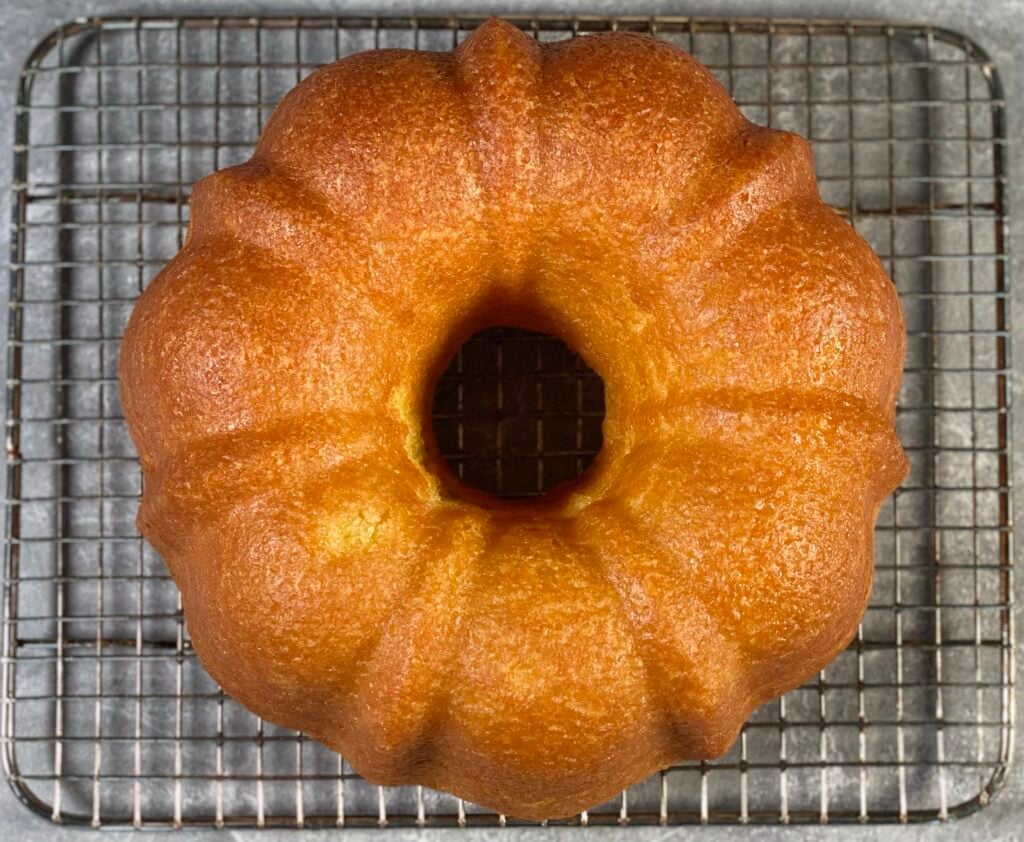
Meet Ruby.
Ruby Red Velvet Pound Cake
I posted Ruby on Instagram one day without a recipe (😮), and the email and DM campaign from the BwB community was swift and immediate. I was utterly shocked at how many of you needed this recipe for your Thanksgiving tables. So Ruby got pushed up in the rotation.
I want to make sure that you’re set up properly to make all of the pound cakes that are on the BwB site, so today’s post is about the prep. There are some tools that I rely on to make consistent, great-tasting pound cakes every time, and I wanted to share those tools in today’s post, so that you’re ready to rock and roll when it’s time to bake.
Ready? Me too!
**note: this post contains affiliate links for products that I use in my home kitchen.**
You might already have most of these things, but I wanted the list to be comprehensive so that you could confidently go forward, knowing that you have all of the tools that you’ll need for these bundt cakes.
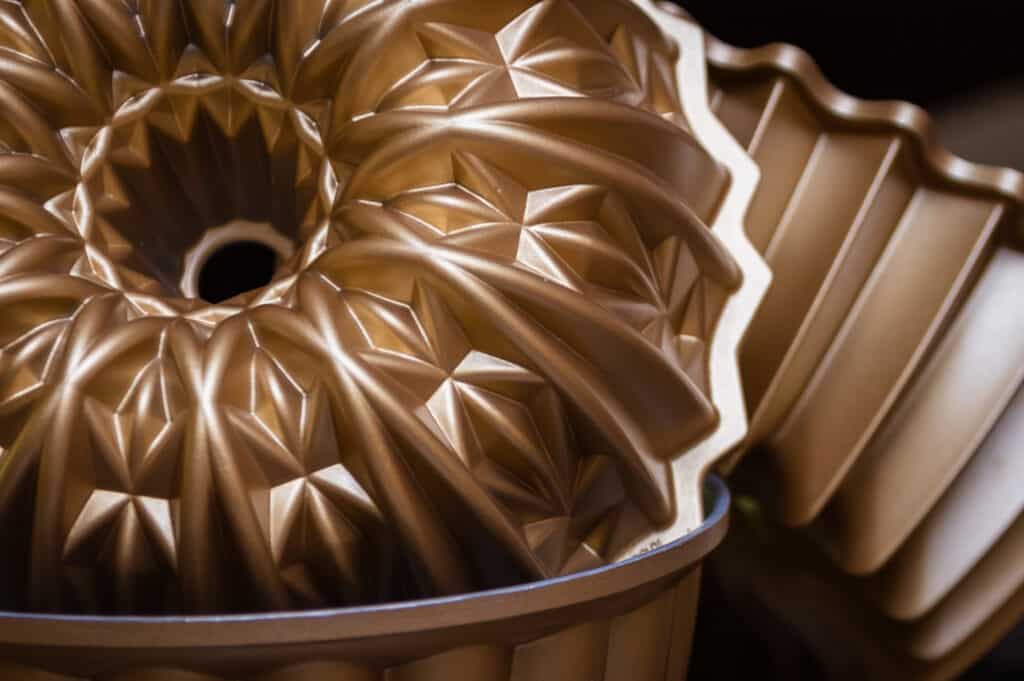
Bundt Pans
In order to get the characteristic shape of a bundt cake, you’ll need a bundt pan. Bundt pans will help you get the beautiful, show-stopping shape that you’re wanting to create. They also have higher sides than your typical cake pan, so you don’t have to worry about the cake batter spilling over the sides (within reason).
http://www.ashleighbingphotography.com/
I wrote a little more about bundt pans in my post about the best pans for a home baker’s kitchen; you can find the section from that post right here. If you’re reading this and you want to know which bundt pans I’ll be using this holiday, here they are!
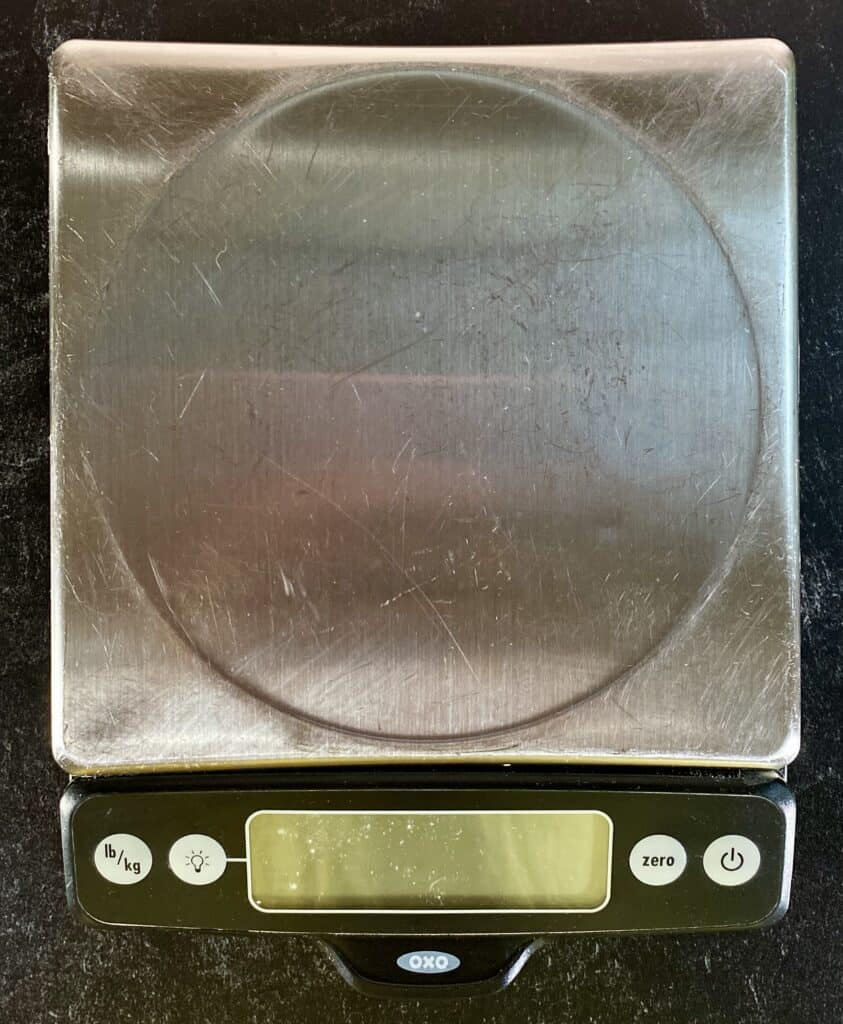
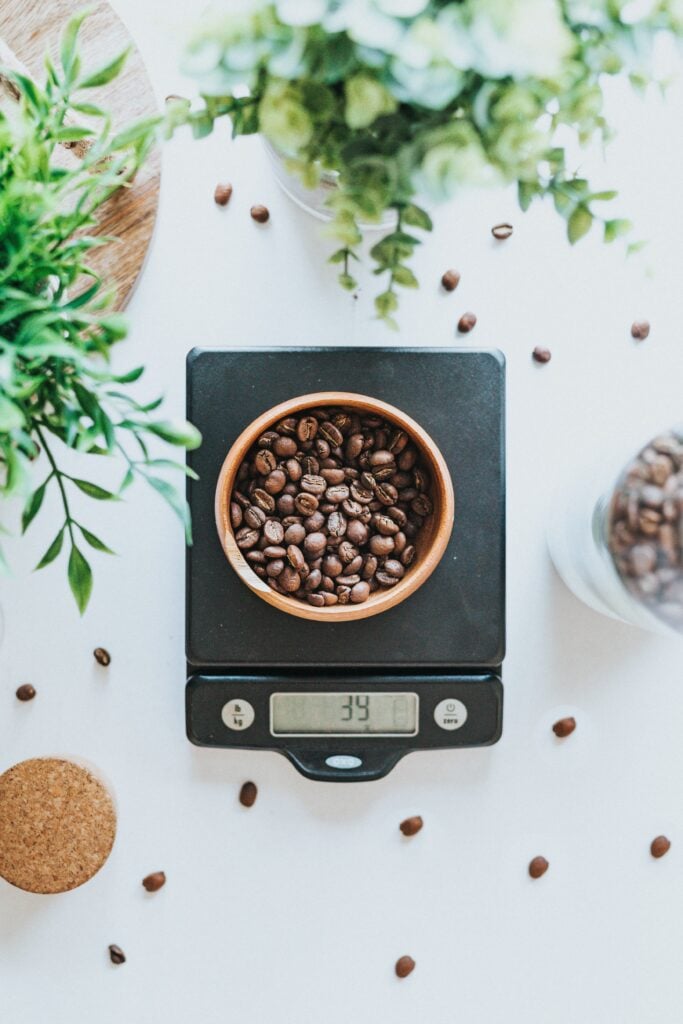
I will always always always recommend using a digital food scale and metric measurement when baking. Pound cakes are a game of inches and it’s a disaster waiting to happen if you are heavy handed with ingredients. A food scale helps to avoid the trauma of watching your cake overflow its bundt pan in slow motion.
You can find my favorite food scales here and here.
Apron
Baking is a messy thing. There’s no real way to get around that. Sometimes there are unintended splashes and spills. And I, for one, would rather have those splashes and spills intercepted by a quality apron.
My favorites? My Hedley and Bennett Essential Apron is my clear favorite, but it was an investment. Williams Sonoma Classic Stripe Aprons are AMAZING aprons that are sturdy and beautiful, and affordable. I have them in light colors and they have NO STAINS. That fact is rather remarkable, considering the amount of food coloring and cocoa powder abuse I’ve subjected them to over the years.
Oh! And aprons keep your clothes from getting sloshed with dish water! Because there will always be dish water when you’re done baking.
Totally worth it though!
Sifter
Sifting is an incredibly key component to pound cakes; it ensures evenly distributed dry ingredients, gets clumps out of those ingredients, and removes impurities that might be in those ingredients.
For example, if you want to make the Ruby Red Velvet Pound Cake, you’ll need a sifter for the cocoa powder and flour mixture. A sifter will break up clumps of cocoa powder and ensure even distribution of that cocoa powder, flour, and other dry ingredients in your beautiful finished pound cake.
Because Ruby? She’s as beautiful as she is delicious. Inside and out. We don’t want lumps of cocoa powder ruining her smooth finish or her perfect internal texture.
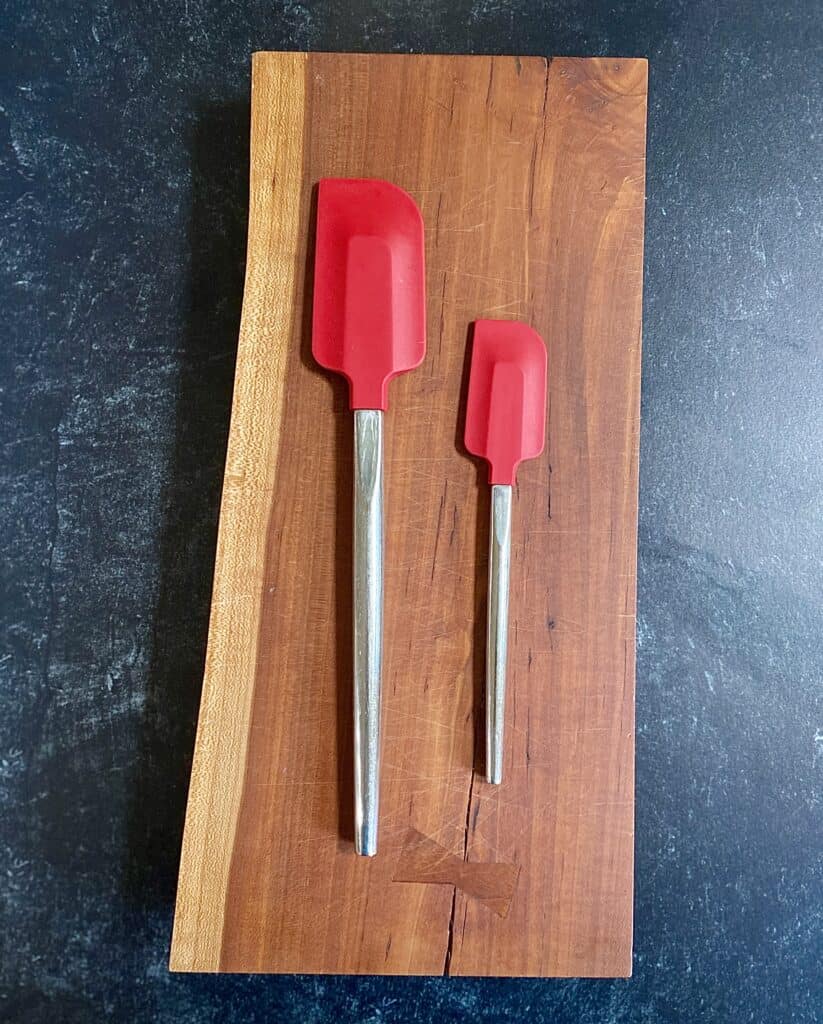
Rubber Spatula
It’s important to have a stiff rubber spatula for bowl scraping and especially for the final turns of the completed batter.
My go-to spatula set for several years has been this set from Williams Sonoma. They are sturdy and can work through the stiffest cake and cookie batters. The small ones are great for scraping measuring cups and jars for that last…little…bit.
I’ve recently started using this set from OXO. I absolutely adore the OXO brand and use several of their products. These have become regulars in my baking rotation because they’re perfectly flexible while also being perfectly stiff, and they’ll work great for this cake.
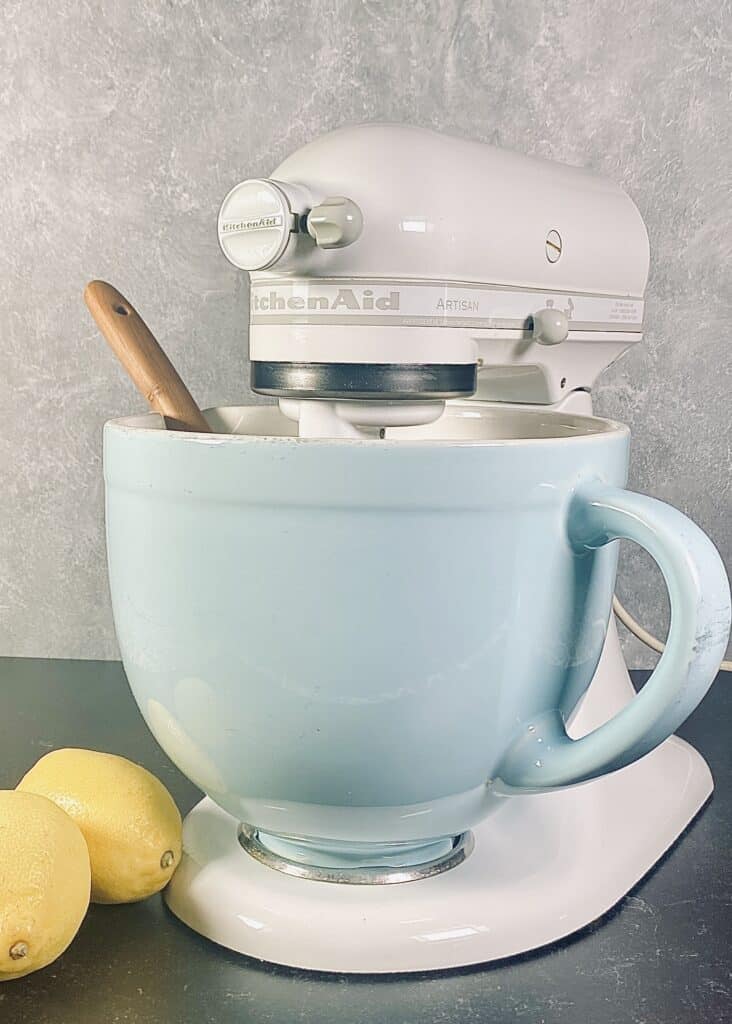
Stand Mixer
I’ve said it before and I’ll say it forever: you do not need a stand mixer to bake amazing things. It’s not a necessity. And if you’ve read my recent post on this exact subject, you know that it’s possible to ruin a beautiful, brand new machine if you’re not yet kitchen-competent.
However, the stand mixer is the undisputed monarch when it comes to efficiency in mixing. This is especially true when it comes to efficiently and quickly creaming butter and sugar. Since this is the most crucial part of the mixing process for pound cake, having the most efficient tool for the job can be a huge bonus.
My kitchen workhorse is my KitchenAid Artisan Stand Mixer. I love this machine. It creams butter and sugar so beautifully. This step is crucial for getting that perfect pound cake density, and the planetary motion in my machine ensures that it’s done evenly, efficiently and quickly.
I love this machine so much so that I’m eyeballing a KitchenAid Professional. But that is still a little way away and it’s certainly not necessary to make any of the pound cakes on my list.
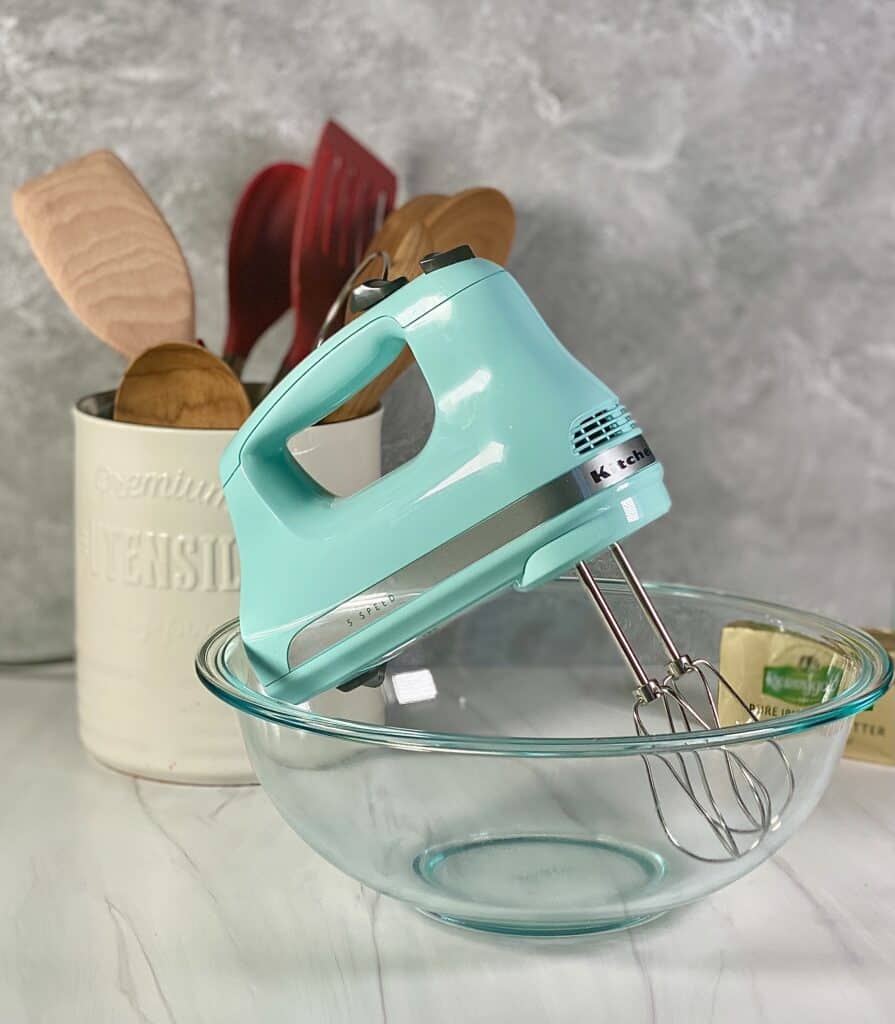
Hand Mixer
A great starter gadget for a new baker is a hand mixer. To be sure, it takes a few more minutes to get that perfectly creamed butter and sugar, but you will get there with enough patience and the result will be just the same. I use my hand mixer for smaller batches, and sometimes when I just feel like doing a lazy bake.
I love love love love my KitchenAid Ultra Power hand mixer. It is an amazing tool for just about every cake I will ever bake.
Mixing Bowl Set
These cakes require quite a bit of prep in their own right! Whether you have a stand mixer or hand mixer, a good mixing bowl set will be really helpful for properly preparing your mise en place. While I did do a whole post on the best bowls for a home baker’s kitchen, to get started, I recommend this set of stainless steel bowls.
They come in different sizes so you can use one for the batter, and smaller bowls to hold your individual ingredients. Because proper prep means being calm and collected in the kitchen. And having multiple bowls will help you prep multiple ingredients for the big bake.
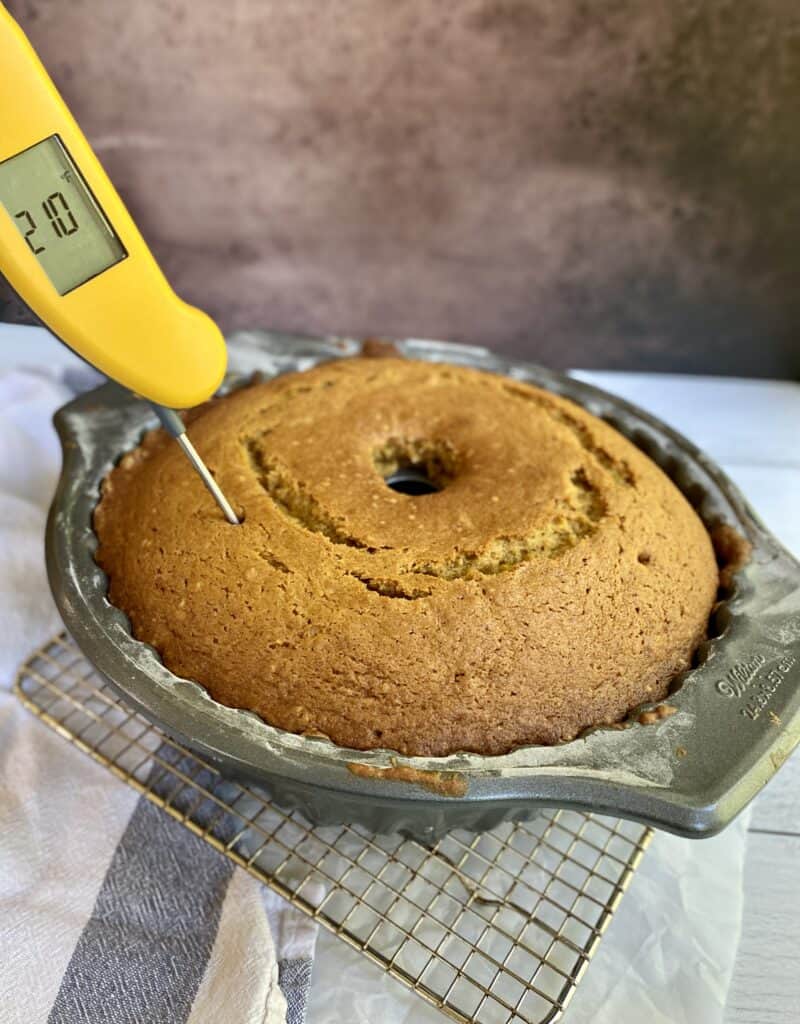
Oven Thermometer
Inaccurate oven temperature is one of the main reasons that baked goods fail. It’s a completely avoidable fate, though.
Seriously. For eight dollars, you can gather a wealth of information about whether your oven runs hot or cold. Because it probably does one or the other.
If you’ve ever read a cake recipe, you’ve probably noticed that they usually tell you that the cake is complete when a toothpick, inserted, comes out clean (or with a few crumbs). While this is a serviceable way to test the doneness of a cake, it’s not the most accurate.
Family. My cakes are involved. They are…a bit of a process. And I want to set you up for success by making sure that you have every tool in my arsenal.
For my cakes, I check doneness with an instant read thermometer. Specifically, I use the Classic Super-Fast Instant Read Thermometer from ThermoWorks. With this tool, I can know with absolute certainty when my cake reaches the magic doneness range (210°F-215°F, though I aim for 212°F on the nose).
Cooling Racks
When your cake comes out of the oven, the general rule is to let it rest for ten minutes and then invert it on a cooling rack.
Like one of these!
When cakes first come out of the oven, they’re still cooking a bit in the blazing hot pan. This is good! It allows the center of the cake to fully set.
It wouldn’t be good to leave the cake in the hot pan for longer than ten minutes after it leaves the oven. This could lead to over baking and dryness. At the ten-minute mark, the bundt pan is not as hot as it was when it first came out of the oven. But it’s still hot enough to overbake your cake.
So, out it goes onto a cooling rack! You can find my absolute favorite cooling rack for bundt cakes here.
Pastry Brush
All of my pound cakes (really, all of my cakes) have a step where you add simple syrup to the warm cake immediately after turning it out of the cake pan. This simple syrup helps to preserve moisture in the cake, and gives pound cakes a gorgeous sheen that makes the cake itself worthy of a special occasion, even without a final glaze.
Some people pour the simple syrup over the top of the cake, but I prefer to use a pastry brush for the task. Using a pastry brush ensures an even distribution of the simple syrup over the entire cake. Plus, for me, this is just a fun way to take a good 360° look at the cake I’ve worked so hard to make.
You can find the pastry brush that I recommend here. My off-brand pastry brushes are very old and I frankly couldn’t find them anywhere online, but I trust the OXO brand because they make so many quality items, so it is without hesitation that I recommend their pastry brushes to you.
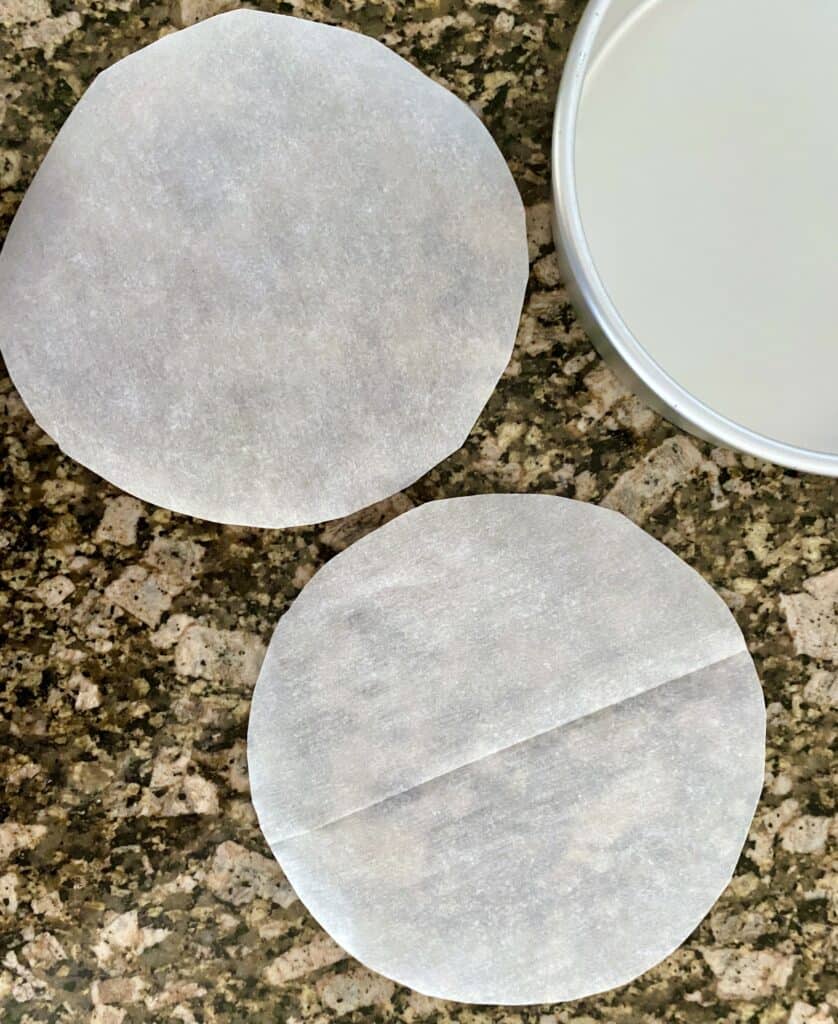
Parchment Paper
Parchment paper is invaluable for pound cakes, both for the simple syrup phase and the final glaze.
Because, as I said before, baking is a messy business. If you put a piece of parchment paper underneath the cooling rack for the simple syrup and final glaze stages, you will have the utterly satisfying experience of crumpling the soiled paper and just…throwing it away.
Parchment paper comes in rolls, like aluminum foil, but it can be cut to fit round, square, or rectangular pans when necessary.
We love parchment.
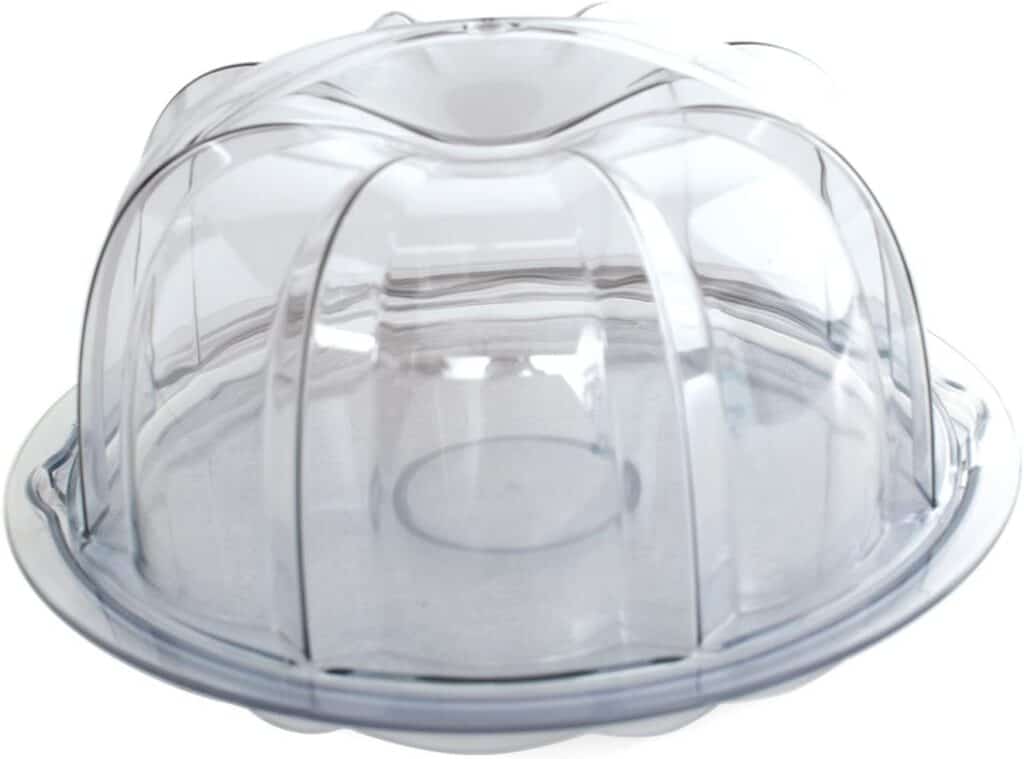
Cake Carrier
Baking a pound cake is a good five-hour process. At the end of that process, you’ll want a proper cake keeper to display and protect your hard work! Whether you’re traveling with your pound cake or you’re serving it at home, I recommend putting your cake on a cake round and using this Nordic Ware Bundt Cake Keeper. It’s sturdy enough to protect and secure your pound cake so that you can confidently and safely transport your cake to its final destination, and it’s also pretty enough to showcase your hard work without having to buy another cake stand.
I truly hope that this guide was helpful for you as you’re preparing to bake pound cakes for this holiday season (and beyond!). I literally cannot wait to see the perfection that you create! Whether you choose one of the Begin with Butter recipes or you use some BwB techniques on your favorite recipes, tag @beginwithbutter on Instagram so we can shout out YOUR success!
Whether you’re planning to spend time with extended family, or you’re having an intimate gathering for two, there’s always room for dessert, am I right?
If you’ve been reading BwB for a while, you’re ready! It’s just a matter of gathering the ingredients and using your newfound baking confidence to execute some amazing pound cake recipes!
But where are the recipes, You ask?
Well, Beloved, that’s the fun part. The recipes are arriving on Black Friday in a BIG WAY!
Okay…Here’s the News!
Beginning on Black Friday, Begin with Butter is going to be the exclusive home of the Twelve Days of Pound Cake Holiday Event!
That’s right. TWELVE. Twelve different pound cakes, with concise step-by-step directions that will help you execute them perfectly for all of your holiday events. Twelve different recipe posts. Twelve consecutive days.
I am still a firm believer that you don’t need a specific recipe to be successful. But so many of you asked for recipes and I’m happy to share.
So share I will! Starting on November 26th, I’m going to share all of the pound cake recipes you’ll ever want for the holidays. It’s my hope that these recipes become staples on your holiday and Sunday dinner tables.
Beginners Start Here
If you’re new to Begin with Butter…WELCOME! This is a super fun community of people from all over the world, and on behalf of everyone here, I’d like to welcome you with open arms.
Of course, learning about ingredients can never hurt, so here’s a link to the Equipment and Ingredients section of the site. This is a great resource for your pound cakes and everything else you want to bake!
These resources aren’t mandatory to make great cakes, but doing a little bit of homework beforehand can help new bakers avoid common pitfalls in the kitchen. That’s how bakers build kitchen confidence!
Pound Cake Tips
Before we even start the Twelve Days of Pound Cake, there are a few great tips that will help you be successful with any pound cake:
Start with Room Temperature Ingredients.
Room temperature ingredients mix quickly and incorporate easily. This is a great way to avoid over-mixing your pound cake batter! It’s also a great way to avoid taxing your hand mixer or your stand mixer and sending it to its demise.
Invest in a Food Scale.
I can’t drive this point home enough. An inexpensive food scale is your best friend in the kitchen because it ensures consistency and prevents heavy-handedness with ingredients. With 10-cup pound cakes, the last thing you want in your batter is unintended extra flour!
Properly Cream Butter and Sugar Before Adding Eggs and Other Ingredients.
Friends, this will change your baking immensely. I believe in this technique so much that I devoted a whole post to it! You can check it out here. There’s videos and photos so that you can see with your own eyes what “creamed” butter and sugar should look like! Since the rise in a pound cake relies very heavily on this step, I wanted to make sure you had everything that you needed to be successful.
Use a Light Touch with Leavening.
My pound cakes have a characteristic tight crumb. I always joke that I like the tight crumb because it allows me to walk around the house with a piece of cake in my hand and not get crumbs everywhere. #NotReallyJoking.
This tight crumb has a lot to do with the fact that pound cakes traditionally don’t need a lot of leavening to be successful (and some don’t need any leavening at all!). Some use as little as a quarter of a teaspoon and they come out beautifully every time! The best advice is to follow the recipe and use a level scoop! You can learn much more about leavening here.
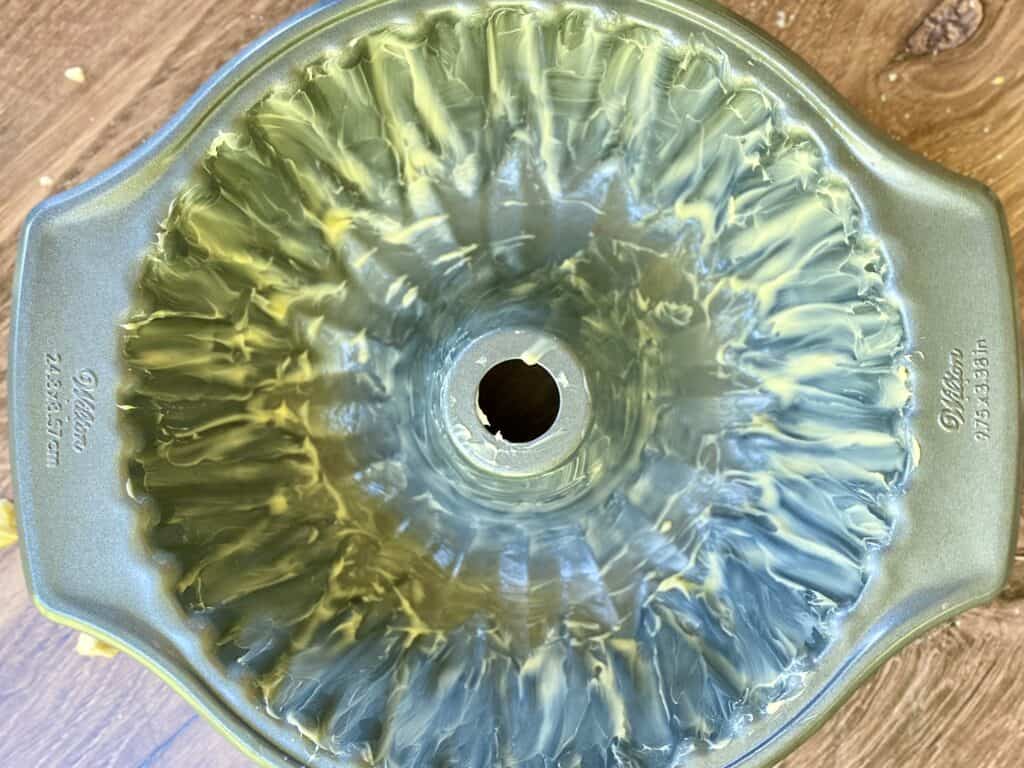
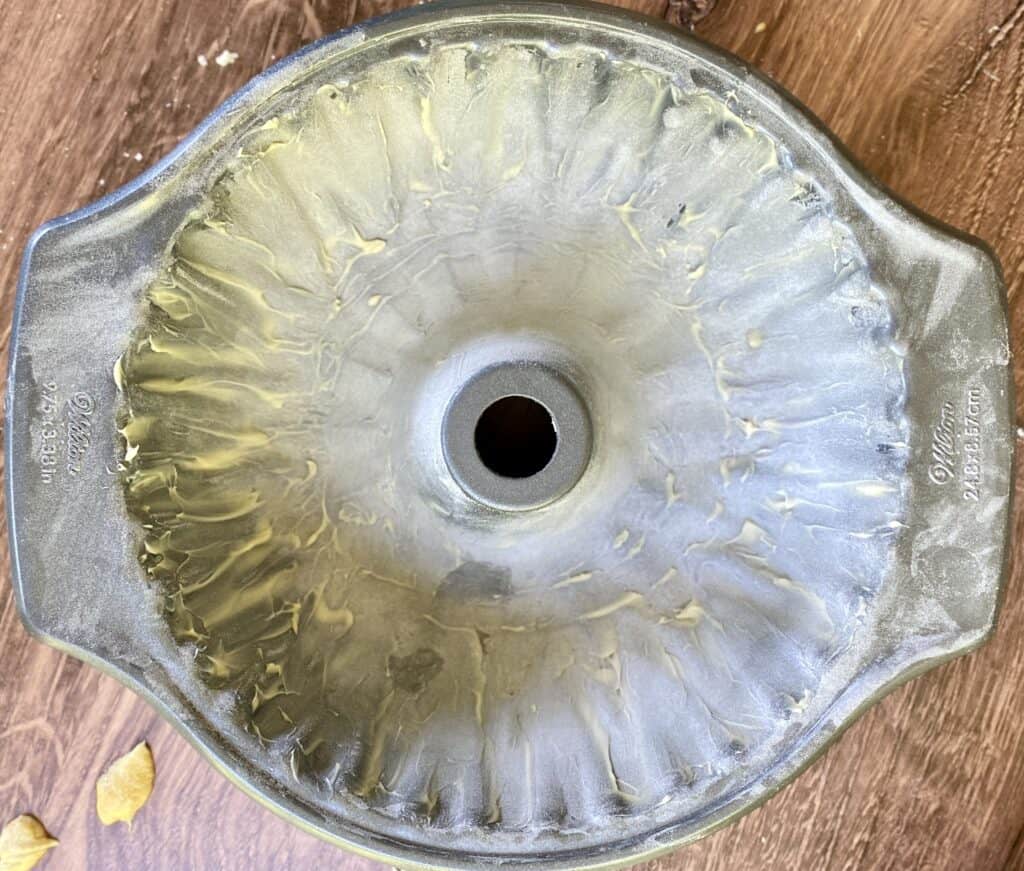
Please Grease Your Pans.
You might have already heard of the mythical “non-stick” bundt pan. This is, in fact, a myth! While manufacturers like Nordic Waredo market their bundt pans as “non-stick”, even Nordic Ware will tell you to grease your pans. That’s because Nordic Ware made its non-stick pans so that they would be easier to clean, not easier to remove cake.
To grease my pans, I use softened butter and flour, and I use a pastry brush to get the butter into those deep crevices that just love to trap cake.
Use an Oven Thermometer.
My pound cakes really rely on accurate baking temps. If the oven temperature is too low, you can expect the cake to overflow its baking pan because the cake won’t set before it rises. If the oven temperature is too high, the outside will burn and the inside will be raw. Both of these are sad events.
These events can be avoided with an oven thermometer, which you can find for less than ten dollars right here.
Give Yourself Enough Time.
Starting a cake (or any baked good) too late is a recipe for an unhappy and stressful day. The pound cakes on my Twelve Days of Pound Cakes list are show-stopping to be sure, BUT they are a time commitment. None of them are going to take you less than 3-5 hours to complete. And my carrot cake recipe? You might as well start that one a day or two in advance.
They’ll be more than worth it though. I promise. ????
The best way to figure out if you have enough time to execute a cake is to read the whole recipe from start to finish before you take out your first bowl or whisk. That way, you’ll be assured that your cake will be ready to present to your guests as soon as the dinner plates are cleared.
Conclusion.
These are some quick and easy pound cake tips that you can practice as you prepare for your Sundays and holidays. I am extremely excited to bring these twelve pound cakes to you all, and I hope you find something on the list to absolutely astound your friends and family this season.
Until next time!
Don’t forget to subscribe while you’re here so that you can get each pound cake recipe delivered directly to your inbox!
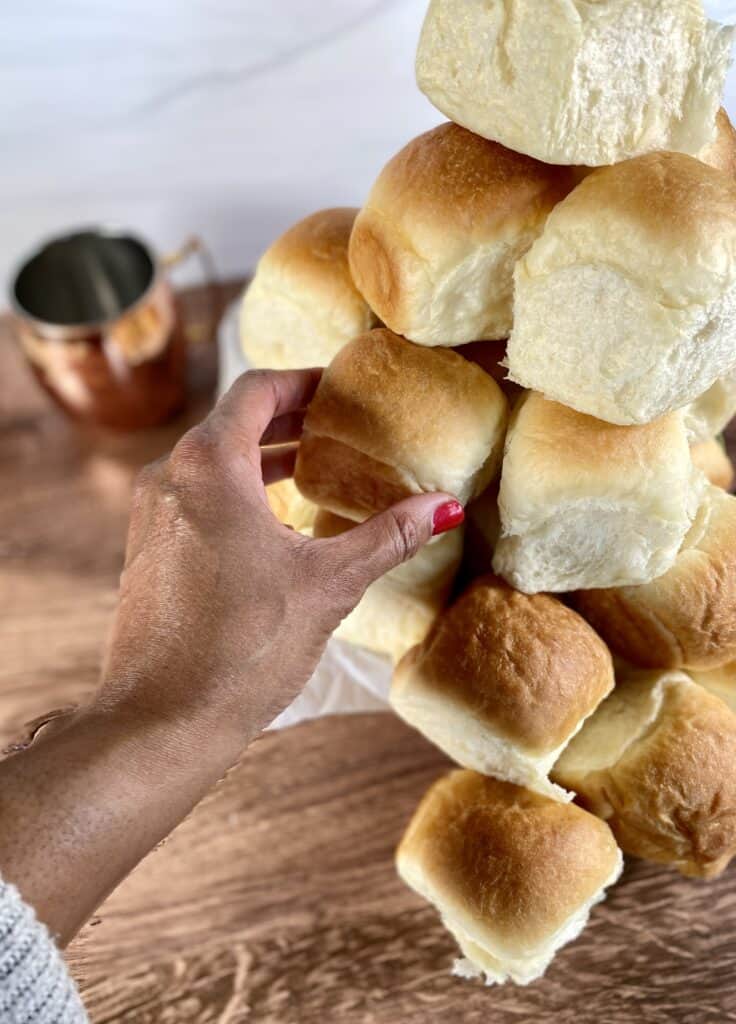
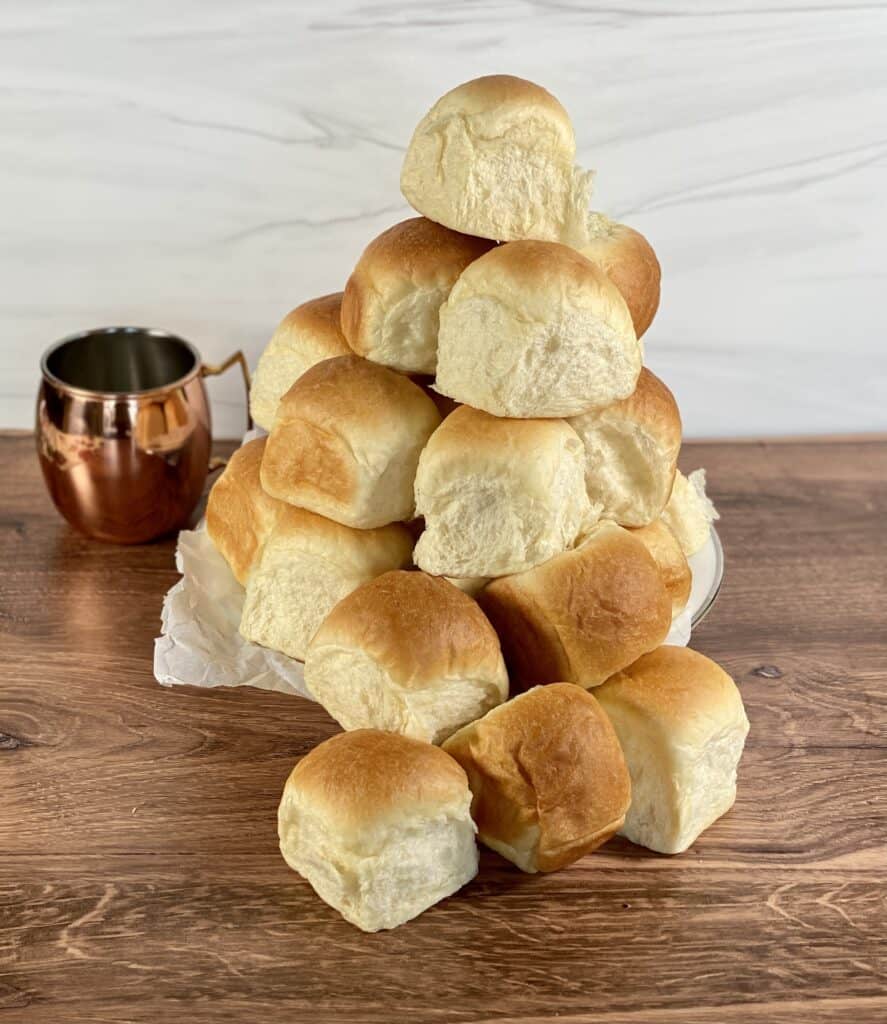
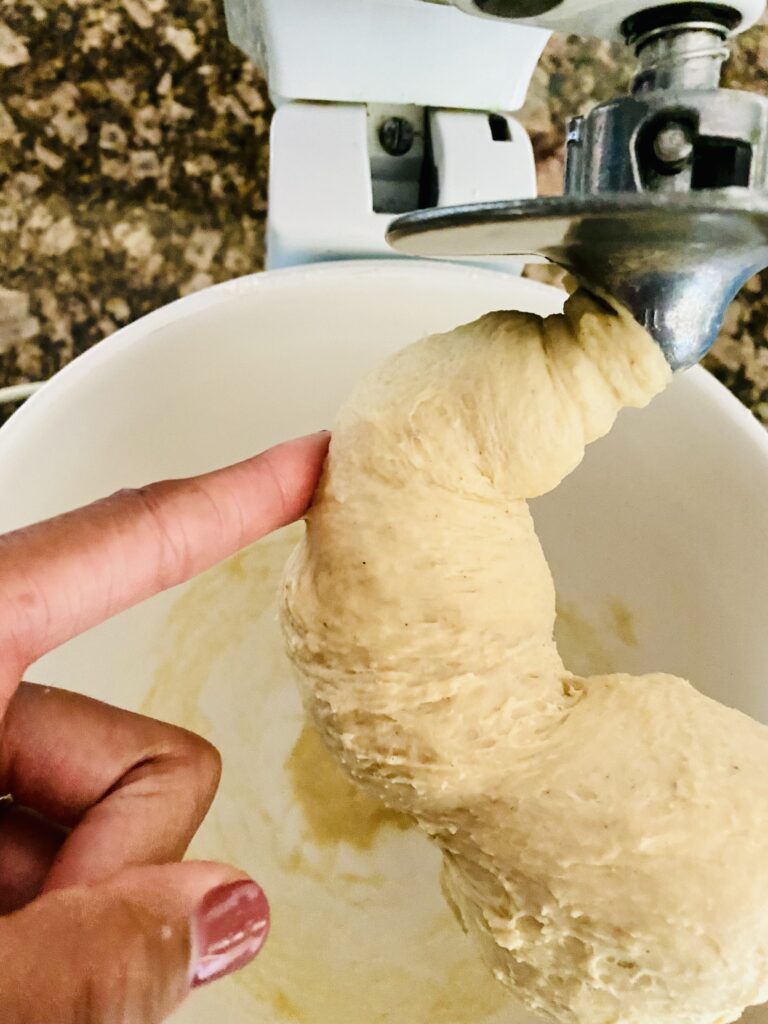
Because, Family, these dinner rolls are IT. They are impressively sized, equally delicious, and well worth the effort for Sunday dinners or holiday dinners alike.
These dinner rolls are buttery, flaky, and rich; these are the dinner rolls that you put in the center of the plate so that they can touch and bless every dish.
**Unless, of course, you don’t like your food touching. Then you can put them on their own plate.**
These are perfect for sopping up extra pot liquor from Auntie’s famous collard greens, or gravy from that delicious turkey. If stuffed acorn squash is more your speed (and it should be because it’s amazing), these will accompany that beautifully as well. They are stunning to look at and equally delicious.
These are even great for those post-holiday sliders! Turkey, cranberry sauce and pickles in one of these babies is heaven on earth.
And now they’re here. With a video tutorial so that you can’t go wrong!
And guess what! You DO NOT need a stand mixer to make these. While a stand mixer makes the kneading process less physically taxing, you can make these unbelievable rolls with a wooden spoon and a large bowl.
I honestly prefer to make bread with my hands, when possible. There’s something so meditative to me about kneading dough by hand until it’s perfectly smooth. Few things in the world make me feel more accomplished than making bread from raw ingredients.
Hungry? Great! Onto the recipe!
Beginners Start Here
If this is your first time baking bread, or you’re intimidated by yeast, or if it’s been a while since you baked, here are some resources from the BwB website that will help you be successful with these dinner rolls!
While these aren’t mandatory reading, they are extremely helpful resources that will definitely help you execute this recipe to a T.
I hope you and your family enjoy these dinner rolls as much as my family and I do!
See you next time! And don’t forget to subscribe while you’re here so that you can be among the first to see the exciting event that starts on Black Friday!
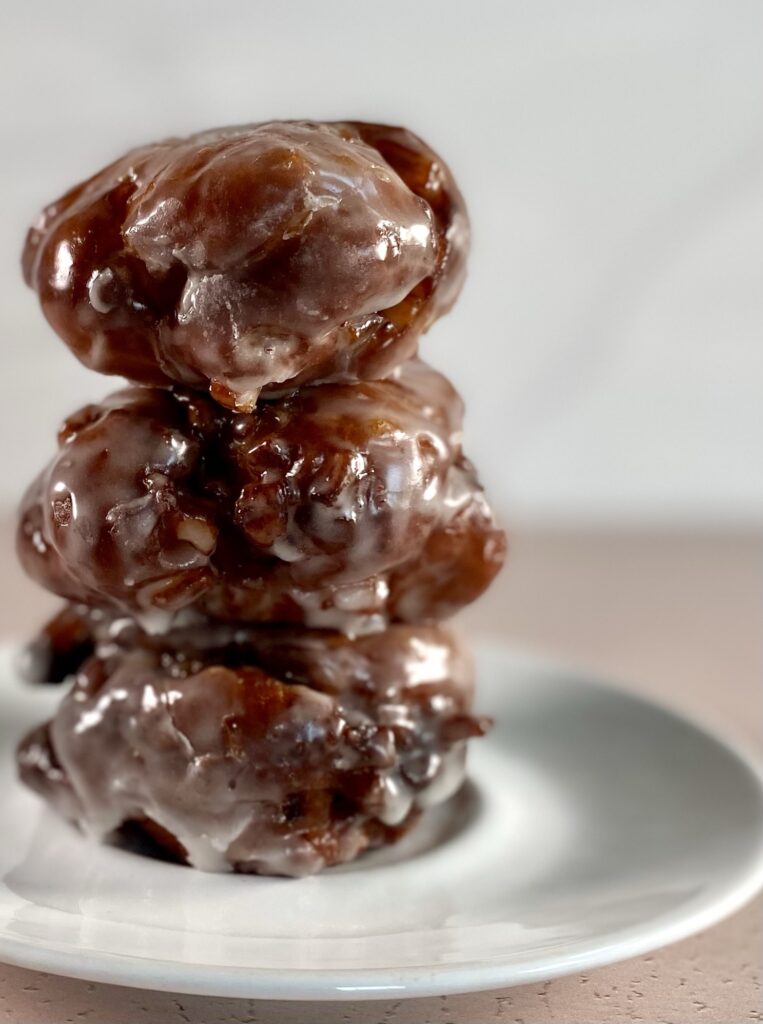
Doughnut. Donut. Does not matter. We love fried yeast donuts in this house. Especially the ones with a good sticky glaze that adheres to our fingers and faces. And the apple fritter, Family, is the reigning Monarch of donuts in our house.
We are a donut family.
My children ask for donuts almost every weekend, but I constantly avoid making them because they’re always gone in sixty seconds when I do make them. My mom guilt won’t allow me to make them on a regular basis.
This past Sunday, I decided to surprise them with donuts.
But not just any donuts.
I made my absolute-favorite-donut-of-all-time, the glorious apple fritter. I found this great recipe from Seasons and Suppers, adapted it, and got to work in the wee hours of the morning so that I could surprise my kiddos when they woke up.
This apple fritter is a spiced donut with a hardened glaze and a yummy, chunky, sugary apple filling. It’s rustic and messy and delicious. If you’re up for cheat day, and you want to make it absolutely worth it (but then get right back to it, of course), then an apple fritter is it. It is IT!
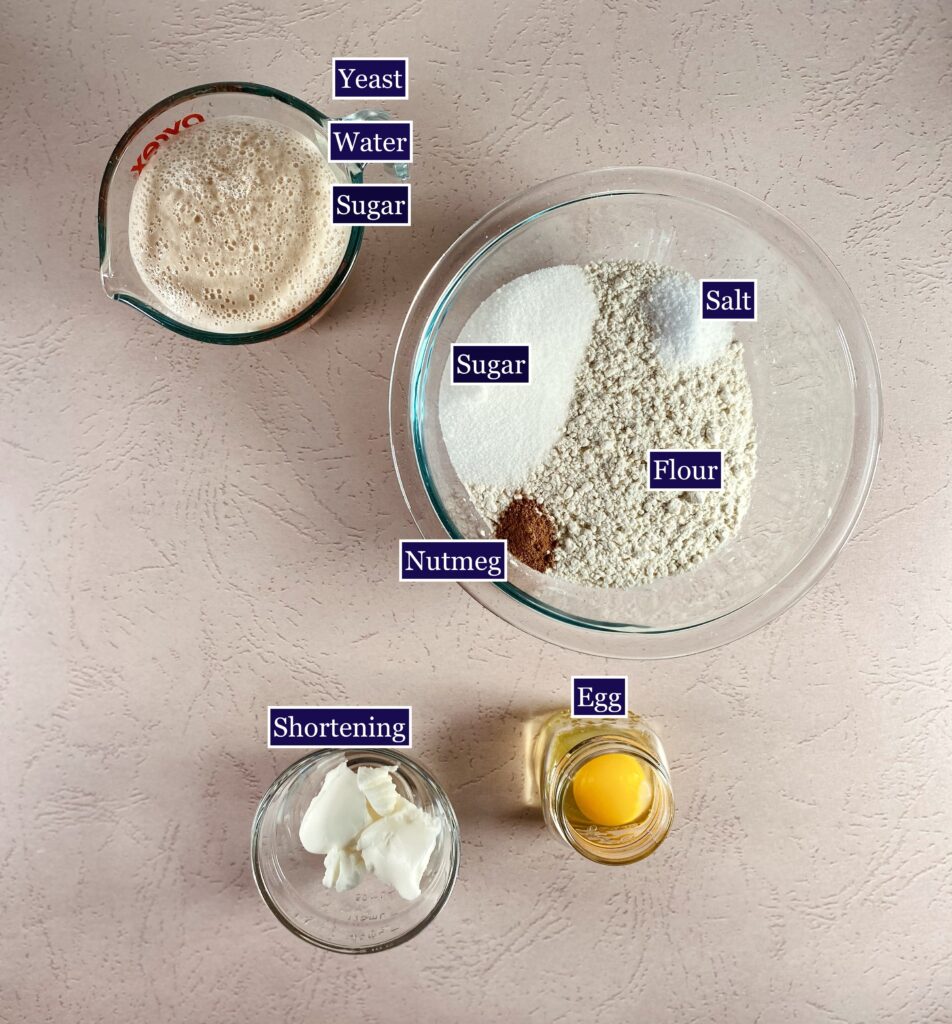
This recipe starts with a basic enriched dough. Family, an enriched dough is simply a yeast dough that contains fat. In this enriched dough, the fat comes from eggs and shortening. The shortening gives these donuts the delicious, light but chewy texture that makes this donut worth the cheat.
As you can see from the beautiful, bubbly brown mess in my measuring cup, above, I started by proofing my yeast before starting a recipe. It’s one simple step at the beginning of a recipe that can help you avoid unrecoverable disaster after your first rise.
You see, if you’re working with dead yeast, and you dump it in with your dry ingredients without first activating it in warm liquid, you likely won’t know that it’s dead until you remove the tea towel after the first rise an hour later. I’d hate to see that happen to you, so I always recommend taking 8-10 minutes to proof yeast before you do anything else, regardless of what kind of yeast you’re using.
Cheat code: you can proof yeast while you double check all of your equipment and ingredients!
Not sure how to prep for a great bake? Check my mise en place post here!
By the time you have everything else gathered, you’ll know whether you’re working with viable yeast or not.
You’re welcome!
In the Mix
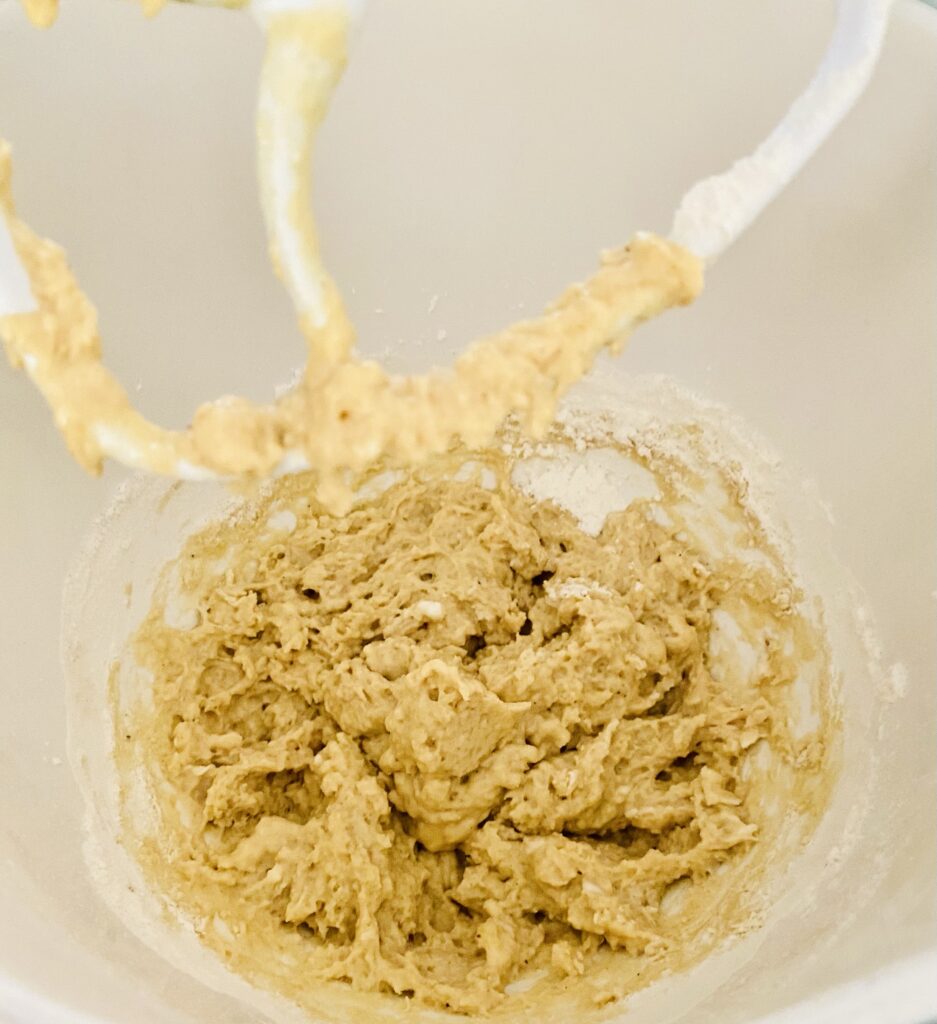
I started these apple fritters by adding the yeast mixture, egg and shortening to my stand mixer and mixing it together with my paddle attachment on low speed for about thirty seconds.
Next, I added about half of the flour mixture to the mixing bowl and mixed on low speed, just until the flour was absorbed by the liquid.
As you can see, it’s a shaggy, lumpy mess. But that’s okay! It’s supposed to look like that!
Time for the dough hook and the rest of the flour! I mixed the rest of the flour and let my mixer go on low speed (never exceeding level 2 on my mixer) for about four minutes.
I don’t add additional flour until I’ve mixed with the dough hook for at least 2-3 minutes, because I’ve found that the longer the dough hook works, the more that gluten bonds form on their own, and the less flour I ultimately have to add.
Beloveds, the kneading process is what causes flour, water, salt and yeast to become bread. You’ll be surprised at how much it will come together on its own, without extra flour. Your patience will pay off!
If you begin adding flour too soon during the kneading process, the dough gets over-floured in a hurry and you’ll have to do that “add some liquid, now add some flour, now add some liquid” dance that is…not my favorite.
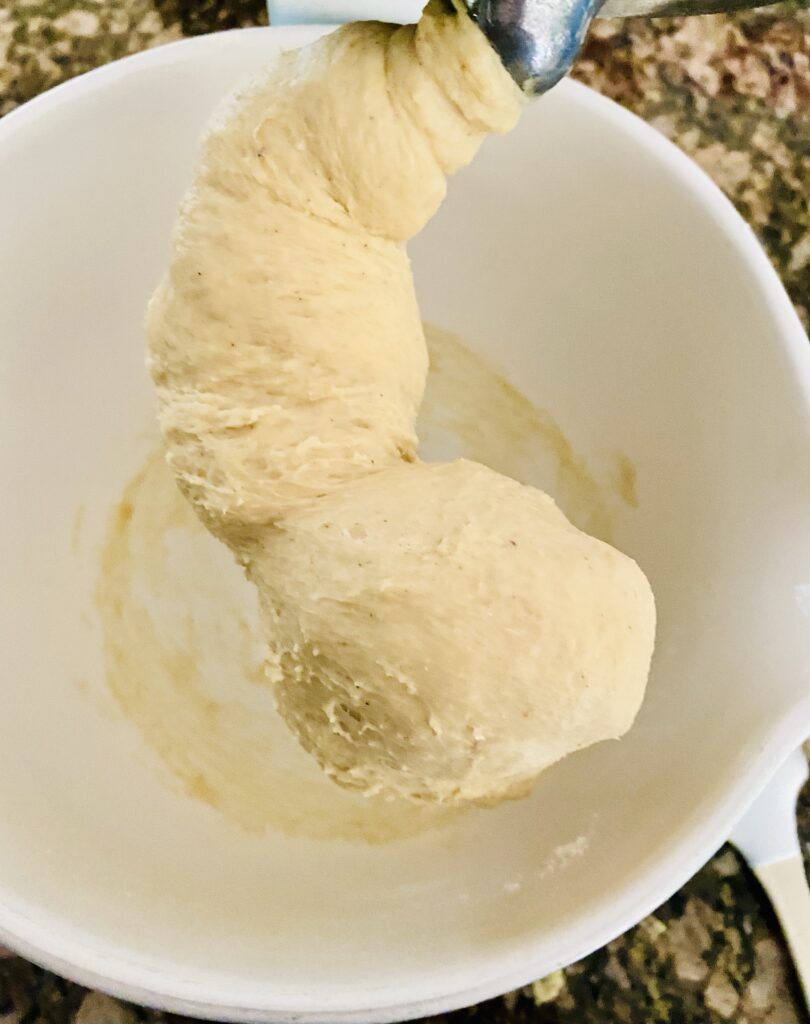
In the video, below, I hadn’t added any flour other than what the recipe called for. You can see that, after about four minutes of mixing, it is already clearing the sides of the bowl.
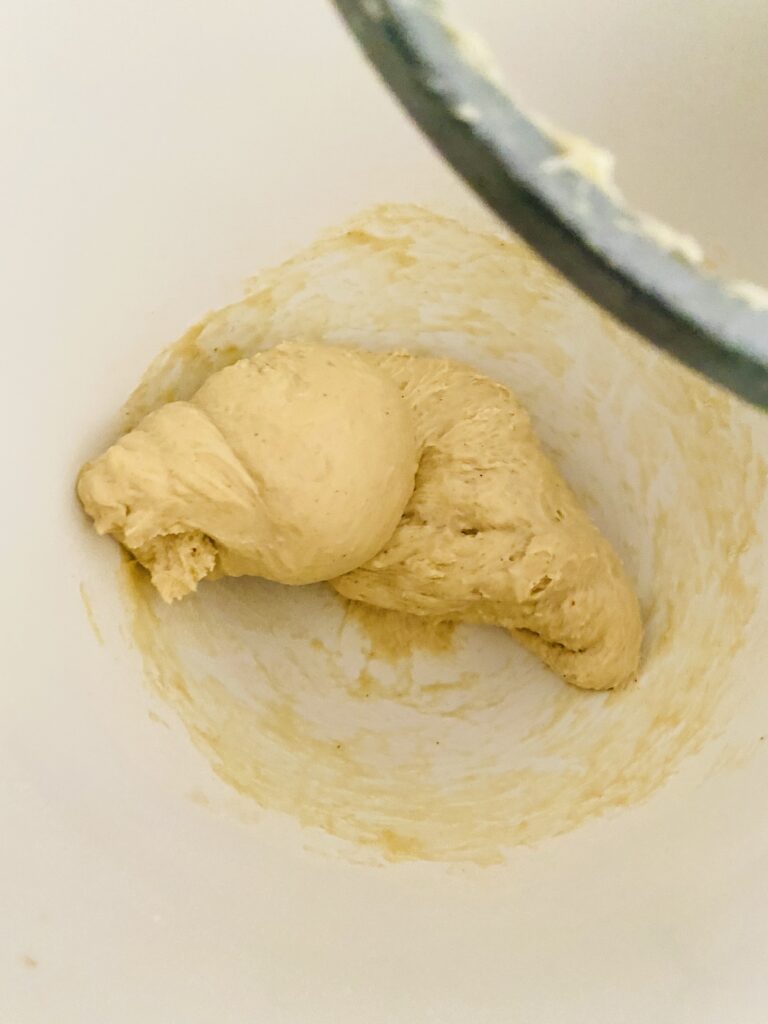
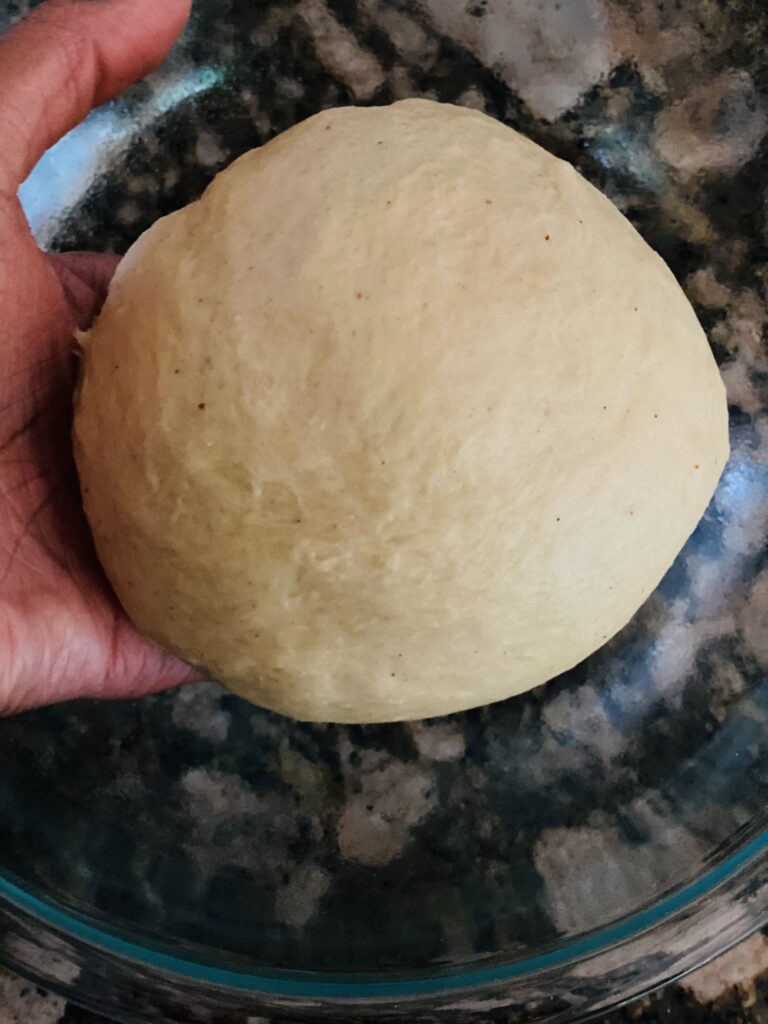
At this point, I began adding flour one tablespoon at a time and letting it mix for at least 30-45 seconds. After another three tablespoons, it was ready to go! The dough was smooth and tacky, but not sticky to the touch.
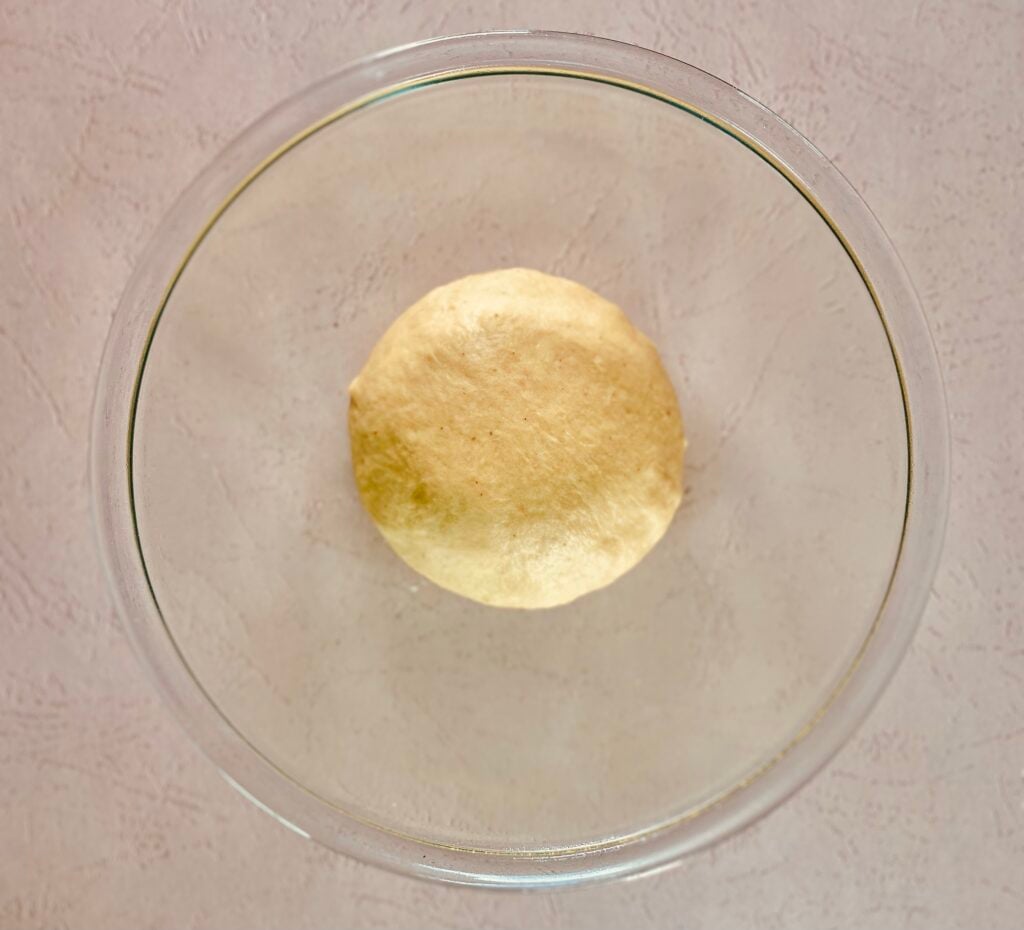
Once the dough was done, I shaped it into a ball and let it rest for an hour.
Fill ‘Er Up
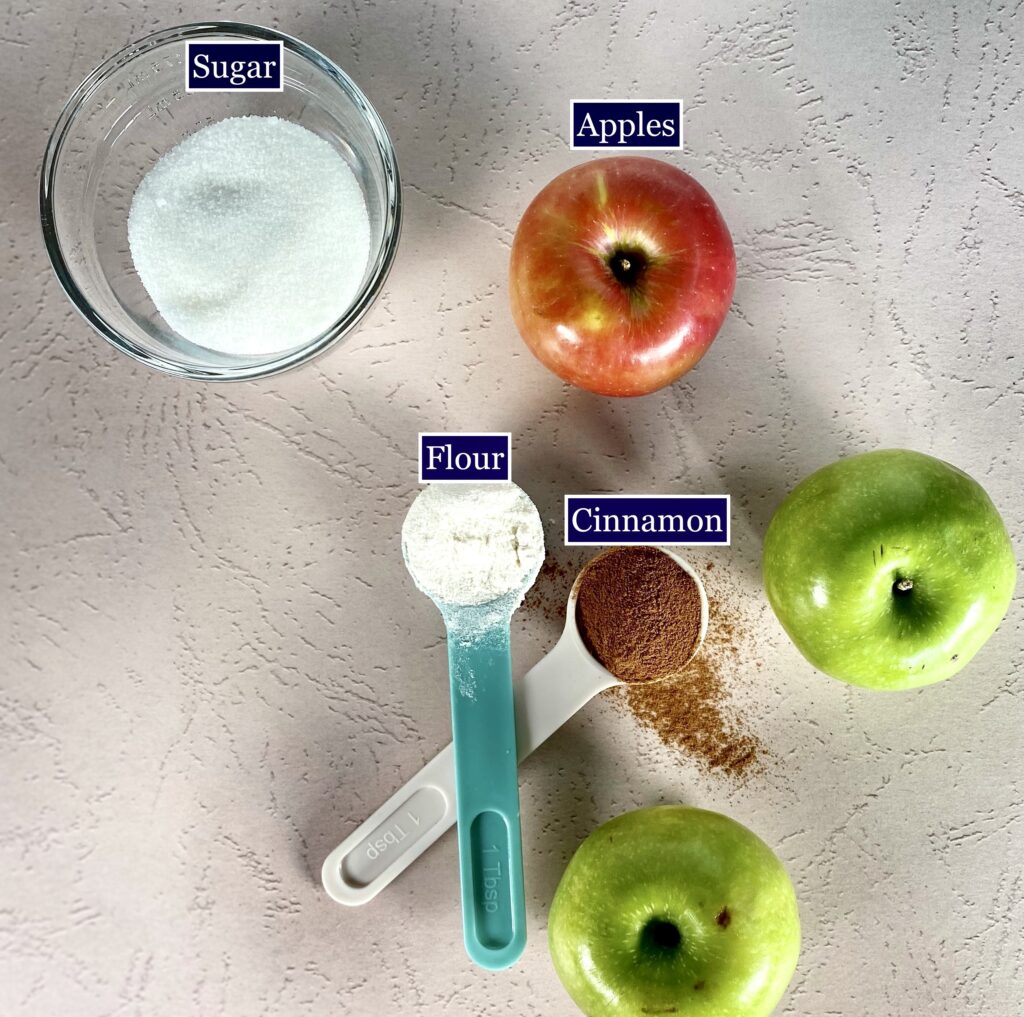
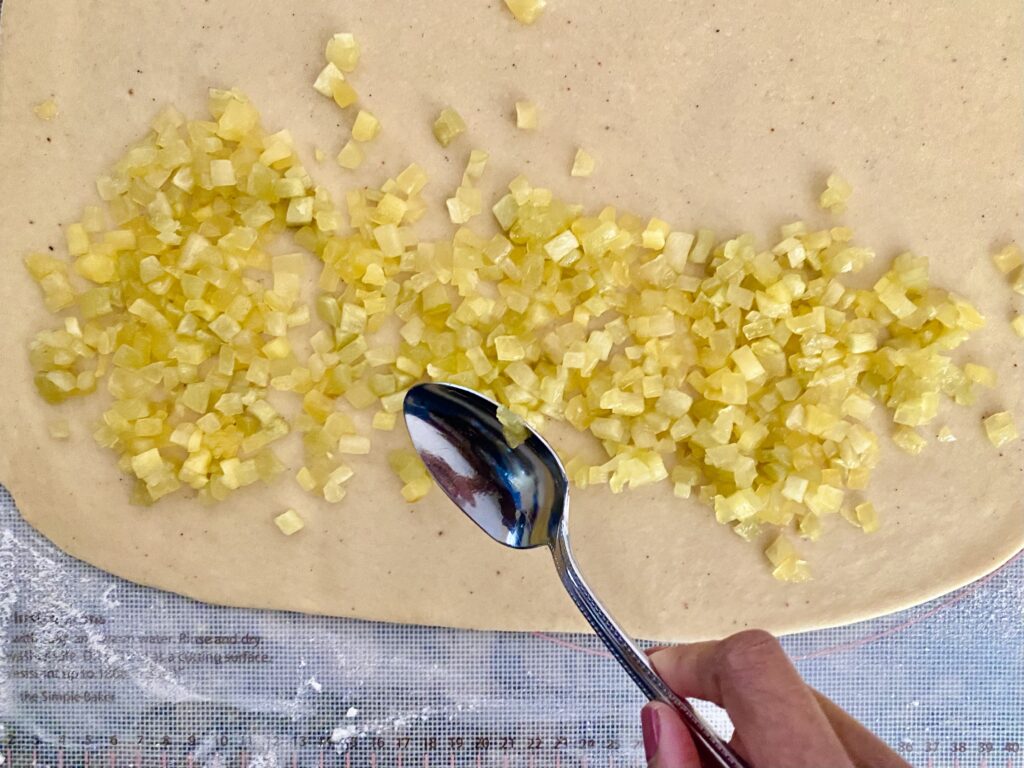
While the dough did its first rest, I prepped the apple filling. The ingredients are SO EASY:
I know the granny smith is the “It” apple for baking, y’all, but my sweet tooth demands that it be mixed with something just s touch less tart. So I threw a honeycrisp in there to shake things up.
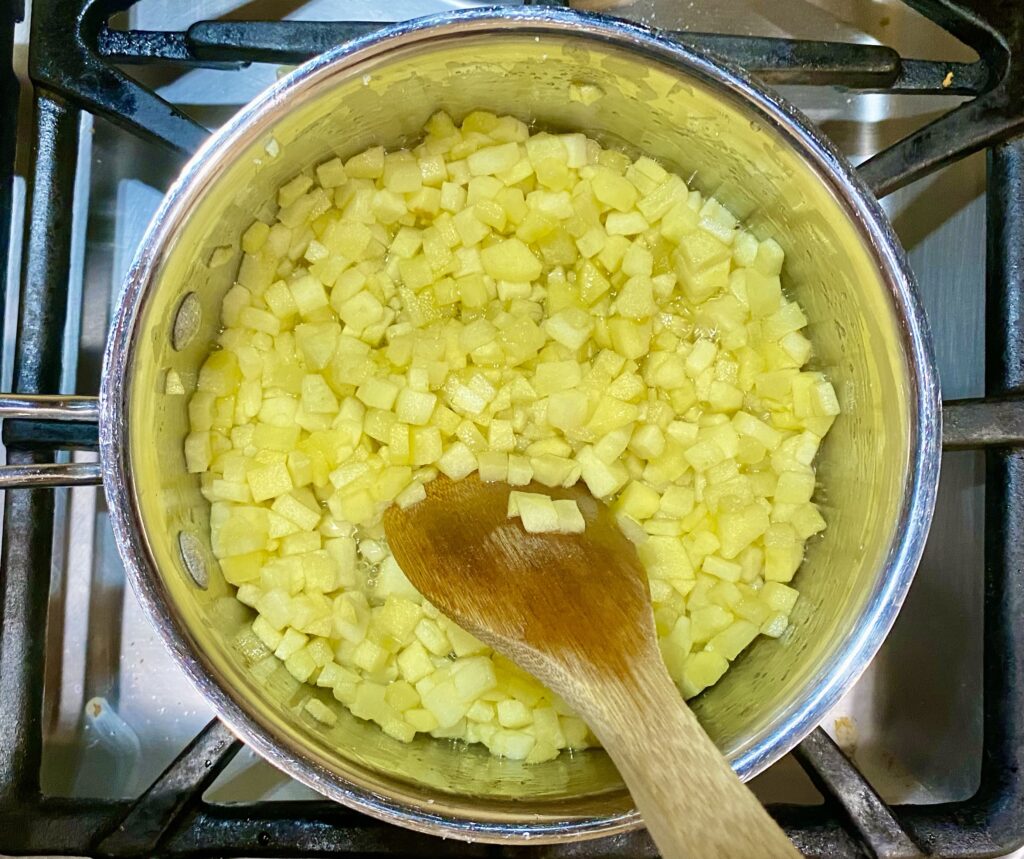
Anyway, onto the filling! It’s a cooked filling, so I got to work immediately after the dough started its first rest period by peeling and dicing the apples. Once this step was done, I added the apples, sugar, and a pinch of salt to a saucepan and and cooked until absolutely no liquid remained. I removed the mix from the heat because I didn’t want the filling to be too hot when I put it on the dough.
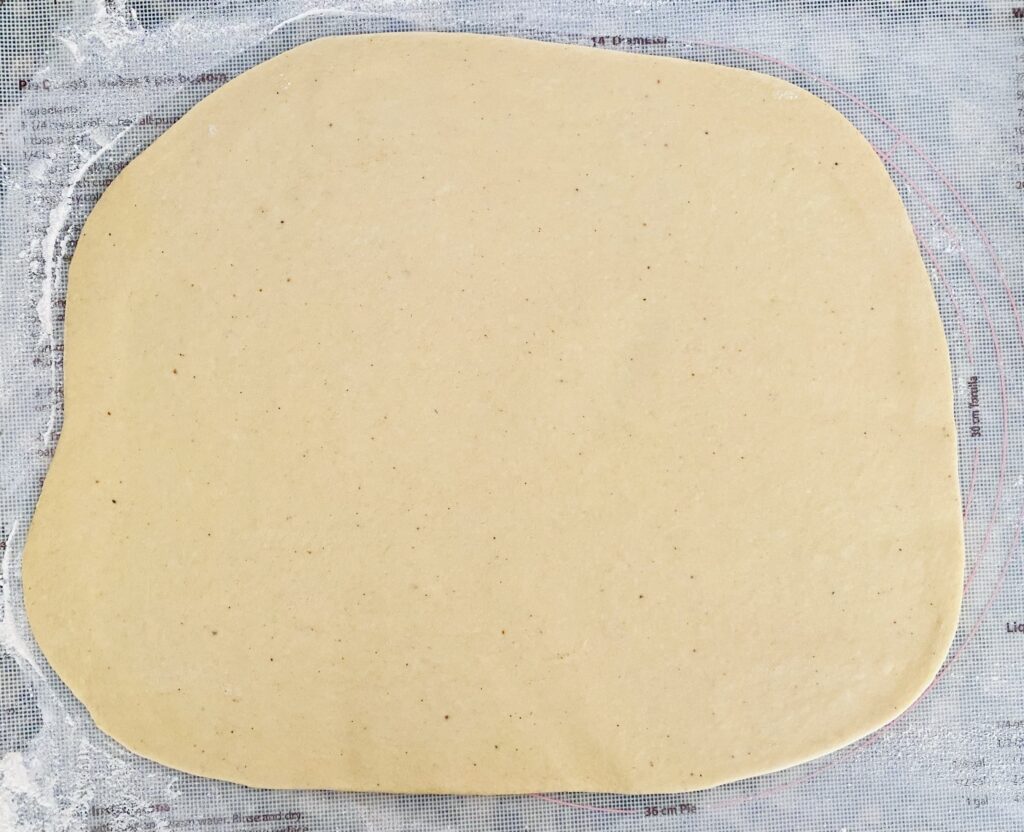
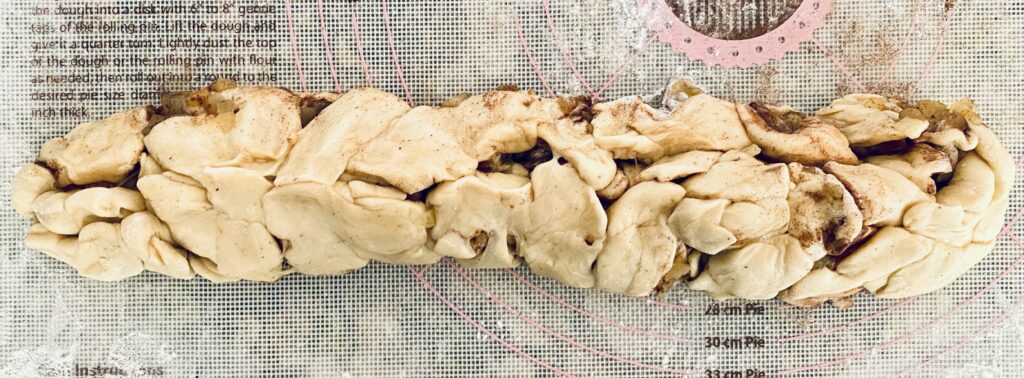
Once the dough finished resting, I rolled it into a “rough” square.
Fam, don’t make fun of my square. I did my best and it was very early!
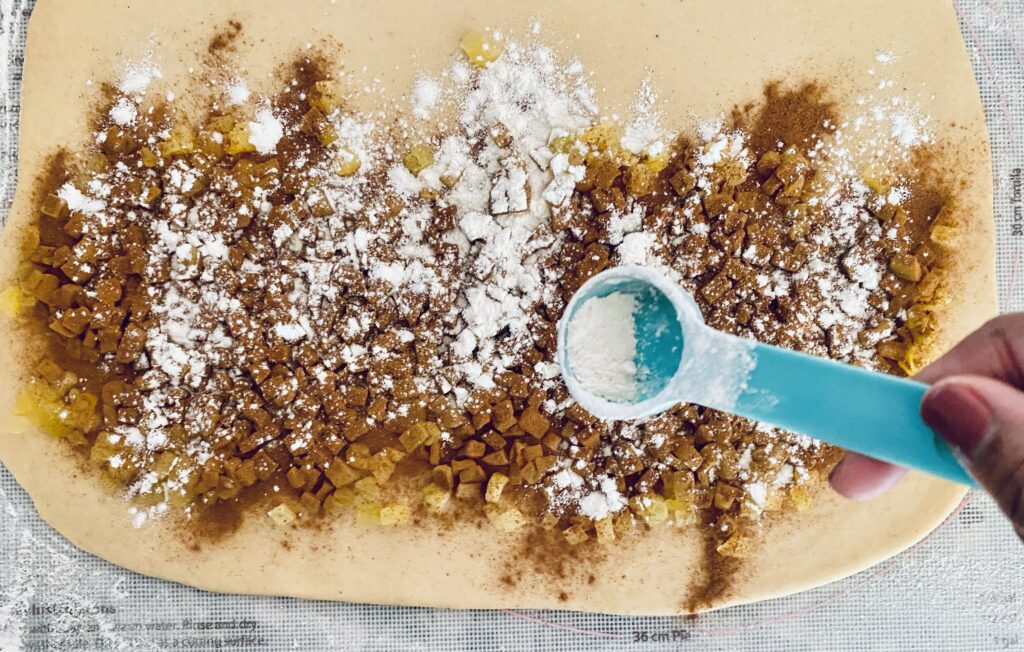
I added the apple filling to the bottom half of the rolled dough, then sprinkled cinnamon and more flour on top. The flour helps absorb any remaining moisture that might remain after cooking. Fruit can be tricky like that.
Taking Shape
A quick foldover and the apples, cinnamon and flour disappeared under the second half of the dough.
Poof
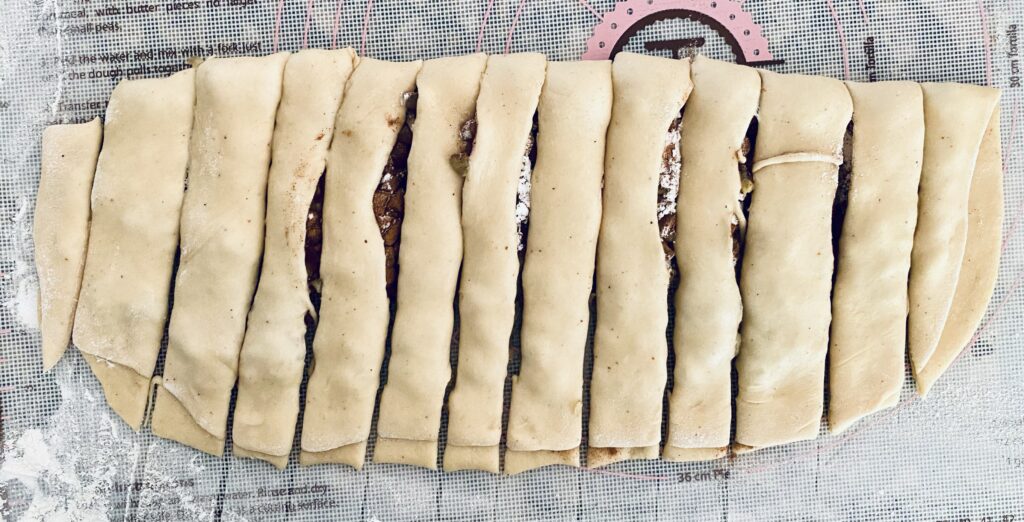
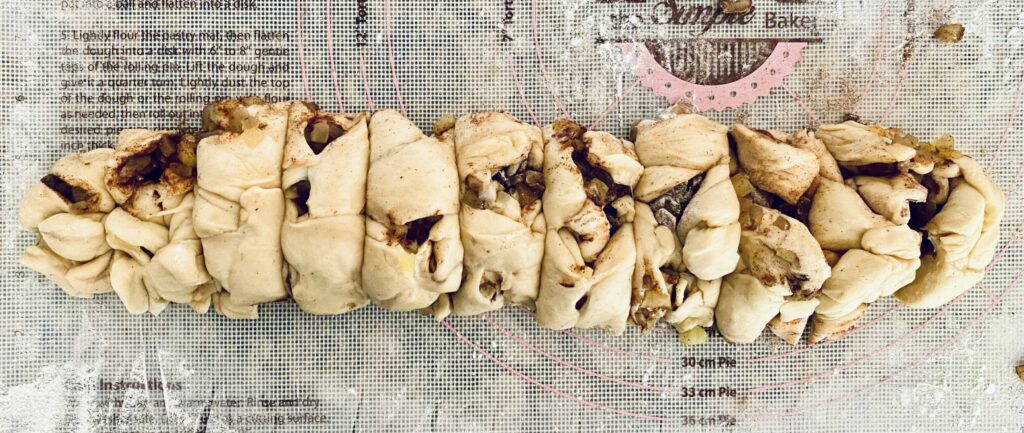
Then I got to slicing…
And dicing…
And roughly shaping into something resembling a log. I know it looks a mess. You don’t have to tell me.
I’d be lying if I said I wasn’t kind of worried at this point. But I pressed on, determined to have this batch ready in time for my children’s arrival downstairs.
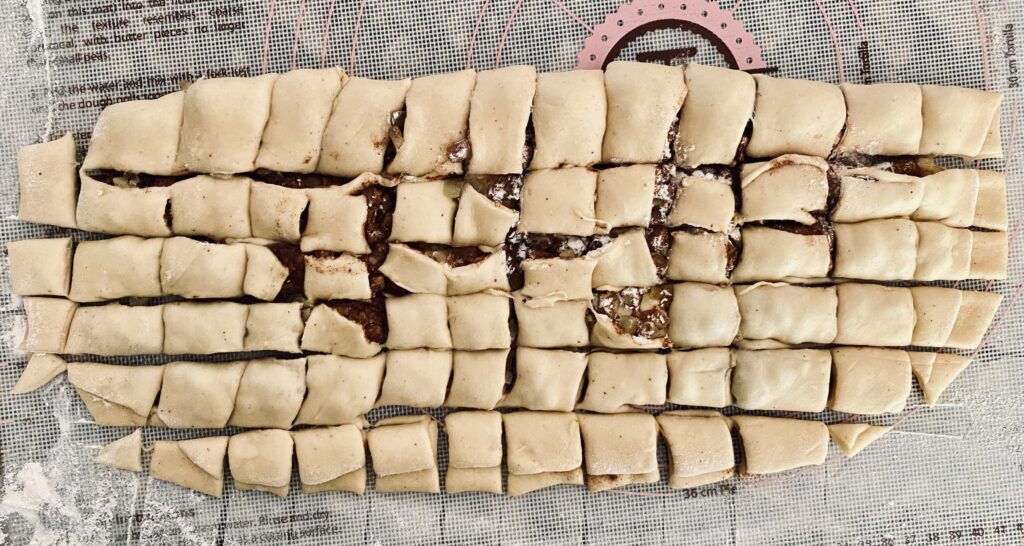
No really. I literally cut the log into what I thought were 12 pieces and pressed each one between my palms. It…was eleven pieces.
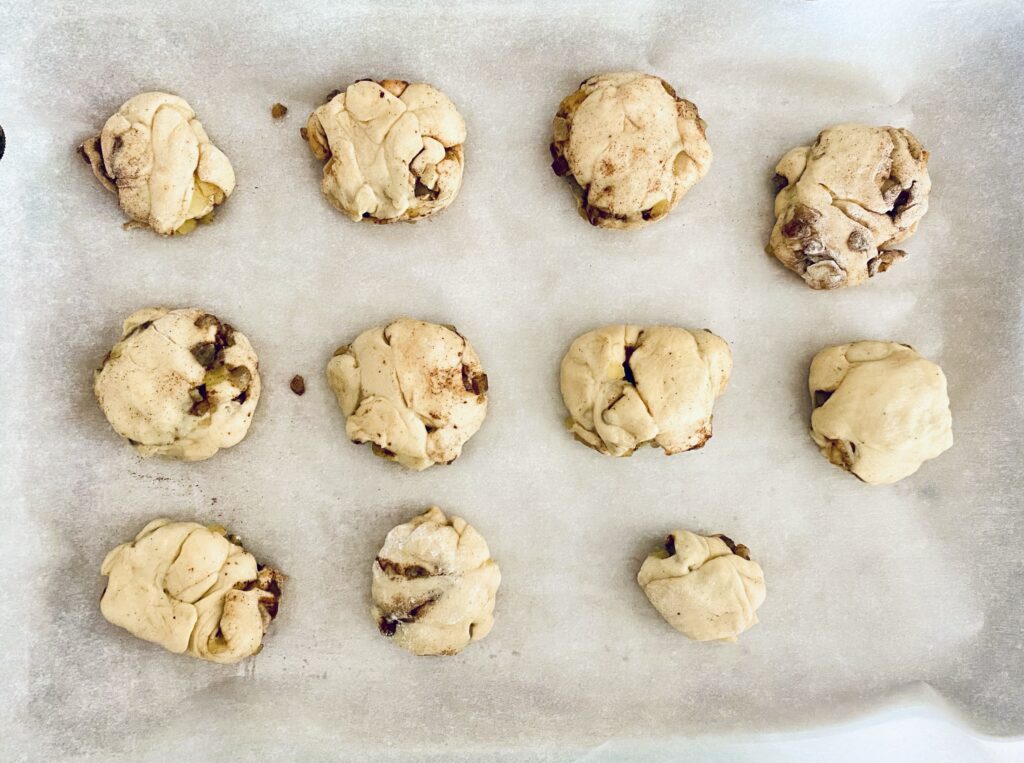
The Make
The “shaped” fritters rested for another 40 minutes while I heated vegetable oil to 360 degrees Fahrenheit in my deepest cast iron pan and made the final glaze. My oil got a little hot so the first one got a little burnt. #ItHappens
Family, I love you, so I’m going to ask that you never ever leave your kitchen while you have oil on the stove. Hot oil can quickly become a fiery menace and can cause irreparable harm to a kitchen. Also, when deep frying, you want a heavy, deep pot. I love fried dough, but I love kitchen safety even more.
I cooked each fritter for about a minute and fifteen seconds per side, then flipped to the other side. You’re looking for a deep, deep golden brown. It’s the color right before burnt.
I ate the burnt one though. It wasn’t that bad.
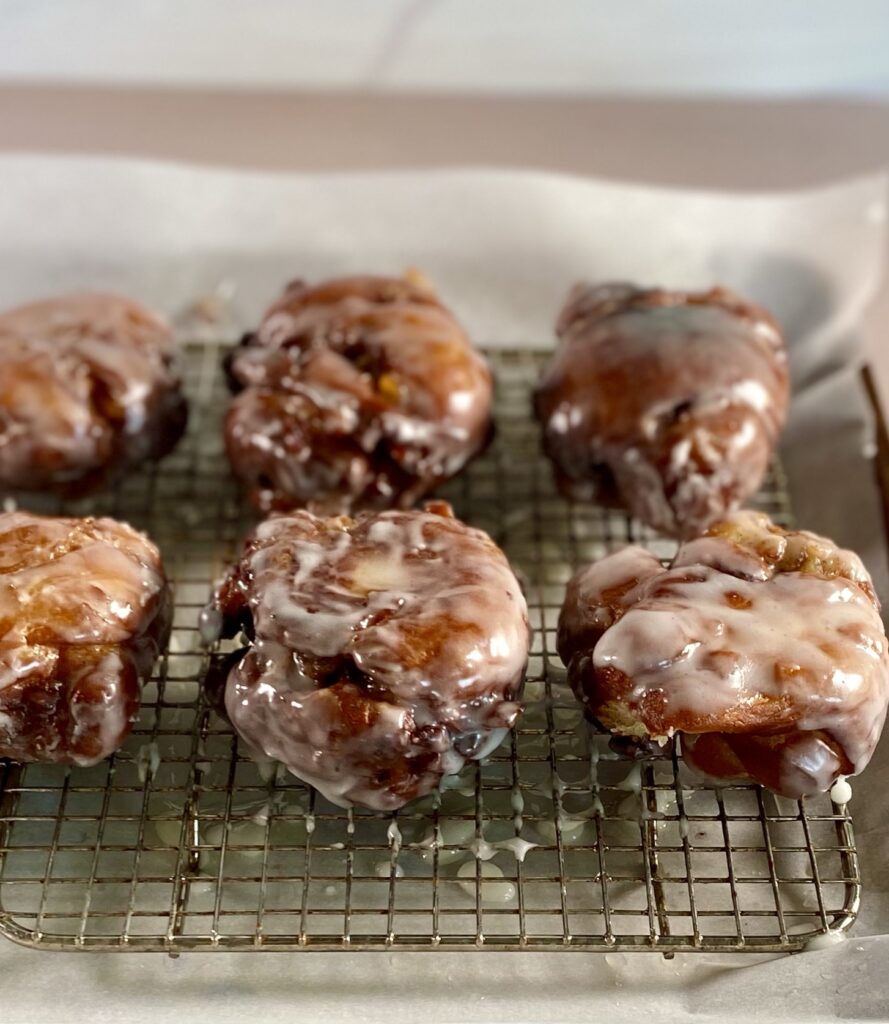
The Apple Fritter
Once the fritters are out of the oil, they quickly go into the glaze. Like, as soon as you’re comfortable touching them, they should be glazed and set on a cooling rack so that the glaze can harden.
I might have slightly scorched my fingers during this process.
Et voilà!
My son took one look at these fritters and started to run for the hills. But then, his angel of a sister said she’d try one bite. This story ends with me snatching the tray of still-warm fritters from them before they each took a third one!
As usual, the fritters slowly dwindled during the day when I wasn’t watching, and there were loud complaints when I took two of them next door. TWO. I’ve added these adapted fritters to my family’s donut menu and I am looking forward to making them again!
With the recipe below, now you can make them too!
Don’t forget to subscribe to Begin with Butter so that you can be the first to get updates!


")