
Saints: Today is the Day We Level Up Our Cakes.
We all know this story. Your grandmother/uncle/mother/father finally gives you that cherished cake recipe. The one that they’ve been making—from memory—for forty years or so. They wrote it on an index card for you in their own hand, and decided you were a worthy recipient to carry it forward to the next generation.
This is actual footage of you dancing to your car after Grandma hands you that recipe (you’re Aunt Viv, obvi):

You get home and make something totally pitiful with that recipe and blame the baking gods. You’ve watched your grandmother/uncle/mother/father make that cake dozens of times, you have the recipe, and you can’t understand where you went wrong.
Let’s assume that the recipe is complete (because giving away incomplete recipes is an actual thing, but we will assume here that the recipe gifter loves you). Go grab your recipe, bring it back here, and let’s put these good tips to work.
Tip #1: Butter and Flour Your Pan After Preparing Your Batter
It’s very common for recipes to start with two steps: 1) preheat your oven (ALWAYS do this, and use an oven thermometer because your oven is a LIAR); and 2) prep your pan and set it aside before you prepare your batter. The reason you should prep your pan before baking is to ensure that your cake releases from your pan when it’s done. Because this?
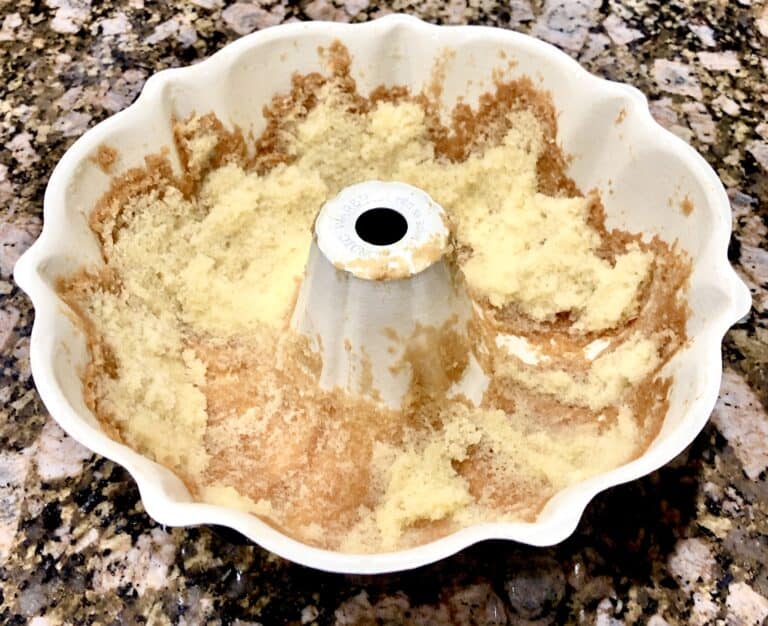
This ain’t it. Unless “it” is trifle.
I’m not advocating for you to put your cake batter into a naked pan. But I am saying that it’s worthwhile to prep your pan after you prepare your batter. I started doing this about two years after I started baking, and it’s one of my favorite tips to share today.
*First, a note*: I am very old-fashioned in my kitchen. We are team fat + flour around these parts. “Baking sprays” have led to moments of irrational sadness and/or fits of rage, soooooo…hard pass. The ancestors used fat (usually butter) + flour, so that is what I use. For layer cakes, I add an additional parchment paper round to the bottom of the pan because I am determined to make the relationship between my cake batter and my pan a short-term one. As in life, a messy break-up between a cake and its pan is a terrible thing.
Anyway, you want to know why I do it this way? Because I’ve found that butter + flour sitting in a pan for too long can solidify into a paste that bakes into a dry, hard crust around the outside of my finished cake. Basically, the fat and the flour combine into that paste while you’re prepping your batter, and that combined paste adheres to the outside of your cake while it bakes.
Keep in mind…this mixture doesn’t combine with your cake batter. It simply creates a dry, unappetizing crust. You don’t want this.
I’ve been prepping my pans after my batter for some time now, and this problem no longer exists. While I do have to work quickly to prep pans after batter, I’ve never had a cake fail because of this technique.
How do I prep my pan? Great question! For Bundt pans, butter + flour is my preferred method. For layer cakes, butter + flour + parchment takes me to a very happy place. For a tutorial on my technique, skip to :34 in the video, below.
Tip #2: Brush Simple Syrup on Warm Cake to Maintain Moisture
Simple syrup has saved many a cake. “Simply” put, simple syrup is a mixture of equal parts granulated sugar and water, boiled until the sugar is completely dissolved and cooled prior to use (because hot sugar BURNS). Before removing cakes from their pans, I brush a thin layer of simple syrup over the top of the cake with a pastry brush. Then I spray a cooling rack with cooking spray, turn it over with a flick of the wrist, and place the cake on top of the cooling rack before again brushing another thin layer of simple syrup over the new *top* of the cake.
The simple syrup helps protect that tender, moist (I know) crumb of the cake that you just baked against the forces of AIR. Air is the mortal enemy a cake, so think of your simple syrup layer as a barrier—a shield, as it were—against the invasion of air. In other words, simple syrup is the world’s sweetest and most natural preservative.
Fret not, Saints. Simple syrup will NOT increase the sugar level of your cake. It simply helps to protect it. And, for those of you (us) who got busy and left the cake in the oven too long, simple syrup *might* resuscitate the crumb a little bit.
Y’all. I did say that it **might** revive it. But don’t expect simple syrup to save a cake that’s browned from top to bottom and back up to to the top again. As my old hairdresser used to say, “this is a comb, not a wand.” Same energy here.
For more on simple syrup (and to check my technique on a layer cake), skip to 3:08 in the video, below.
Tip #3: Crumb Coat Your Cake
I cannot say enough about the mighty crumb coat. Since this is a blog post and not a novel, however, I’ll try to keep it brief. If you are making a layer cake, a quick crumb coat is worth your time.
A crumb coat is like shapewear for your cake. No, really! For those of us (ahem) who wear shapewear, we understand that it holds everything together. The same goes for the crumb coat! The purpose of a good crumb coat is to help strengthen the structure of your cake so that it doesn’t slide, and also to lock in any loose crumbs so that they don’t get into the final frosting layer of your cake. So, yes. Crumb coats and shapewear are nearly the same thing, and they both help pave the way for a smooth outer layer.
To crumb coat: after you’ve stacked your cake layers, smoothing a good amount of frosting between the layers, use a spatula to place 2-3 good dollops of frosting on top of your cake. Then, spread the frosting until it begins to spill over the sides of your cake. Once the frosting spills over the side of the cake, use an offset spatula to work the frosting into a uniform layer around the cake. Once the sides are uniform, use the offset spatula to ensure that the top has the same uniform layer. Take care with the top corner of the cake, making sure to remove any extra frosting from this corner. Unless you want a shelf on your final product (you probably don’t).
For more on the crumb coat (and a bonus tip for stacking cakes), check out the video, below at the 5:11 mark.
Let’s be real. A cake is a time-consuming project. A true labor of love. These three tips will help you make your favorite cakes even better; something your grandmother/uncle/mother/father will be proud to see represent them and their baking heritage.
If you improve upon their recipe and they get mad, though…please don’t send them after me. I’m only here to help.
Until next time!