
This post contains affiliate links. While I receive a small commission if you purchase from these links, they are products that I use and trust in my own kitchen.
Welcome to Day 4 of the Twelve Days of Pound Cake, and Friends, I’m beyond excited about this one. You see, Over the summer, I had a conversation with a friend, and she shared with me that Baba au Rhum was her favorite dessert. Something along the lines of “OMG I love Baba, Shani.” So, of course, I had to add it to this event. And today, on this Day 4 of the Twelve Days of Pound Cake for 2023, you’re getting Baba au Rhum (Rum) Pound Cake. ❤️

Sit down and get cozy for this one, Friends, because this one is a ride.
About Baba au Rhum
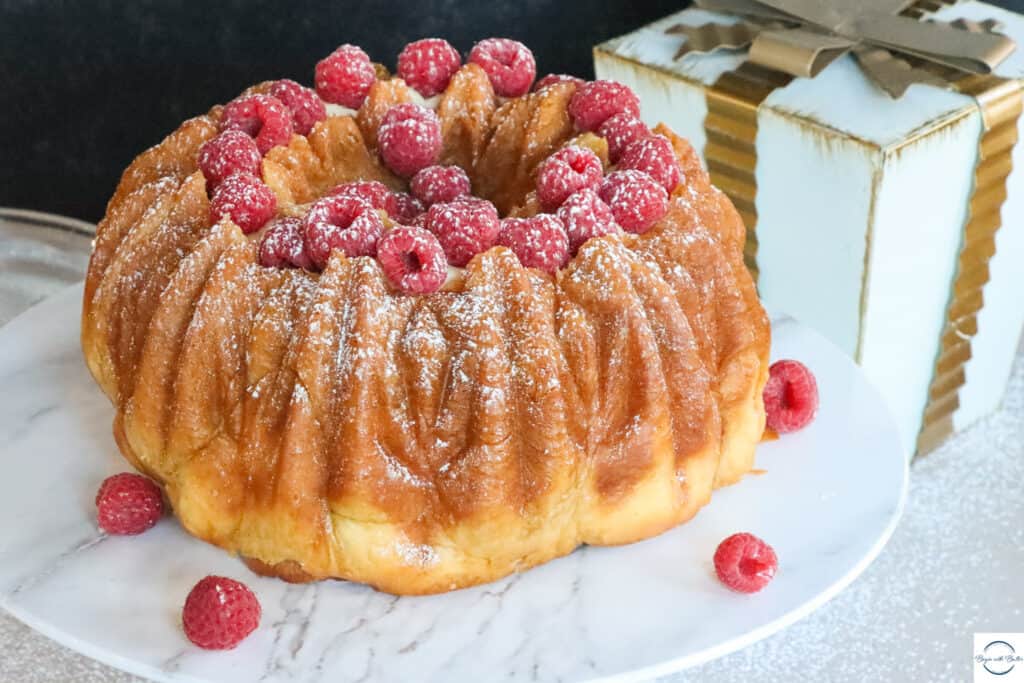
Baba au Rhum is a yeasted cake that is positively (and quite literally) doused in rum, then filled with pastry cream. It’s one of those traditional holiday treats that is not for children, but it’s ever so delicious and worth every moment of extra effort for just the grown folks.
Did I mention it uses yeast? It does! Really, Baba au Rhum is more similar to brioche than traditional pound cake texture, and it uses much less sugar (and is thus less sweet). Much of the sweetness comes from the rum reduction that soaks the cake, and the pastry cream that’s piped into the cake after baking, and whoa Friends…it is something else.
Scared of using yeast? No worries! Check out my post, Yeast Basics for Beginning Bread Bakers, for a bunch of great, confidence-building tips!
About this Pound Cake
This Baba au Rhum Pound Cake follows the traditional baba rules. It’s a rich, yeasted brioche that is an absolutely perfect base for this dessert. Instead of straight rum, I created a rum reduction that you can actually personalize as you like. Want it rummy? Cook the reduction a little less. Want it less rummy? Cook it a little more. The longer the reduction cooks, the less alcohol you’ll get. Also, if you want a sweeter dessert, reduce it a little further. 😊
But let’s be real. People love a good rum cake around the holidays, and this one delivers.
Baba au Rhum Pound Cake Ingredients
Whole Milk: Whole milk adds richness to this beautiful dough. You won’t use very much of it at all, but I guarantee that this dough won’t be dry. You need the full fat content in the whole milk, so it’s best not to substitute a lower fat alternative.
Instant Yeast: I use SAF Instant Yeast for this recipe, as I do for most bread recipes. If you’d prefer to use active dry yeast, just increase the rising and proving times by 10-15 minutes (and keep an eye on your dough!).
Turbinado Sugar: I use turbinado sugar to proof the yeast. Yeast likes a lil’ sugar, so it’s there to help it bloom.
All-Purpose Flour: I prefer all-purpose flour for this brioche dough. Since this is technically a dessert/cake, and not a bread, I didn’t want the enhanced chewiness that bread dough would offer.
Kosher Salt: As with any dessert (or, for that matter, any bread), salt is necessary to help balance the other flavors. In this dough, the salt helps to counter the richness of the whole milk and all those eggs.

Granulated Sugar: This enriched dough uses very little granulated sugar. I chose granulated sugar in this particular dough because it adds beautiful caramelization to the finished product.
Eggs: This dough uses three whole eggs and two egg yolks. The protein of the egg whites adds a hint of liquid and structure to the brioche dough, while the fatty yolks add incredibly delicious flavor.
Vanilla Bean or Vanilla Extract: You can use either; this is a matter of personal preference. Vanilla bean lends a stronger vanilla flavor this brioche, but don’t fret if you cannot find it (or if they’re prohibitively expensive).
Unsalted Butter: Friends, Brioche = Butter. Use the good stuff for this dough. The stuff you’ve been saving in your freezer all year. 😊
Beginners Start Here
If you’re new to baking, or if you want to become more consistent with bread in general, here are a couple of super helpful articles from the BwB site that will help you get set up for success with this Baba au Rhum Pound Cake.
- Meet Your Kitchen BFF–Your Digital Kitchen Scale!
- Baking 101: How to Measure Ingredients
- Knowing When to Stop a Technique
- Baking Science: Dough Hydration
- The Five Flours I Keep Handy in My Kitchen
- Of course, you can always sign up for my Bread Bootcamp and get every one of my bread-making secrets during that class! You’ll be able to make the best Baba au Rhum of your life (and bread for the rest of your life!) after taking that class!
These resources are super helpful to help you build consistency and confidence on your baking journey. Happy Reading!
Important Tools Used in this Baba au Rhum Pound Cake
Below, you’ll find some tools that I used for this Baba au Rhum Pound Cake. These are the tools that I use all the time in my own kitchen.
**I get paid a small commission if you purchase directly from these links, but they are truly amazing products that you’ll find in my kitchen.**
If you have them already, great! Think of this as a checklist to help you build the confidence that you’ll need to execute this recipe!
My friend shared that she looked forward to Baba au Rhum every year when she was younger. It’s my great hope that this adaptation makes her very proud. She is such a dear heart, and she was such a good sport when I asked her no fewer than 5,955,101 questions in an effort to respectfully adapt this recipe for this event. ❤️
Enjoy the recipe, Friends! See you tomorrow for Day 5 of the Twelve Days of Pound Cake!
Print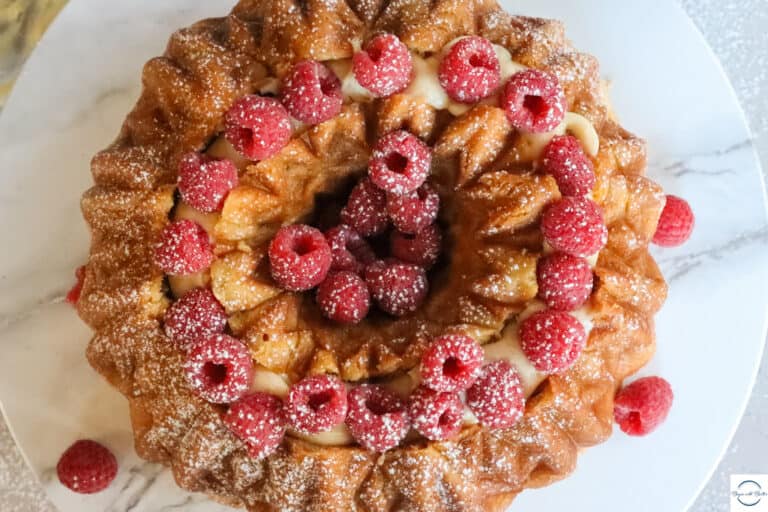
Baba au Rhum Pound Cake
This Baba au Rhum Pound Cake features a buttery brioche base, a dazzling rum reduction, and a luscious pastry cream. It is an absolutely perfect adult dessert!
Ingredients
For the Brioche:
- 78 g whole milk
- 1 tbsp instant yeast
- 1 tsp turbinado sugar (optional)
- 320 g (2.5 c) all-purpose flour
- 1/2 vanilla bean or 1 tsp vanilla extract
- 1/2 tbsp salt
- 2 tbsp sugar
- 2 egg yolks
- 3 eggs
- 78 g unsalted butter, room temperature
For the Rum Reduction:
- 375 g (1.5 c) rum (I used Gosling’s)
- 200 g (1 c) granulated sugar
- 250 g (1 c) water
- 1/4 tsp salt
- 1 tsp vanilla
For the Pastry Cream:
- 250 g (1 c) whole milk
- 1/2 vanilla bean
- 50 g (1/4 c) sugar
- 1.5 tbsp cornstarch
- 1/4 tsp kosher salt
- 2 egg yolks
- 1 tbsp butter
Instructions
To Make the Cake:
- Place the milk into a heat-proof measuring cup. Microwave for 20-30 seconds, or until the milk reaches a temperature of 105°F-110°F. Add the turbinado sugar and the instant yeast and stir with a whisk to combine. Allow the yeast to bloom for 6-8 minutes, or until a yeasted dome appears at the top of the milk.
- Cut the butter into 1 tbsp cubes and set aside. You won’t need them until the rest of the dough has come together, but you want them to be a soft room temperature before they’re added to the dough.
- Add granulated sugar, salt, eggs, egg yolks, and about 320 g (~2.5 cups) of the all-purpose flour to the yeast mixture. Using the dough hook of your stand mixer, begin kneading your dough.
- Slowly add additional flour, about 1/8 of a cup at a time, until the dough starts to come away from the sides of the bowl. You might not need all of the flour that the recipe calls for.
- Once you have a slightly tacky dough that comes away from the sides of the bowl, spray non-stick spray on your hands and do the windowpane test. The dough is ready to move on when it is ever-so-slightly tacky to the touch, but not sticky. Without non-stick spray on your hands, the dough will just seem undone. It’s tricky like that!
- Once the dough passes the windowpane test (the first time), begin adding the butter, one tablespoon at a time. Allow the dough to fully incorporate each tablespoon of butter before adding the next one. The bowl will likely get a little buttery during this process. That is normal! Just allow each tablespoon of butter to fully incorporate.
- When all of the butter is incorporated, allow the dough to knead for another 3-5 minutes on low speed. The dough is complete when it easily passes the windowpane test (again!) and is very pliable.
- Spray the mixing bowl with a light coating of cooking spray, and allow the dough to rise, covered with plastic wrap (with a small hole to vent gases), for an hour and 5 minutes, or until doubled in size. You can also use the finger poke test so that you can decide whether it needs a few more minutes.
- Gently de-gas the dough by pressing down on it in the mixing bowl. Use your fingers to shape the dough into a rough rectangle on your work surface, with the long side of the rectangle facing you. You will not need additional flour to work with this dough.
- Using a pastry brush, generously butter your bundt pan. You do not need to use flour in your pan.
- Use a rolling pin to roll the dough into a 12”x 16” rectangle, with the shorter side facing you.
- Roll the dough into a log, starting with the short side closest to you. Press all seams together on the log.
- Form the log into a circle, then press the seams together from the two ends. Try to make the circle as even in thickness as you can. Don’t worry if one side is slightly thicker than the other though.
- Check to make sure all of the seams are closed, and place the circle into the prepared bundt pan. Cover loosely and allow to rise for 45-50 minutes, or until the dough has doubled in size.
- While the dough is rising, set your oven to a true 325°F. An oven thermometer is extremely helpful to help ensure that your oven is the correct temperature.
- Once the dough has finished its second rise, place the dough into the 325°F oven for 25-35 minutes, or until the dough is deep brown. You’ll know it is complete when it reaches an internal temperature of 200°F-210°F, and when it sounds hollow when thumped with your thumb.
- Turn out the brioche onto a cooling rack immediately after baking. Allow to completely cool before moving onto the next step.
To Make the Rum Reduction:
- Add granulated sugar, salt, and water to a saucepan and bring to a boil. Continue to boil until all of the sugar has dissolved.
- Reduce to a very low simmer and add the rum and vanilla extract. Reduce the rum sauce to the desired strength (1-5 minutes). If you want this truly rummy, you don’t have to reduce at all. Keep in mind, though, that it will have a very strong rum taste.
- Place the pound cake back into the bundt pan. Use a serrated knife to level the cake, if necessary. Pour some of the rum reduction onto the bottom of the cake.
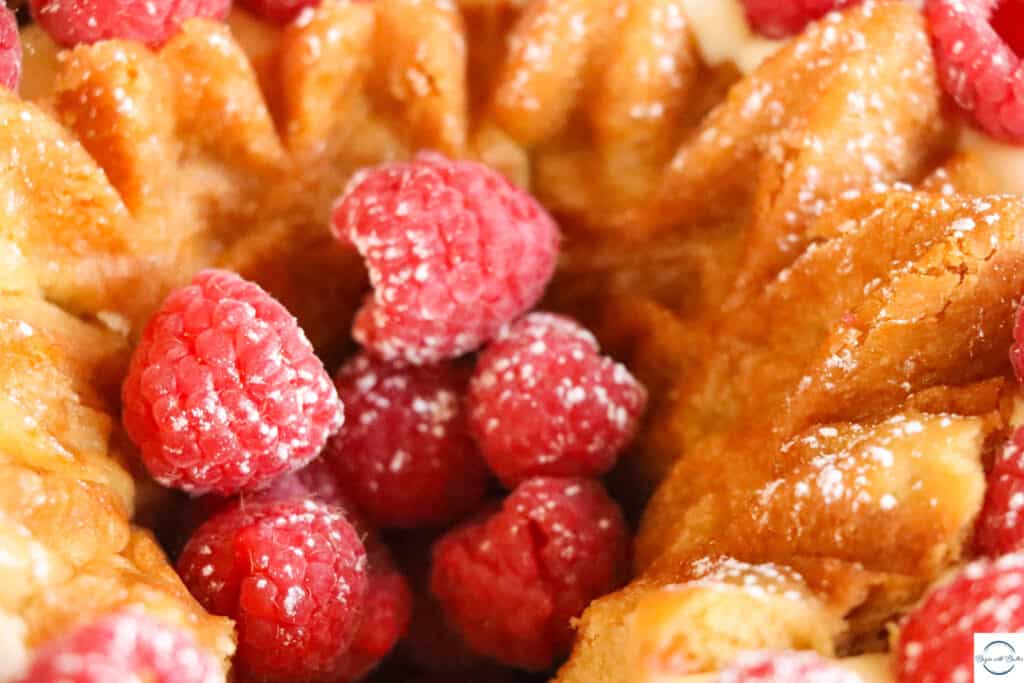
- Place the cake back on the cooling rack, with parchment paper underneath the cooling rack. Cut a 1.5” trench into the top of the cake and remove the extra cake from the trench. Pour the rum reduction evenly over the entire cooled cake.
To Make the Pastry Cream:
- Place the whole milk and vanilla bean seeds in a small saucepan. Bring to a simmer and remove from the heat. Set aside, covered, for 45 minutes.
- Combine the sugar, cornstarch, and salt in a heat-proof bowl. Add the egg yolks and whisk vigorously for about 90 seconds, or until the mixture is light yellow in color.
- Create an ice bath in a large bowl.
- Slowly add the milk mixture and stir until combined.
- Place the entire mixture back into the original saucepan. Whisk constantly, on medium heat, until the mixture starts to thicken. It will take about 5-7 minutes, but it will thicken. When you notice it starting to thicken, reduce the heat to medium-low and continue whisking.
- Once it thickens, keep whisking constantly for one more minute.
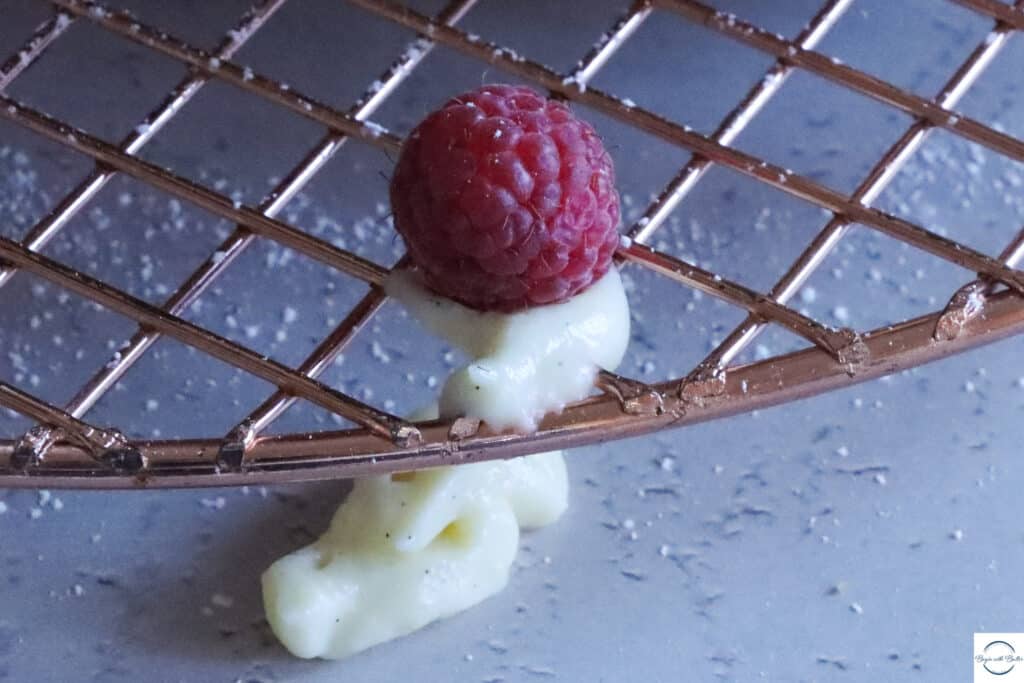
- Remove from heat and add butter, whisking until the butter is completely incorporated.
- Run the pastry cream through a fine mesh strainer in a medium bowl. Immediately place plastic wrap on the top in order to avoid a skin, and place in an ice bath for 20 minutes, making sure not to submerge the pastry cream. After 20 minutes, place the bowl into a refrigerator for about 90 minutes.
- Whisk the pastry cream when you’re ready use it. Pipe into the trench of your cake. Garnish with fresh berries, if desired.
- Enjoy!
Notes
- This cake needs to be completely cooled before adding the rum reduction.
- Once completed, it is best eaten immediately, though you can store it in the refrigerator for up to 2 days.