Ingredients
Units
Scale
- 532 g whole milk (2 cups plus 2 tbsp)
- 1 tbsp instant yeast
- 1/2 tbsp turbinado sugar
- 736 g (5.5 c) Bread Flour, divided
- 1 tbsp salt
- 1.5 tbsp vital wheat gluten
- 2 eggs, divided
- 1 tsp water
Instructions
- Warm milk to 110°F-115°F. Add instant yeast and turbinado sugar and stir to combine completely. Allow yeast to proof for 8-10 minutes, or until it becomes foamy on top. If yeast does not become foamy, then try again with new yeast.
- Add yeast/milk mixture, salt, vital wheat gluten, one egg, and 576 grams (4.5 cups) of bread flour to a large mixing bowl (or the bowl of a stand mixer). Use a wooden spoon or the flat beater of your stand mixer to mix on low speed until flour is completely combined. The dough will be very loose and sticky at this point. This is fine!
- If using a stand mixer, switch to the dough hook attachment. If making by hand, you can continue using a wooden spoon, or switch to a Danish dough whisk at this point.
- Add flour, 32 grams (1/4 cup) at a time, adding more flour once the previous addition is fully incorporated into the dough.
- Once all of the recipe flour is incorporated and the dough is in the shape of a rough ball, turn the dough out onto a very lightly floured work surface and knead by hand for about two minutes before adding any additional flour. The kneading process itself helps gluten development and sometimes you don’t need additional flour! You can also continue kneading with a stand mixer, but I don’t recommend leaving the mixer
- If necessary, add additional flour, one tablespoon at a time, then knead by hand for at least a minute after each addition. This dough should not need more than 3-5 tablespoons of additional flour.
- You’ll know the dough is done when it passes the windowpane test. The dough should be tacky, but not sticky when it is done.
- Spray the mixing bowl with a light coat of nonstick spray. Shape the dough into a ball and place into the mixing bowl. Cover loosely and allow to rise in an area free of drafts for about 45 minutes, or until the dough has doubled in size. Alternately, you can check your dough by doing the finger poke test, which is my favorite way to test bread dough!
- Use a digital kitchen scale to separate the dough into two equal halves. Use your fingers to shape the first half into a rough rectangle. Fold the short end of the rectangle up 1/3 of the way and use the heel of your hand to seal the dough. Fold the resulting triangular-shaped sides of the dough into the loaf and use the heel of your hand to seal. Repeat this two more times, until you have a loaf shape. Then, pinch the final seam and roll gently over the seam to form the final seal. (Confused about how to shape sandwich bread loaves? Click here for a video tutorial!)
- Place the loaf into an 8.5”x4.5” loaf pan, seam side down, and repeat step 9 with the second half of the dough.
- Allow the loaves to rise for another 45 minutes, or until the loaves are roughly 1” over the top of the loaf pans.
- During the final rise (proofing) time, preheat your oven to a true 400°F. A long preheat time is essential to getting a beautiful loaf! Also, during this time, add the egg and one teaspoon of water to a small bowl and scramble thoroughly.
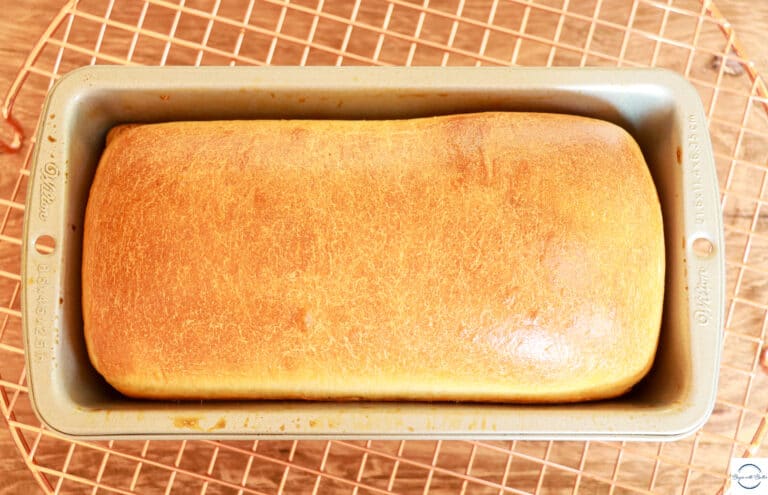
- When the loaves are finished proofing, gently brush egg wash over both loaves. Bake at 400°F for 18-25 minutes. Loaves are done when they reach an internal temperature of 190°F, or when the loaves sound hollow when thumped on the bottom.
- Allow loaves to cool for at least 45 minutes before slicing.
- Allow loaves to cool completely before freezing for storage.
Notes
- This bread can last in the freezer for up to a month.
- This bread is best eaten within 48 hours of making it, if it’s left out at room temperature.
- Plastic wrap is great for bread storage, and will give you another day of freshness if used properly.
- Prep Time: 30 minutes
- Rise Time: 1 h 45 minutes total
- Cook Time: 18-25 minutes