

Family. I am ready for SPRING!
We had some spring-like temperatures here recently, so of course I was inspired to create cake. The promise of spring was a false promise, and we’ve been plunged back into the depths of winter, but the seeds of spring baking have already germinated.
I find inspiration everywhere, Y’all. Specifically, the inspiration for this cake came from the sight and smell of some early blooms that I saw on my morning constitutional. The poor blooms were fooled by the early spring-like weather. I was arrested by the vision and immediately thought of Limoncello.
Limoncello is an Italian liqueur. It’s bright and bold in color and taste, and it’s got a big bite. It’s yummy and aggressively lemony, and it’s everything that those poor flowers needed to be in order to survive that false spring.
Even the lemons that are traditionally used to make limoncello are known for their hardiness; according to Italy Magazine, authentic limoncello comes from lemons found in the Costeria Amalfitana (Amalfi Coast) region in Italy, since those lemons “grow with a thick skin that is rich with essential oils, fragrant and with a strong aroma.”
Those flowers must have some limoncello lemon genes, because they survived the false spring. ???? Inspiration intact, I knew that this cake was meant to be.
About this Cake
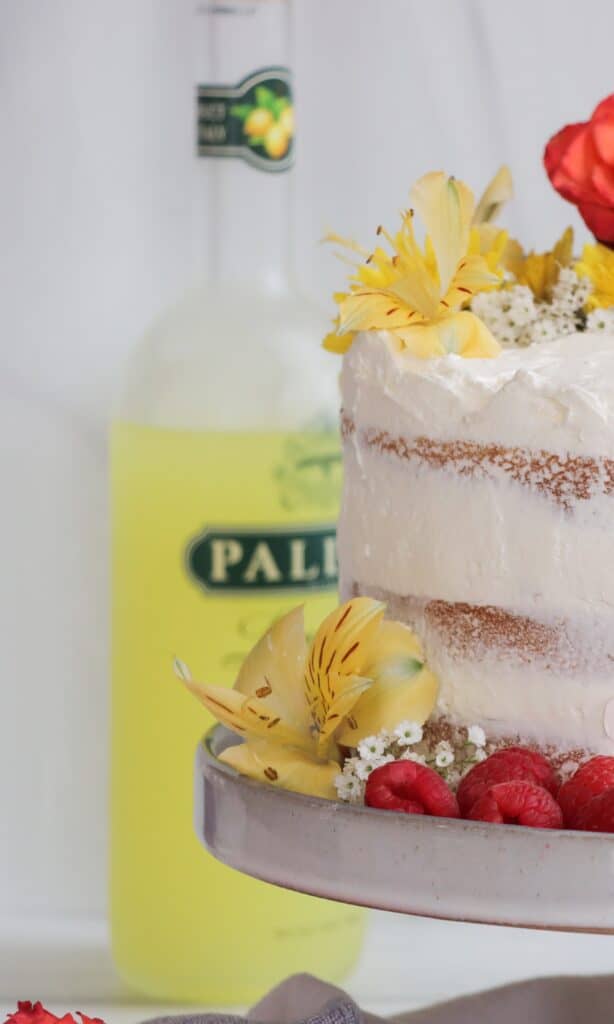
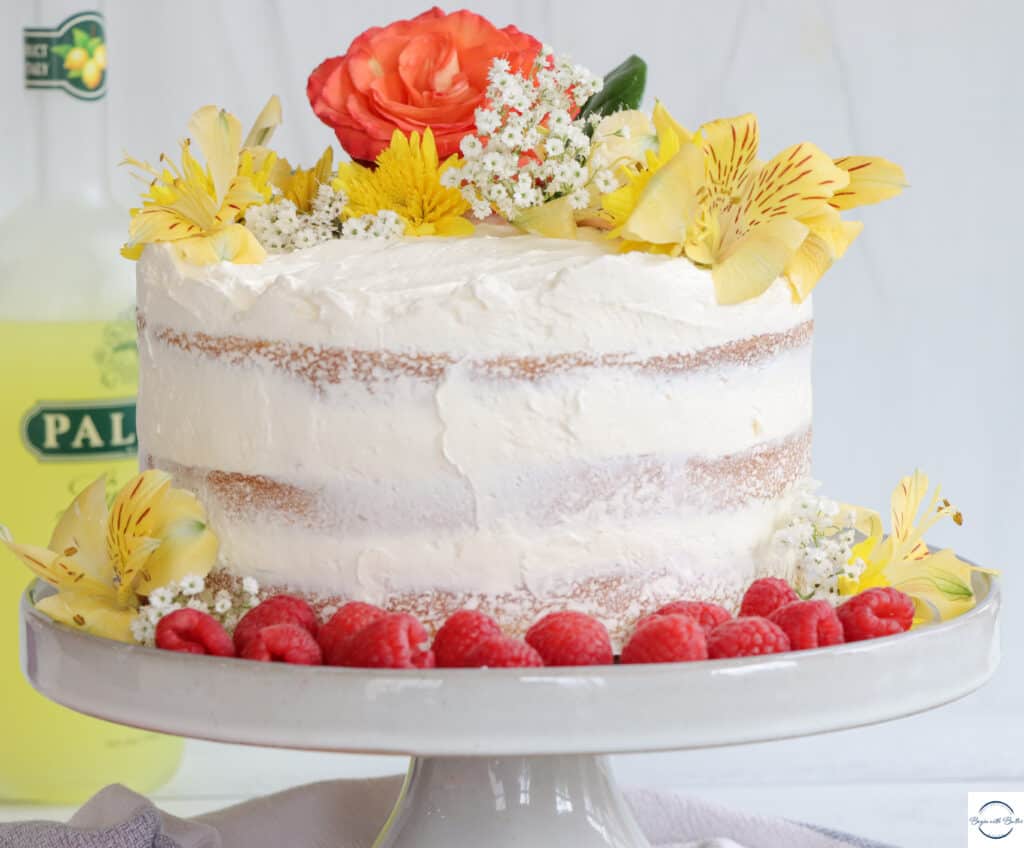
From concept to creation, this cake has been a dream come true. It features an airy, moist crumb and a perfectly decadent and balanced Swiss Meringue Buttercream, which truly allows the limoncello flavor to shine.
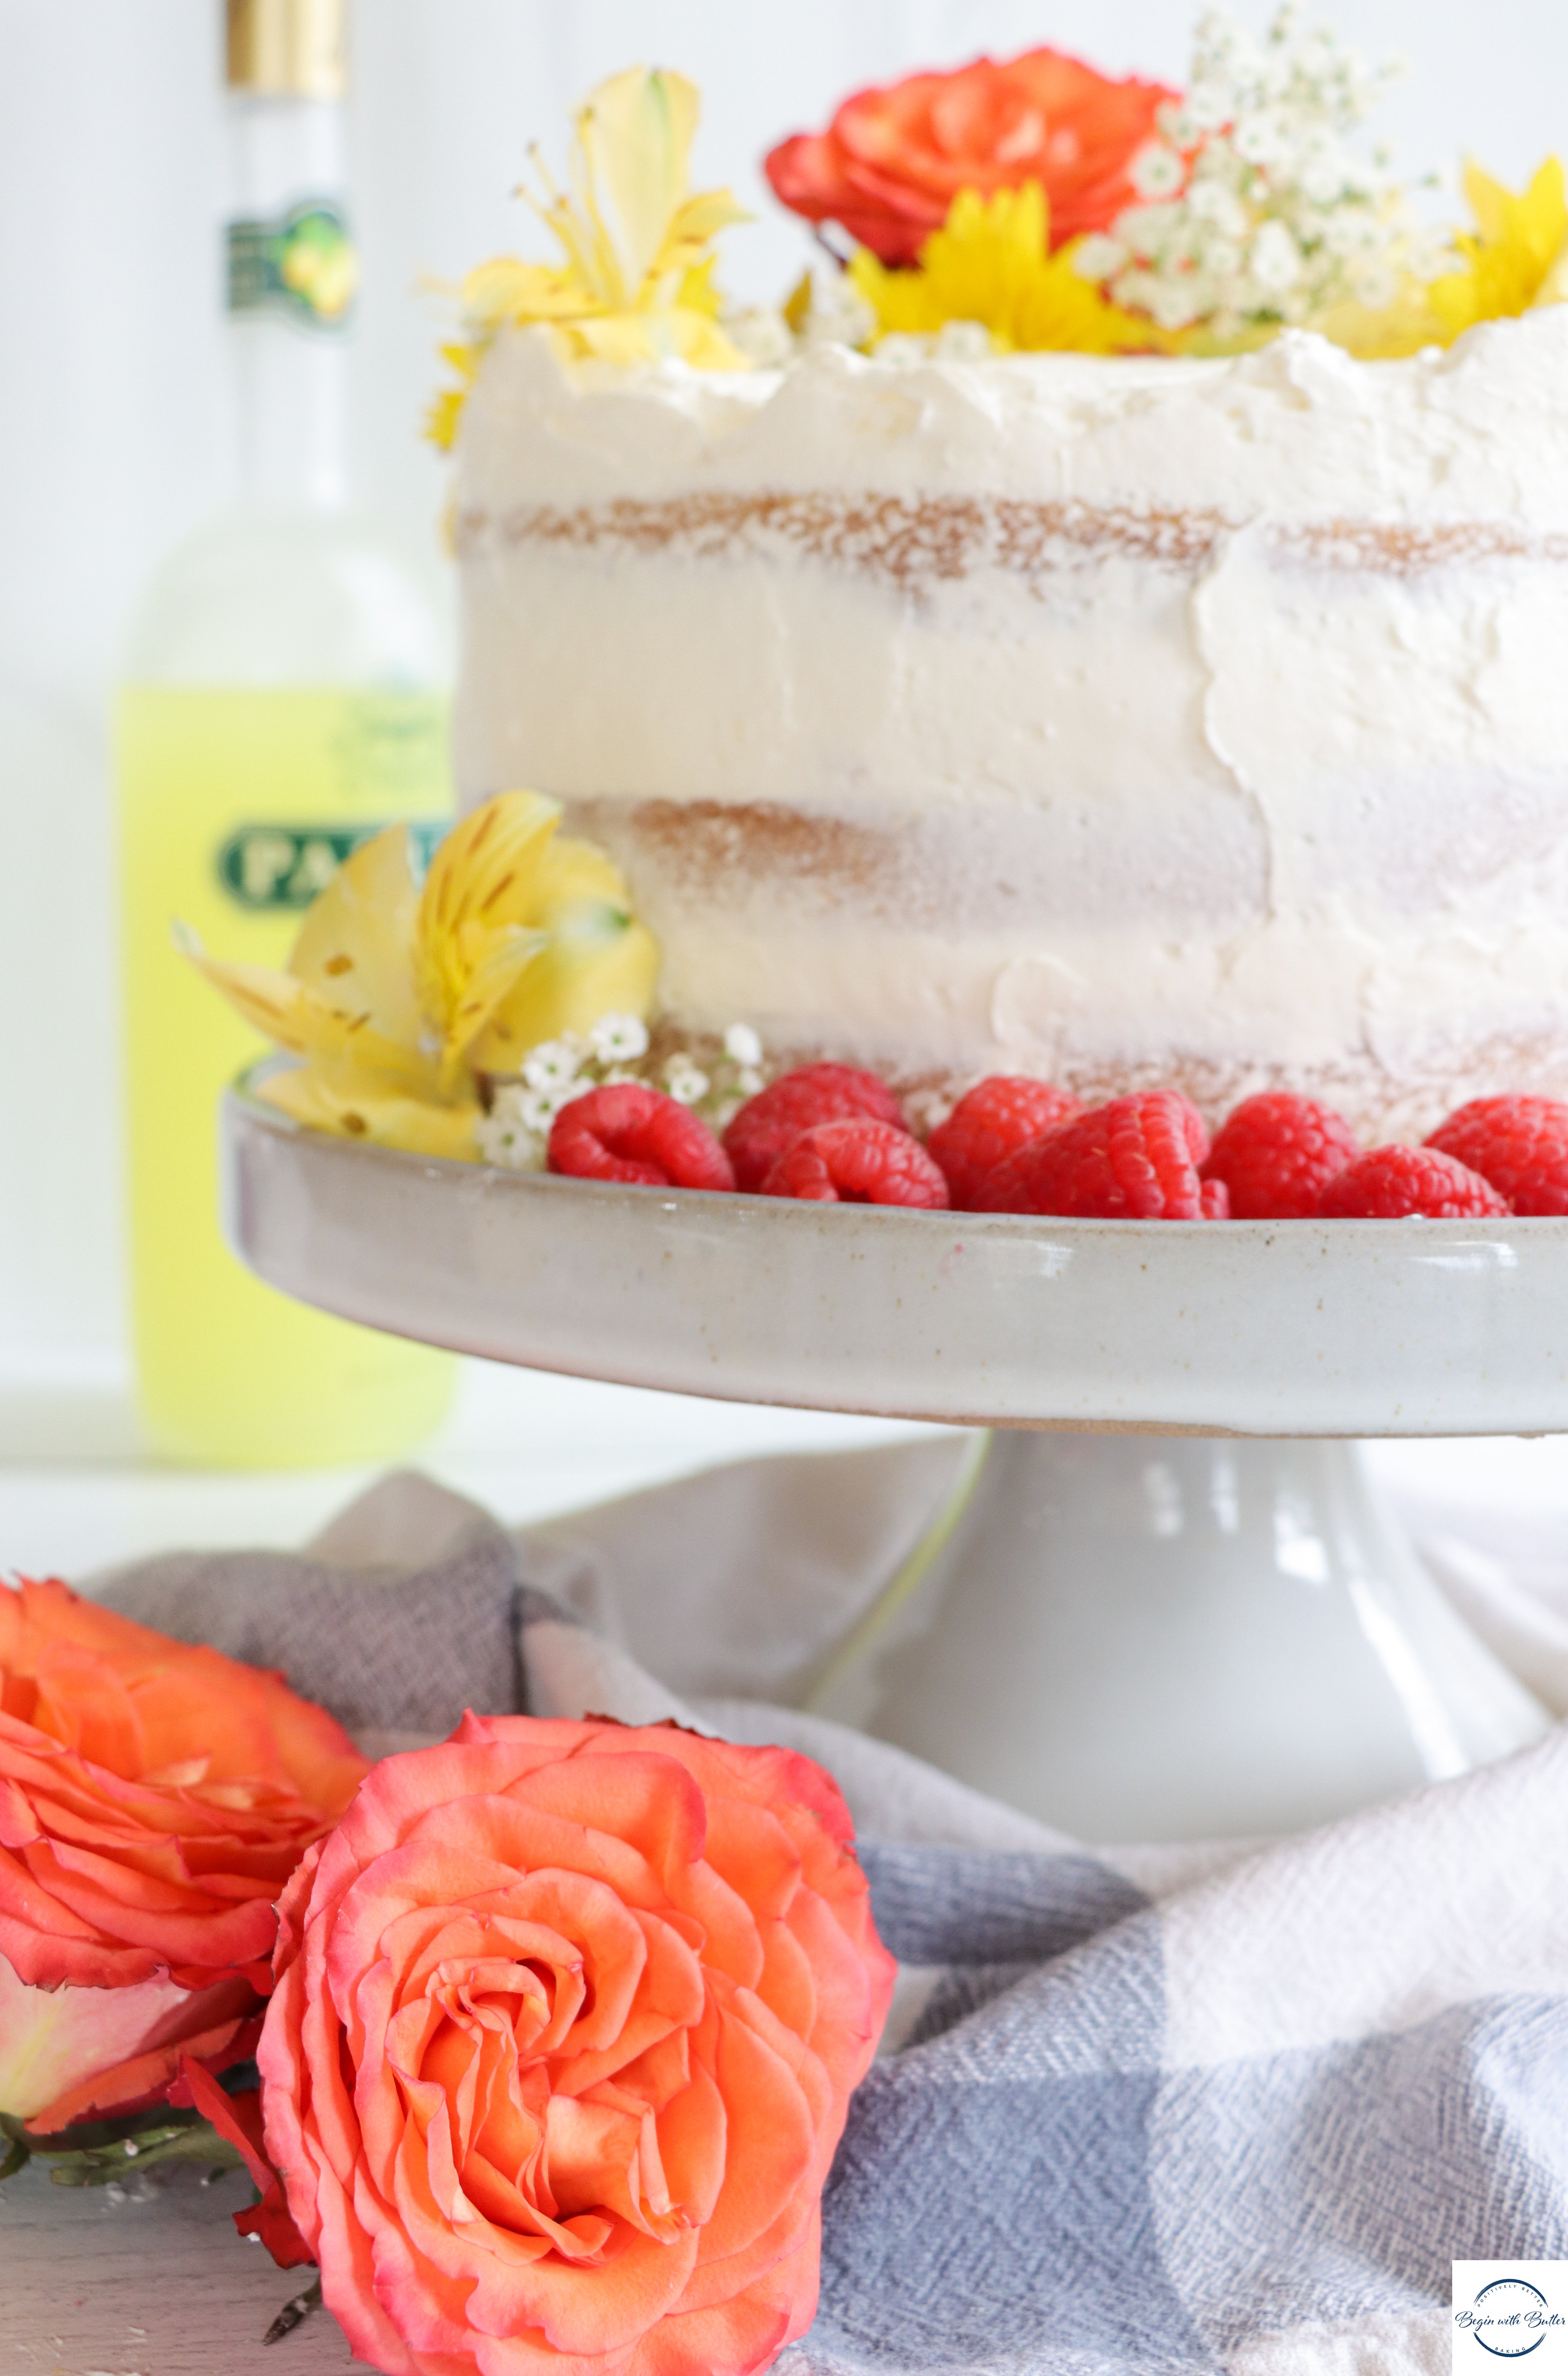
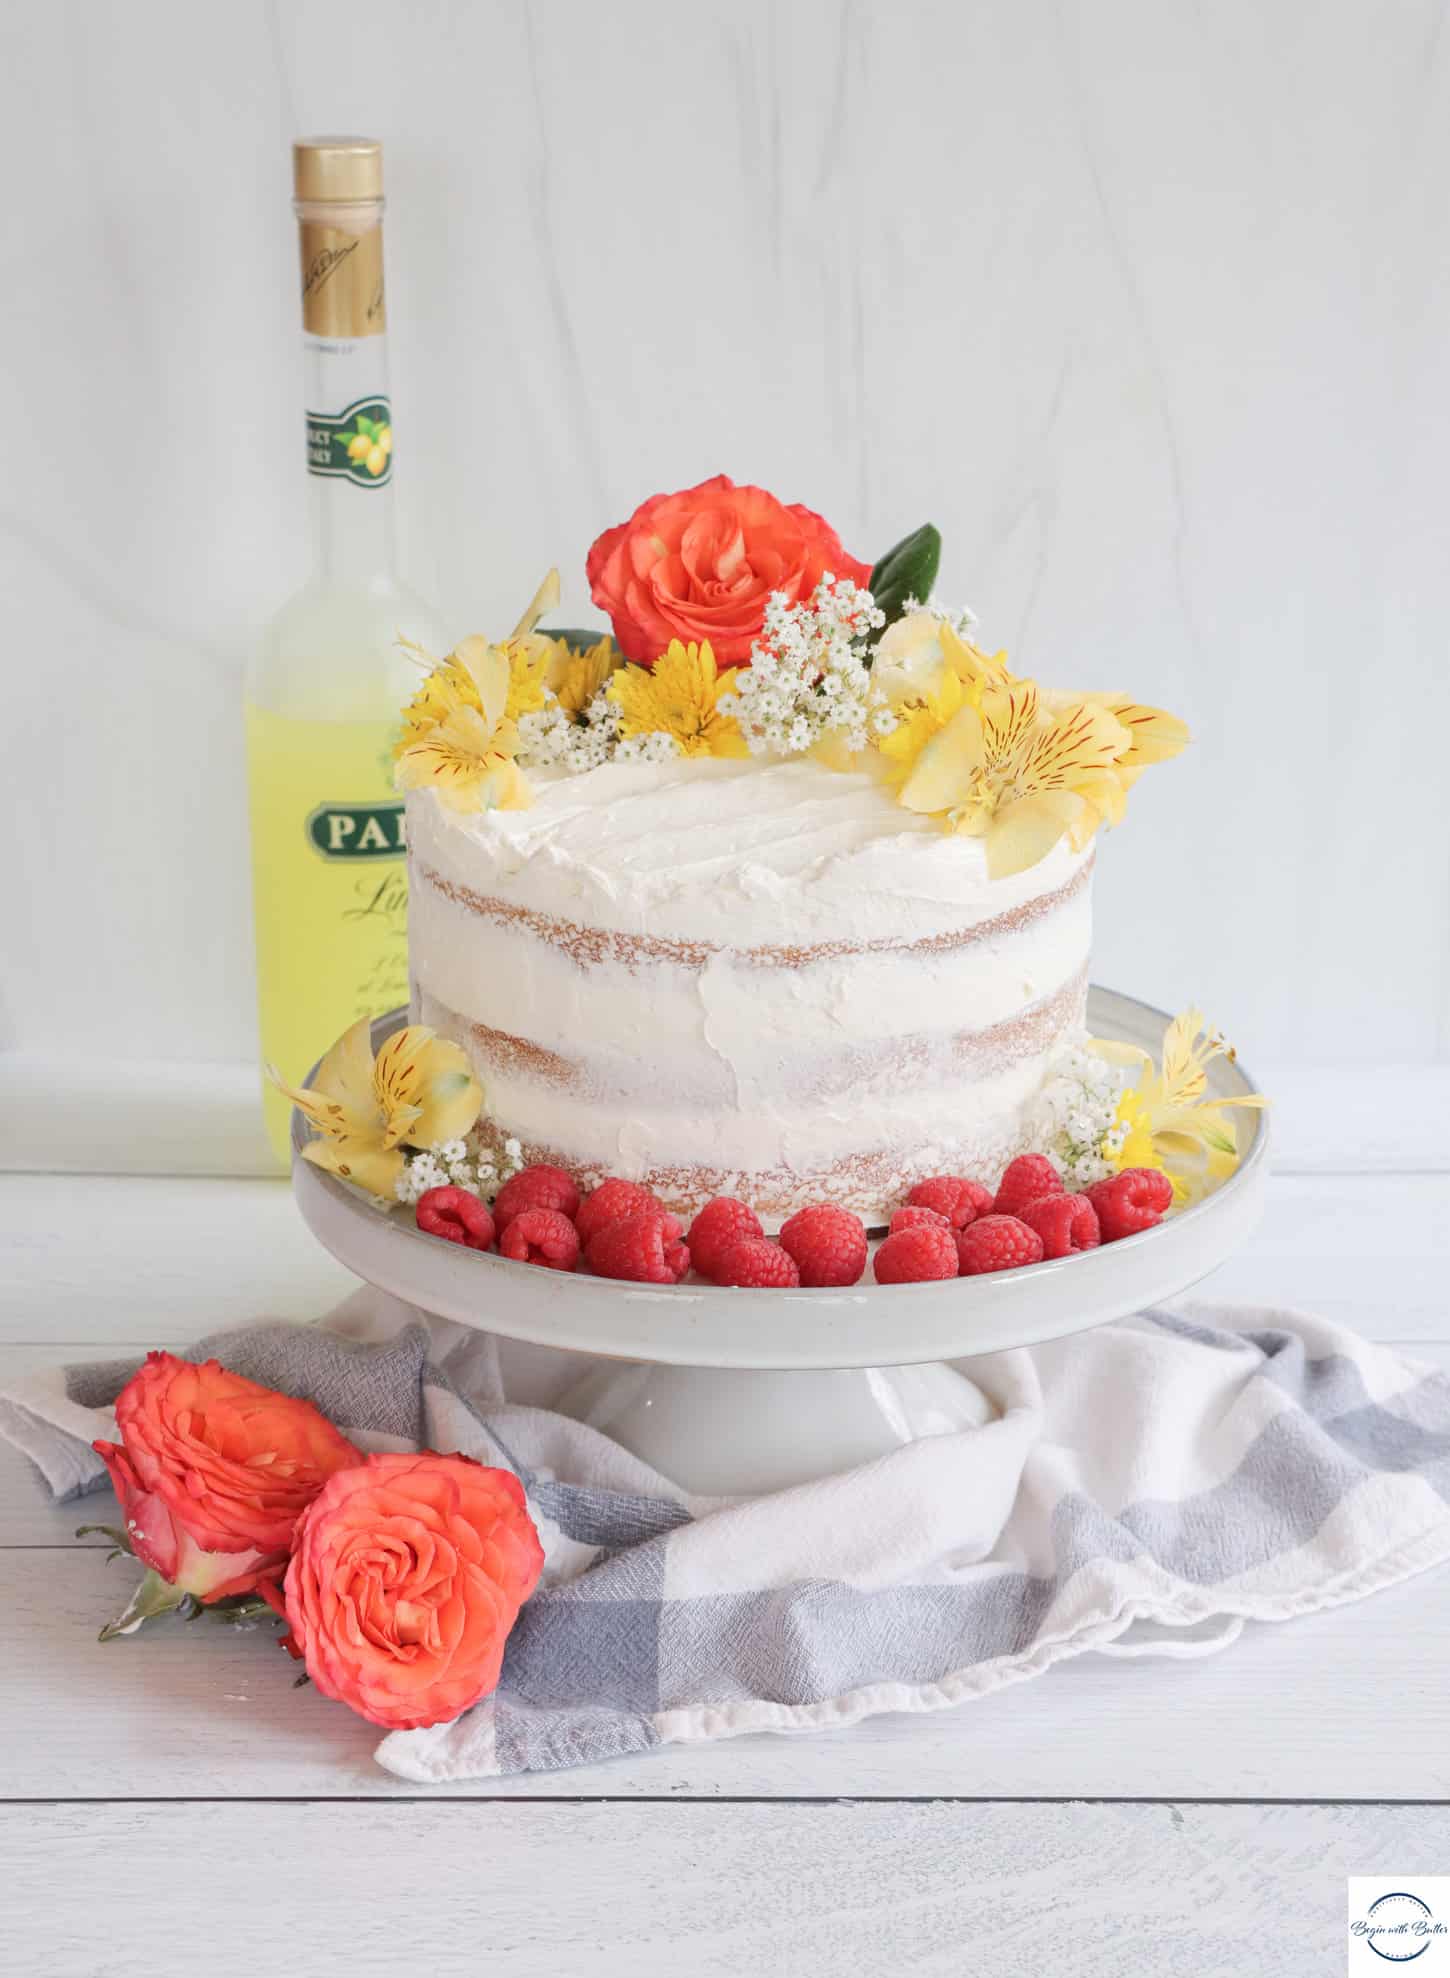

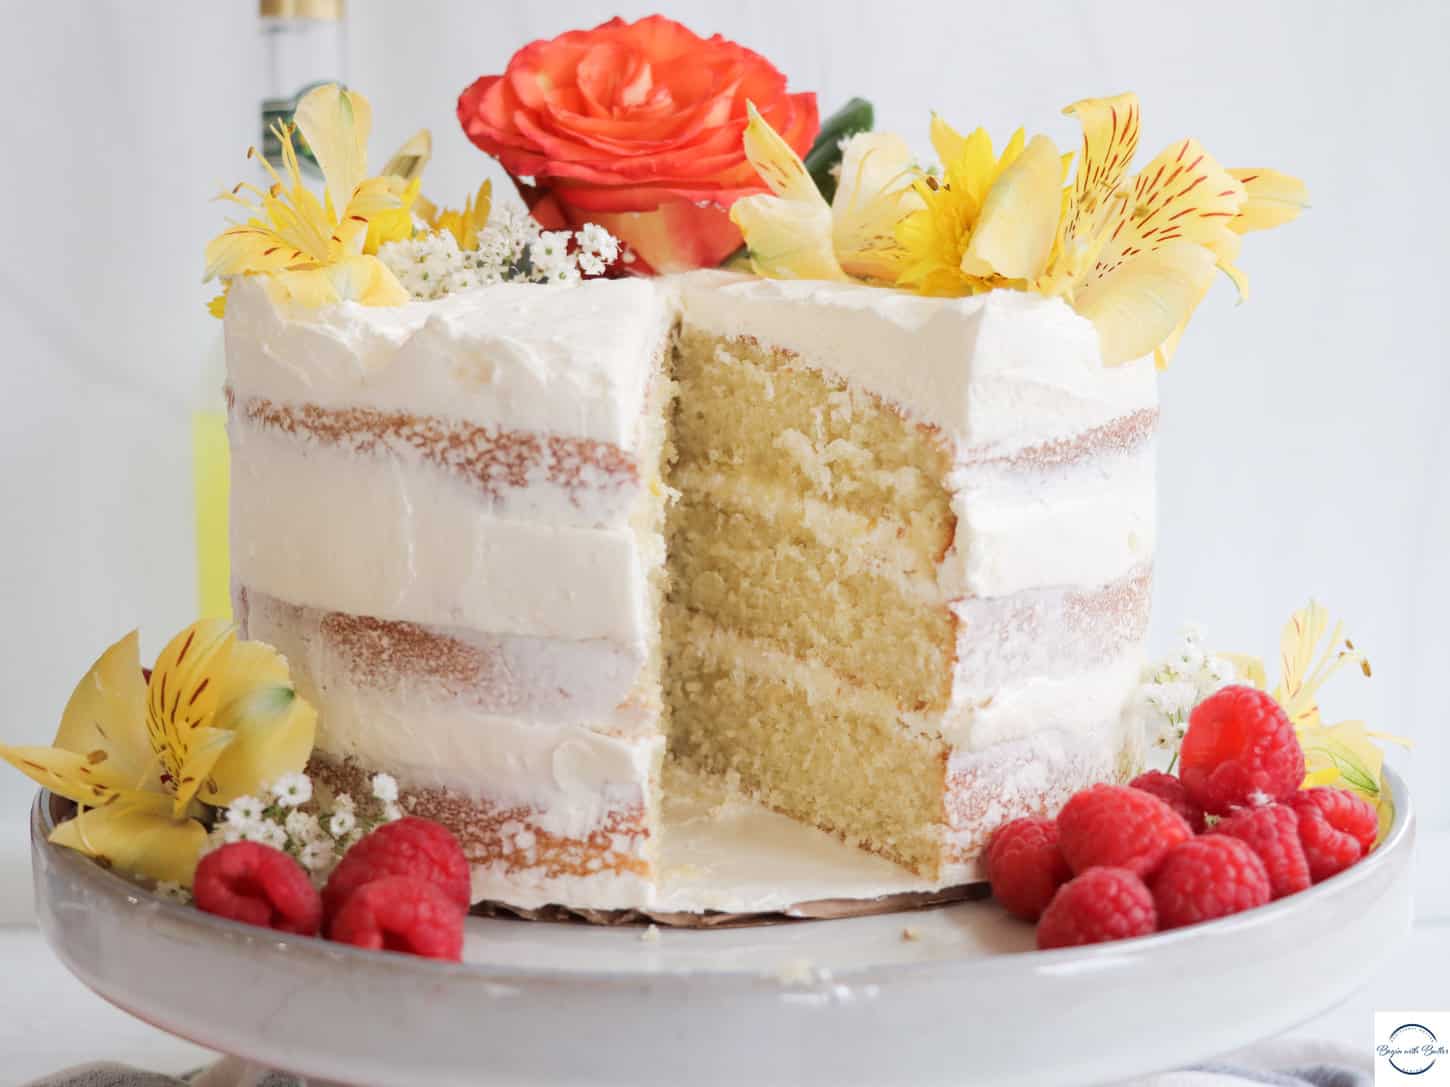
While there is the potential for limoncello in every layer of this cake, the classic limoncello “bite” is not overpowering (the “bite” cooks out of both the cake and the simple syrup, and it’s not enough to overwhelm the sugar and butter in the buttercream) and you’re left with a wonderfully smooth and special lemon flavor in this cake.
To be sure, you can replace the limoncello with lemon extract, and you’d make a tremendous cake. BUT, Friends, this cake is at its level best when it features this wonderful ingredient from the Amalfi Coast. In every recipe that I develop, I’m always looking for that ingredient that makes consumers wonder “what is that wonderful thing that I can’t quite place”? In this cake, the limoncello is that ingredient.
Beginners Start Here
If you’re new to baking, or if you’re like me and just love learning about baking science, here are a couple of articles from the BwB site that will help you get off to a great start with this fun recipe!
- Meet Your Kitchen BFF–Your Digital Kitchen Scale!
- How to Cream Butter and Sugar (With New Video!)
- Baking 101: How to Measure Ingredients
- Knowing When to Stop a Technique
These resources are super useful to help you understand the techniques that you’ll need to successfully execute this Limoncello Layer Cake.
Important Tools Used in this Recipe
Below, you’ll find some tools that I used for this Limoncello Layer Cake. **I get paid a small commission if you purchase directly from some of these links, but they are truly amazing products that you’ll find in my kitchen.**
If you have them already, great! Think of this as a checklist to help you build the confidence that you’ll need to execute this recipe!
- Oven Thermometer
- Digital Food Scale
- KitchenAid Hand Mixer
- KitchenAid Stand Mixer (not an affiliate link)
- Stainless Steel Mixing Bowl Set
- OXO Spatula Set
- Sifter
I am incredibly proud of this recipe, and how it went so perfectly from recipe concept to actual cake. I hope you love love love it! Don’t forget to tag me on Instagram @beginwithbutter so that I can shout you out when you’ve made it!
Ciao for now, Friends!
Print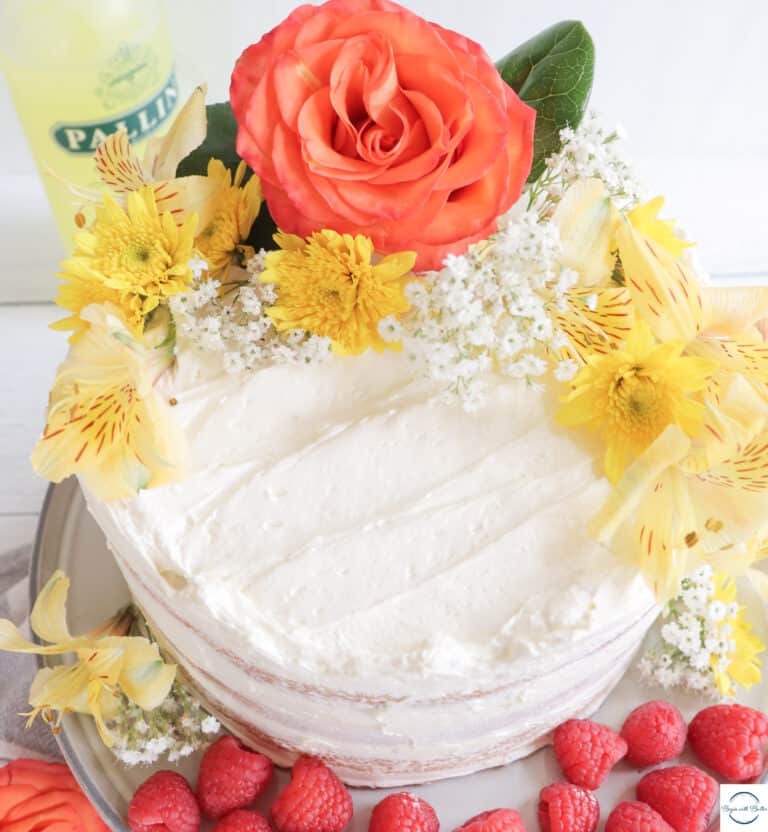
Limoncello Layer Cake
This airy yet decadent cake, which showcases a perfectly balanced Swiss Meringue Buttercream, features a classic Italian liqueur that gives it an amazingly special flavor.
- Total Time: ~5 hours (with cooling time)
- Yield: 18 servings 1x
Ingredients
For the Cake:
- 320 g (2.5 c) cake flour
- 1/2 tsp baking soda
- 1 tsp kosher salt
- 227 g butter
- 350 g (1.75 c) granulated sugar
- 1 tbsp limoncello
- 1 tbsp lemon zest
- 2 tsp vanilla extract
- 5 eggs
- 250 g buttermilk
Simple Syrup:
- 125 g water
- 100 g granulated sugar
- 2 tbsp Limoncello or lemon juice
- 1/8 tsp salt
Swiss Meringue Buttercream:
- 8 egg whites
- 450 g (2.25 c) granulated sugar
- 350 g butter, cut into 1-tbsp sized pieces
- 2 tsp vanilla extract
- 2 tsp Limoncello or lemon extract
- 1/8 tsp salt
Instructions
To Make the Batter with a Stand Mixer:
- Preheat oven to 325°F. It’s highly recommended to use an oven thermometer for this recipe, since proper oven temperature will impact the outcome of your cake. Take out three 8” cake pans and parchment paper and set them aside.
- Combine the flour, baking soda, and salt in a medium bowl.
- Sift the flour mixture into another medium bowl. Set aside.
- Place the room temperature butter in the bowl of your stand mixer. Mix on low speed until smooth. (30 seconds)
- Slowly add the granulated sugar and mix on medium speed until the mixture is light and fluffy. (5-10 minutes)
- Add eggs, one at a time, mixing for at least 45 seconds after each addition. Scrape the sides and bottom of the bowl as needed. (5 minutes)
- Add vanilla extract, limoncello and lemon zest and mix on medium speed until thoroughly combined. (1 minute)
- Add half of the flour mixture and mix on low speed until combined. (30-45 seconds)
- With the mixer on low speed, add the buttermilk and mix on low speed until combined. (~1 minute).
- Add the second half of the flour mixture and mix on low speed until combined. (~1 minute)
- Using a rubber spatula, fully scrape the sides and bottom of the mixing bowl. Then, stir the batter until it is smooth and consistent. Make sure to fully scrape the bottom of the bowl during this step!
- Prepare three 8” cake pans. Place parchment round at the bottom of the cake pan to help prevent sticking.
- Fill cake pans evenly. I use a digital kitchen scale, and my cake pans each hold roughly 400-420 g of cake batter.
- Level out the cake batter with a spatula. Tap the cake pans on the countertop to help prevent large bubbles in your cakes.
To Make the Batter with a Hand Mixer:
- Preheat oven to 325°F. It’s highly recommended to use an oven thermometer for this recipe, since proper oven temperature will impact the outcome of your cake.
- Combine the flour, baking soda, and salt in a medium bowl.
- Sift the flour mixture into another medium bowl. Set aside.
- Place the room temperature butter in a large mixing bowl. Mix on low speed until smooth. (30-45 seconds)
- Slowly add the granulated sugar in two additions and mix on medium speed until the mixture is light and fluffy. (7-12 minutes)
- Add the eggs, one at a time, mixing for at least 45-60 seconds after each addition. Scrape the sides and bottom of the bowl as needed. (4 minutes)
- Add vanilla extract, limoncello and lemon zest and mix until thoroughly combined. (1 minute)
- Add half of the flour mixture and mix on low speed until combined. (30-45 seconds)
- With the mixer on low speed, add all of the buttermilk and mix on low speed until combined. (~1 minute).
- Add the second half of the flour mixture and mix on low speed until combined. (~1 minute)
- Using a rubber spatula, fully scrape the sides and bottom of the mixing bowl. Then, stir the batter until it is smooth and consistent. Make sure to fully scrape the bottom of the bowl during this step!
- Prepare the three 8” cake pans. Place parchment round at the bottom of the cake pan to help prevent sticking.
- Fill cake pans evenly. I use a digital kitchen scale, and my cake pans each hold roughly 400-420 g of cake batter.
- Level out the cake batter with a spatula. Tap the cake pans on the countertop to help prevent large bubbles in your cakes.
To Bake the Cake:
- Bake the cakes at a true 325°F for 30-35 minutes, or until an instant read thermometer reads 210°F.
- Allow the cakes to rest for ten minutes, and then turn out on a cooling rack to cool completely.
To Make the Simple Syrup:
- Combine sugar, water, and salt in a small saucepan and bring to a boil.
- Reduce to medium heat and add limoncello.
- Stir occasionally until the sugar is completely dissolved.
- Remove the simple syrup from the heat and allow to cool completely.
- Place the simple syrup in a small bowl or squeeze bottle.
To Make the Swiss Meringue Buttercream:
- Bring 3” of water to a low boil in a large (3 qt.) sauce pan. Reduce to a simmer.
- Cut cold butter into 1-tbsp pieces and set aside.
- Carefully separate 8 eggs, placing the whites in a very clean, nonreactive metal bowl (either a stand mixer or large stainless steel bowl). Add sugar and stir to combine.
- Place metal bowl over the top of the sauce pan while the water is simmering. Whisk the egg white mixture over the sauce pan until all of the sugar is completely dissolved. (~3 minutes)
- Remove the metal bowl from the stove. Using the whisk attachment on either your hand mixer or your stand mixer, whisk the mixture on lowest speed until it is nearly opaque. (~1-2 minutes)
- Increase the mixer to medium speed until the mixture begins to look light and fluffy. (~4 minutes for stand mixer; ~5-6 minutes for hand mixer)
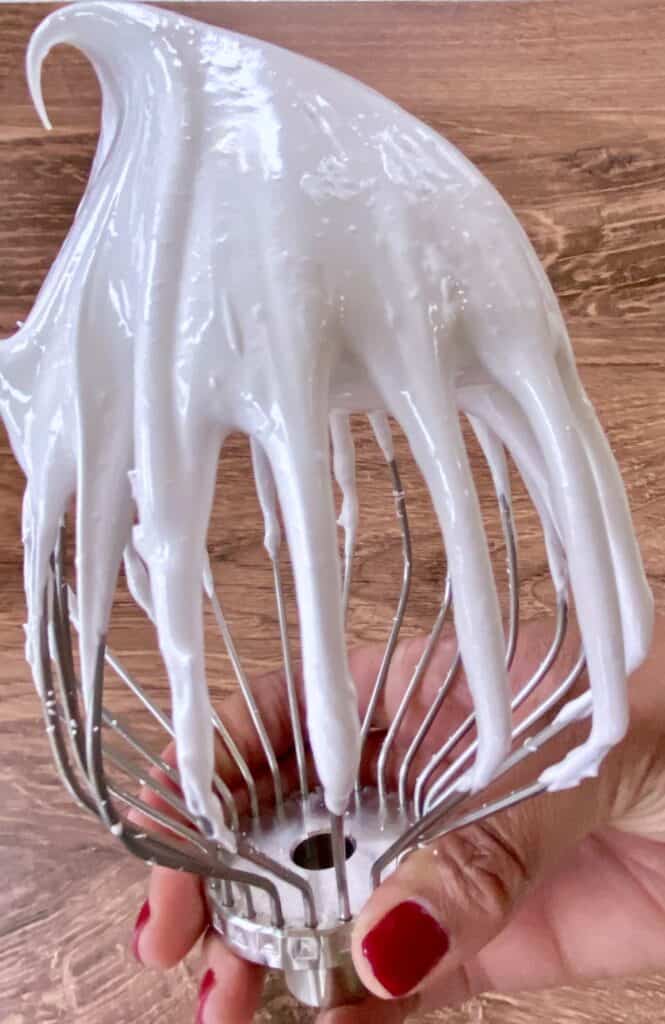
- Increase the mixer to highest speed until the meringue has reached nearly stiff peaks. The meringue should be lukewarm before moving onto the next step. This step could take anywhere from 10-15 minutes. If the meringue doesn’t form nearly stiff peaks after this time, place in the refrigerator for 15 minutes and whip again.
- With the mixer on medium speed, add the butter, one tablespoon at a time. Make sure that each tablespoon of butter is fully incorporated before adding the next tablespoon. (8-10 minutes)
- It is important to note that the Swiss Meringue Buttercream will begin to look more liquid while you add the butter. Keep going! It will firm back up as you get toward the end of the butter additions!
- After adding the last tablespoon of butter, you can switch to the paddle attachment on your mixer if you’d prefer a smoother buttercream. Mix the buttercream on medium speed until it reaches a firm texture. This generally takes between 2-6 minutes, but the temperature and humidity of your kitchen will be the big determining factor. Watch your mixer carefully to make sure that the buttercream doesn’t curdle.
- If the buttercream won’t firm up, place the bowl into a refrigerator for no more than 20 minutes. Mix again on medium speed until it reaches a firm texture.
- Add salt, limoncello and vanilla and mix until it again reaches a firm texture.
- This buttercream is not stiff like American Buttercream, but it should be stiff enough to pipe (if desired).
To Build the Cake:
- Place a 10” cake round on a turntable or a cake stand.
- Place a dollop of Swiss Meringue Buttercream on the round to secure the bottom cake.
- The cakes might be slightly domed from baking. If they are domed, gently cut off the domes to make them level. (I cooled these cakes with the dome side down, which fixed this issue for me.)
- Use either a spoon or a squirt bottle to add simple syrup to the top of each layer.
- Place the second layer on top of the first layer. Add buttercream to the middle layer and spread.
- Invert the final layer and place on top of the other two layers. Press down gently and double check to make sure the cake is level.
- Using an offset spatula, spread the buttercream over the entire cake.
To Store:
This cake can be left on the countertop for two days, or refrigerated for up to a week. Allow to come to room temperature before serving.
Notes
- The buttercream recipe makes more than enough to create the naked cake that I created, but you can increase the recipe proportions by 1.5 times in order to cover the whole cake.
- When making the Swiss Meringue Buttercream, it’s important to use an extremely clean bowl, as debris or fat residue will prevent the meringue from forming properly.
- Prep Time: 1.5 hour (active)
- Cook Time: 25-35 minutes
- Category: Dessert
- Cuisine: American
Nutrition
- Serving Size: 1 slice
- Calories: 522
- Sugar: 49.2 g
- Sodium: 199.5 mg
- Fat: 28 g
- Carbohydrates: 63.6 g
- Protein: 5.5 g
- Cholesterol: 122.1 mg
Hi,
I made this cake for a friend’s birthday. She really loved the flavor. Although it did end up being dense. Any ideas why?
I followed the directions perfectly. I used 6″ tins, dropped baking temperature by 25 degrees as I baked in a countertop Oster oven. I used the cake wraps on the tins too. I used a scale to weigh all ingredients and the batter in the tins before baking.
On another note, The Swiss Meringue was awesome. This was only the second time making that.
Hi there! Not sure why it ended up dense for you. It could have been because the cakes were baked in smaller pans, but I’m not 100% sure. I’m so glad you liked the Swiss Meringue Buttercream and I hope you’ll try the cake again!